



2. Lay out the pistons with connecting rods and new sets of piston rings so that when measuring the gaps in the ring joints and during subsequent assembly of the engine, the sets of rings always correspond to the same piston and cylinder.
3. Insert the top ring into the first cylinder and press it into the cylinder using the piston crown as a guide. This will force the ring to be perpendicular to the cylinder walls. Place the ring near the base of the cylinder, at the lower boundary of the ring movement zone. Please note that the top and second compression rings are different from each other. The second ring can be identified by its cone; in addition, it has a step on the bottom surface.
4. Measure the gap in the ring lock using a fan-shaped feeler gauge.
5. Repeat the procedure with this ring in the upper zone of the cylinder, at the upper limit of its movement (figure 17.5) and compare the measurement results with the values specified in "Specifications". If the joint clearances are incorrect, check that the rings are correctly selected for the specific engine and cylinder size.
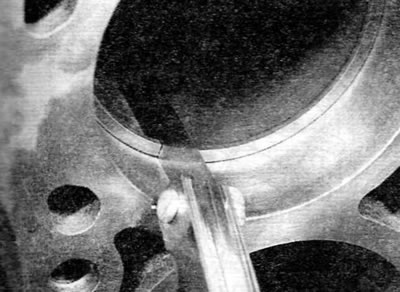
Figure 17.5. Measuring the gap in the piston ring joint
6. Repeat the procedure for checking each ring in the first cylinder and perform similar steps for the rings in the remaining cylinders. Remember to maintain proper alignment of rings, pistons and cylinders.
7. After checking the clearances in the ring locks, the rings can be installed on the pistons.
8. Install the piston rings using the same technique as when removing them. Install the bottom one first (oil scraper) ring, and then the remaining rings in the direction from bottom to top. When installing the oil scraper ring, first install its expansion element (if available), and then install the ring itself, turning its lock 180° relative to the lock of the expansion ring. Install the second compression ring, ensuring that the identification mark (painted dot or "TOP" mark) faces up and the stepped surface is at the bottom (figure 17.8). Then install the top ring. Rotate the compression rings so that the locks are at an angle of 120° in relation to each other and in relation to the oil scraper ring.
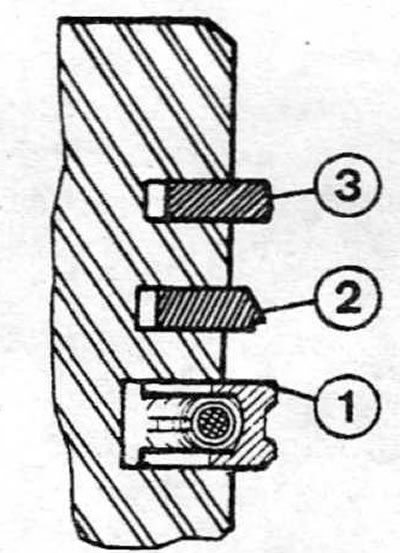
Figure 17.8. Typical arrangement of piston rings
1. Oil scraper ring
2. Second compression ring
3. Upper compression ring
Note: Be sure to follow the instructions included with new piston ring sets. Different manufacturers may prescribe different procedures. Do not confuse the top and second compression rings, as they have different cross-sections.