
Note. If the engine has been seriously overheated, it is best to assume that the cylinder head is deformed - check the head carefully for signs of this.
Cleaning
2. Remove all traces of material «old» cylinder head gaskets.
3. Remove carbon deposits from the combustion chambers and intake and exhaust channels and thoroughly flush the cylinder head with kerosene or an appropriate solvent.
4. Remove any serious deposits that may be on the valves, and then use a wire brush powered by an electric drill to remove deposits from the valve heads and stems.
Inspection
Note. Before deciding whether to call a workshop or engine overhaul, complete all inspection procedures below. Write down all the points that require attention.
Cylinder head
5. Carefully inspect the head for cracks, signs of coolant leakage or other damage. If cracks are found, a new cylinder head will be required.
6. Using a ruler and feeler gauge, check the surface of the cylinder head for deformation (pic. 8.6). If there is deformation, the surface of the head can be reground, provided that the height of the cylinder head does not decrease below the prescribed minimum height.
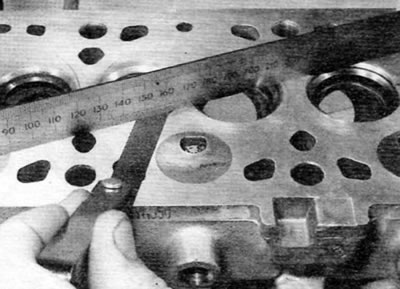
Pic. 8.6. Checking the mating surface of the cylinder head for deformation
Note. After machining the cylinder head, the valve seats may need to be reworked. This is necessary in order to maintain the correct size relationship between the valve heads, valve guides and cylinder head mating surface.
7. Inspect the valve seats in each combustion chamber. If they are severely pitted, chipped, or burned, replacement or machining is required, which can be done by an engine overhauler. If the seats are only slightly pitted, this can be corrected by lapping the valve head and seat with a fine grained valve paste as described below.
8. Check the valve guides for wear. To do this, insert each valve into its guide and check the lateral movement of the valve. Very little movement is allowed. If the movement seems to be increased, remove the valve. Measure the valve stem diameter (see below) and replace the valve if worn. If the valve stem is not worn, the wear should be in the guide bushing and the bushing should be replaced. It is recommended that the valve guides be replaced by a Peugeot/Citroen dealer or an engine overhauler who has the necessary equipment to perform this procedure.
9. When replacing valve guides, the valve seats should only be reground or ground after the guides have been installed.
10. On 1.8L and 1.9L engines, inspect swirl chambers for burn marks or other damage such as cracks. Small cracks in the chambers are acceptable; replacement of the chambers will be required only if the tracts have severe burning and deformation, or they do not provide a tight fit in the cylinder head. If there is any doubt about the condition of the swirl chamber, seek the advice of a Peugeot/Citroen dealer or an appropriate repair shop that specializes in diesel engines. The replacement of the swirl chamber should be entrusted to a specialist. Using a dial indicator, verify that the protrusion of the vortex chamber is correct (see «Specifications») (pic. 8.10). Zero the indicator on the mating surface of the cylinder head, and then measure the protrusion of the swirl chamber. If the protrusion is out of specification, seek advice from a Peugeot/Citroen dealer or an appropriate diesel engine repair shop.
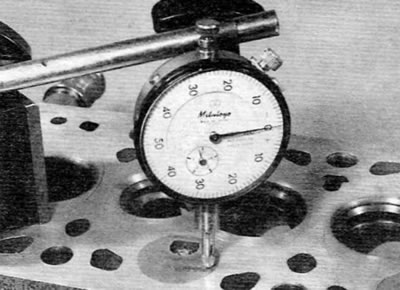
Pic. 8.10. Checking the protrusion of the swirl chamber (engines 1.8 l and 1.9 l)
Valves
11. Inspect each valve head for pitting, burning, cracks, and general wear, and check the valve stem for nicks and wear. Rotate the valve and check if it is bent. Inspect each valve stem tip for pitting and excessive wear. If there are any signs of wear or damage, replace the valve.
12. If the valve seems satisfactory at this stage, measure the diameter of the valve stem in several places with a micrometer (pic. 8.12). Any significant difference in the readings obtained indicates rod wear. If any of these conditions are present, the valve must be replaced.
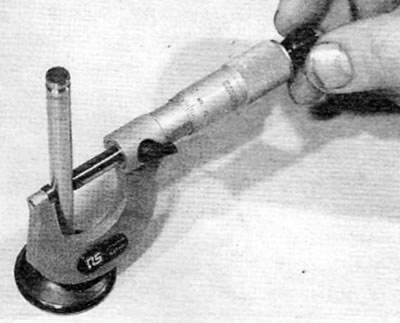
Pic. 8.12. Valve Stem Diameter Measurement
13. If the valves are in satisfactory condition, they should be lapped into their seats to provide a gas-tight seal. If the seat is only lightly pitted or has already been sanded to achieve the required surface finish, use only fine sanding compound. Coarse valve lapping compound should not be used unless the seats are badly burned or deeply pitted. If this is the case, to decide whether it is necessary to regrind the seat, or replace the valve, or replace the seat, consult a specialist. He should inspect the cylinder head and valves.
14. Lapping of valves is performed as follows. Turn the cylinder head upside down with the combustion chambers up and in this state, fix it on a workbench.
15. Apply an appropriate grit lapping compound to the seat surface and press a suction cup lapping tool against the valve head. Using a rotating motion in both directions, lap the valve head against the seat, occasionally lifting the valve to redistribute the grinding paste (pic. 8.15). A weak spring mounted under the valve head will make this job much easier.

Pic. 8.15. valve resurfacing
16. If coarse grain is used (rude) compound, work only until you get a smooth matte surface on both the valve seat and the valve itself. Then wipe off the used compound and repeat the process with the fine compound (for fine grinding). When you get a smooth light gray o-ring with a matte finish on both the valve and the seat, the lapping process is complete. Do not wipe the valves more than is really necessary. Otherwise, the seat will be too recessed into the cylinder head.
17. After fitting all valves before assembling the cylinder head, thoroughly wash off all traces of abrasive paste with kerosene or an appropriate solvent.
Valve elements
18. Inspect the valve springs for signs of damage and discoloration. Spring free length is not specified by Peugeot/Citroen. Therefore, the only way to evaluate valve spring wear is to compare it to a new element.
19. Place each spring on a flat surface and check for squareness (pic. 7.17). If any of the springs are damaged, deformed, or/have lost elasticity, purchase a complete set of new springs. It is generally recommended that all valve springs be replaced during a major overhaul.
20. Replace valve stem seals regardless of their external condition.