
English Русский
Български
Беларускі
Український
Српски
Hrvatski
Română
Polski
Slovenský
Magyar
Bookmark Articles Sitemap Contacts
Company Hyundai Company Opel Company Skoda Company Kia Company Mitsubishi Company LADA Company Audi
PeugeotBook.ru


Series 100   Series 200   Series 300   400-500   Series 600   Crossovers   Others
 
Partner I (1996-2008) Peugeot 807 (2002-2014) Peugeot 806 (1994-2002) Peugeot J5 (1981-1993)

Cylinder block/engine crankcase — cleaning and inspection (Peugeot Partner I)

  • Main
  • Пежо
  • Partner I (1996-2008)
  • Power unit
  • Overhaul of diesel engines
  • Cylinder block/engine crankcase — cleaning and inspection
0
Table of contents: Cleaning 🠇 Inspection 🠇

Cleaning


1. Remove all external components and electrical switches/sensors from the cylinder block. Ideally, smooth surfaces should also be removed for complete cleaning (rod) plugs (figure 12.1). Drill a small hole in the removable plug and screw a self-tapping screw into it.
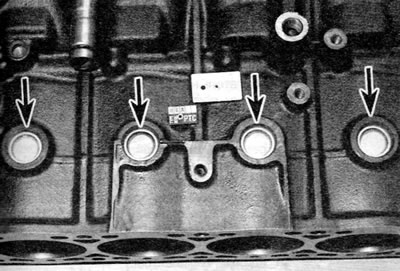
Figure 12.1. Cylinder block rod plugs (marked with arrows)

Figure 12.1. Cylinder block rod plugs (marked with arrows)


Information copied from the resource PeugeotBook.ru

2. Pull the screw with pliers and remove the plug. You can also use an impact puller.

3. If applicable, remove the bolts and piston cooling oil jet tubes from the inside of the cylinder block.

4. Remove all traces of gasket material from the cylinder block/crankcase, being careful not to damage the mating/sealing surfaces.

5. Remove all oil channel plugs (if available). The plugs are usually very tightly fitted. They may need to be drilled out and the holes re-threaded. When reassembling the engine, use new plugs.

6. If any elements are heavily soiled, steam cleaning should be performed.

7. After this, clean all oil holes and oil channels again. Rinse all internal passages with warm water. You need to rinse until the water comes out clean. Dry thoroughly and apply a thin layer of oil to all mating surfaces to prevent rust. If you have access to compressed air, use it to speed up drying and blow out all grease holes and passages.


Caution! Wear eye protection when working with compressed air.


8. If the unit is not very dirty, you can use hot soapy water and a stiff brush to clean it. Take your time and work thoroughly. Regardless of the cleaning method used, clean all lubrication holes and passages very thoroughly and dry all components well. To prevent rust, take protective measures as described above.

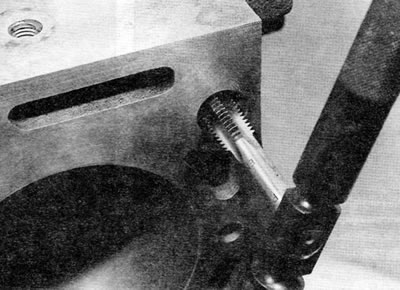
9. Clean all threaded holes; this will ensure the required tightening torques during assembly. To clean the threads, tap each hole with a tap of the proper size. This will remove rust, corrosion products, thread sealant or sludge and restore damaged threads (figure 12.9). If possible, use compressed air to clear the holes of traces of previous cleaning.
Cylinder block/engine crankcase — cleaning and inspection


Figure 12.9. Use a suitable tap to clean the threaded holes in the cylinder block


Caution! Wear eye protection when working with compressed air.


10. Apply appropriate sealant to the new oil passage plugs and insert the plugs into the holes in the block. Tighten them securely. Also apply a suitable sealant to the new smooth plugs and use a piece of pipe with machined ends or a socket head to insert the plug into the cylinder block.


11. On engines with piston cooling oil nozzles, clean the threads of the piston cooling oil nozzle mounting bolts and apply a drop of locking compound to the threads of these bolts. Install the oil pipes onto the cylinder block, screw in the bolts and tighten them to the specified torque.

12. If the engine is not to be reassembled immediately, cover it with a large plastic bag or just film to keep it clean. Protect all mating surfaces and cylinders as described above to prevent rust.

Inspection


13. Visually inspect the cylinder block for cracks, rust and corrosion. Inspect the threaded holes for stripped threads. If there has been an internal coolant leak, it may be helpful to take the engine block to an engine overhaul specialist to have it inspected using specialized equipment. If any defects are found, correct them if possible or replace the cylinder block.

14. Check each cylinder for scratches and burrs. Check for wear ridges in the upper area of the cylinder. This ridge indicates increased cylinder wear.

15. Accurate measurement of cylinder diameter requires special equipment and experience. It is recommended to have the measurement carried out by an engine repair specialist who can also provide the appropriate pistons (if possible), if the engine repair requires cylinder boring.

16. If the cylinder "mirrors" and pistons are in acceptably good condition and do not have excessive wear and the clearances between the pistons and cylinder walls are within the norm, only the piston rings will need to be replaced. If this is the case, the cylinders should be honed to allow the new rings to seat properly and ensure the best possible fit (as far as possible) compaction. An engine repair specialist will do this job for a reasonable price.

17. At the time of writing, it was not known whether repair-note size pistons were available for all models. For the latest piston availability information, please contact your Peugeot/Citroen dealer or engine repair specialist. If there are pistons of repair size (purchased either from a Peugeot/Citroen dealer or from another source), it is possible to bore out the cylinders and install pistons of a repair size. If oversize pistons are not available and the cylinders are worn, replacing the block is the only option.
This article is available at russian, bulgarian, belarusian, ukrainian, serbian, croatian, romanian, polish, slovak, hungarian
Article reviewed by editor: Nikonova Veronica
Share information:
Previous
Partner I: Overhaul of diesel engines
Next

Crankshaft — removal
Pistons with connecting rods — removal
Cylinder head assembly
Cylinder head and valves — cleaning and inspection
Cylinder head — disassembly
Piston and connecting rod assembly — inspection
Crankshaft — inspection
Main and connecting rod bearings — inspection
Engine Overhaul — assembly sequence
Piston rings — installation
See similar information for other Peugeot models

➨ Cylinder block/crankcase — cleaning and inspection Peugeot 106 (1991-2003)
➨ Cylinder Block Specifications (1.6L Petrol Engine, TU5) Peugeot 207 (2006-2014)
➨ Cylinder head — disassembly, cleaning and assembly Peugeot 305 (1977-1989)
➨ Checking the engine crankcase ventilation hoses (20,000 km/12… Peugeot 405 (1987-1997)
➨ Heater Switch Block Peugeot 605 (1989-2000)
Link to this article in different formats
Comments and feedback from visitors
No comments yet


Add two numbers 27 + 18


Partner I (1996-2008) 
  • General information
  • Introduction to the guide
  • Faults en route
  • Weekly checks
  • User manual
  • Maintenance (petrol)
  • Maintenance (diesel)
  • Power unit
  • Petrol engines
  • Diesel engines «XUD»
  • Diesel engines «DW»
  • Overhaul of petrol engines
  • Overhaul of diesel engines
  • Cooling and heating
  • Power and exhaust (petrol)
  • Power and exhaust (XUD diesels)
  • Power and exhaust (DW diesels)
  • Emission reduction
  • Starting and charging system
  • Transmission
  • Clutch
  • Mechanical gearbox
  • Drive shafts
  • Chassis, running gear
  • Brake system
  • Car suspension
  • Steering
  • Body and interior
  • Exterior (external elements)
  • Interior (internal elements)
  • Doors, locks and windows
  • Electrical equipment
  • Equipment and devices
  • Electrical circuits
Peugeot 807 (2002-2014) 
  • General information
  • Operating instructions
  • Maintenance
  • Troubleshooting
  • Power unit
  • Gasoline engines
  • Diesel engines
  • Cooling and heating
  • Fuel injection (petrol)
  • Fuel system (diesel)
  • Fuel system
  • Exhaust system
  • Ignition system
  • Transmission
  • Clutch
  • Manual gearbox
  • Automatic gearbox
  • Chassis, running gear
  • Brake system
  • Car suspension
  • Steering system
  • Body and interior
  • Exterior (external elements)
  • Interior (internal elements)
  • Electrical equipment
  • Power devices
  • Electrical circuits
Peugeot 806 (1994-2002) 
  • General information
  • User manual
  • Maintenance
  • Power unit
  • Petrol engines
  • Diesel engines
  • Lubrication system
  • Cooling system
  • Fuel injection (petrol)
  • Fuel system (diesel)
  • Ignition and exhaust systems
  • ECM Bosch Motronic MP 3.2
  • ECM Magneti-Marelli (MM)
  • Transmission
  • Clutch
  • Mechanical gearbox
  • Chassis, running gear
  • Brake system
  • Car suspension
  • Steering
  • Electrical equipment
  • Equipment and devices
  • Electrical circuits
Peugeot J5 (1981-1993) 
  • General information
  • Introduction to manual
  • Specifications
  • Gasoline engine
  • Engine repair
  • Lubrication system
  • Cooling system
  • Fuel system
  • Ignition system
  • Diesel engine
  • Engine repair (DB9)
  • Lubrication system (DB9)
  • Cooling system (DB9)
  • Fuel injection (DB9)
  • Engine repair (U25)
  • Lubrication system (U25)
  • Cooling system (U25)
  • Fuel injection (U25)
  • Transmission
  • Clutch
  • Gearbox
  • Drive shafts
  • Chassis, running gear
  • Steering system
  • Car suspension
  • Brake system
  • Electrical equipment
  • Power devices
  • Electrical circuits
PeugeotBook.ru © 2018–2026 | Mobile version | Sitemap: EN BG BY UA RS HR RO PL SK HU | Write message | Site search | Add to bookmarks | Peugeot owners
106 (1991-2003) | 206 (1998-2012) | 207 (2006-2014) | 305 (1977-1989) | 306 (1993-2002) | 307 (2001-2008) | 405 (1987-1997) | 406 (1995-2004) | 605 (1989-2000) | Partner-I (1996-2008) | Eurovans-807 (2002-2014) | Eurovans-806 (1994-2002) | J5 (1981-1993) |
Cookies are used to ensure the correct display of pages on the site.