
Replacing wheels on sedan cars
Park the vehicle on a firm, non-slip, level surface.
Brake the vehicle with the parking brake, engage first gear or reverse (position «R» for automatic transmission) and turn off the ignition.
Grasping the handle, raise the floor of the luggage compartment. To secure the floor in the raised position, hook the twine into the hooks on the rear shelf.
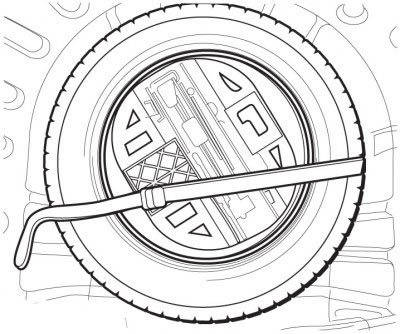
Pic. 1.60. Location of the spare wheel and tool kit on sedan cars
The set of tools is stored in a special tool module molded from polystyrene located in the spare wheel (pic. 1.60). It includes:
- wrench for unscrewing the wheel bolts;
- centering rod;
- wheel stop;
- jack;
- removable towing loop;
- a stripper for decorative caps of bolts for fastening discs made of light alloy.
Using the tool module and wheel stop, support the wheel diagonally opposite the one being changed.
Remove the wheel trim by prying it off with a wheel wrench near the air vent.
Loosen the four wheel bolts (on light alloy wheels, first remove the decorative caps from the bolts).
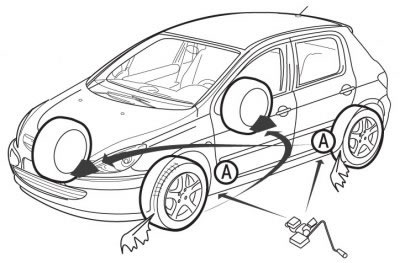
Pic. 1.61. Places (A) installation of a jack and wheel stops and a sequence of rearrangement of wheels on sedan cars
Place the jack under one of the four support sockets specially designed for this purpose A (pic. 1.61) in the lower part of the body, located closest to the wheel being removed.
Spread the jack between the support socket and the floor. Make sure the lower jack leg is exactly in line with the upper jack leg A.
Raise the car with a jack.
Loosen the wheel bolts and remove the wheel.
Install the wheel in place using the centering rod.
Screw in the wheel bolts by hand and remove the centering rod.
Pre-tighten the bolts with a wrench.
Lower the vehicle, remove and fold the jack.
Tighten the wheel bolts to the stop.
Replace the decorative cap by pressing the palm of your hand on its surface. Start with the part of the hood that is located near the air vent.
Put the tool and wheel in the trunk.
Tighten the spare wheel strap to reduce vibration and ensure safety in the event of a collision.
Replacing wheels on station wagons
The tool kit is stowed on the right in the luggage compartment.
It includes:
- wrench for unscrewing the wheel bolts;
- removable towing loop;
- bushings for loosening the wheel bolts.
The special tool module located in the spare wheel contains:
- jack;
- centering rod;
- stripper of decorative caps of bolts of fastening of disks from an easy alloy;
- wheel stop.
Park the vehicle on a firm, non-slip, level surface.
Engage parking brake, first gear or reverse (position «R» for automatic transmission) and turn off the ignition.
Open the tailgate.
Pull on the loop and open the cover that blocks access to the winch holding the spare wheel.
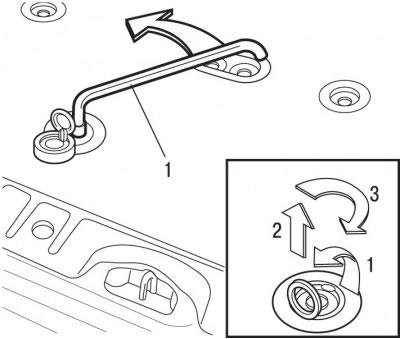
Pic. 1.62. Directions for removing the cover that blocks access to the winch and unscrewing the nut (1) winches
Unscrew the winch nut to the stop using a wrench to unscrew the wheel bolts to unwind the winch cable (pic. 1.62).
Release the wheel bracket.
Release the hook and lower the wheel.
Slide the cover to access the tools.
Use the wheel chock to support the wheel diagonally opposite the wheel being changed.
On vehicles with steel rims, remove the wheel trim by prying it off with a wrench near the air valve.
Loosen the four wheel bolts (on light alloy wheels, first remove the decorative caps from the bolts).
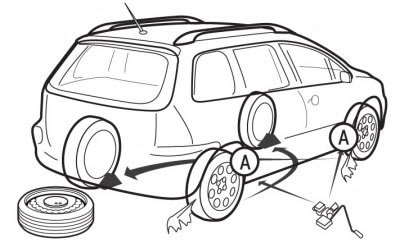
Pic. 1.63. Places (A) installation of the jack and wheel stops and the sequence of rearranging the wheels on cars with a station wagon
Place the jack under one of the four support sockets specially designed for this purpose A (pic. 1.63) in the lower part of the body, located closest to the wheel being removed.
Spread the jack between the support socket and the floor. Make sure the lower jack leg is exactly in line with the upper jack leg A.
Raise the car with a jack.
Remove one wheel bolt and install the centering rod in its place.
Loosen the remaining wheel bolts and remove the wheel.
Install the wheel in place using the centering rod.
Screw in the wheel bolts by hand and remove the centering rod.
Pre-tighten the bolts with a wrench.
Lower the vehicle, remove and fold the jack.
Tighten the wheel bolts to the stop.
Replace the decorative cap by pressing the palm of your hand on its surface. Start with the part of the hood that is located near the air vent.
Put the tools in the box and close the lid.
Lower the spare wheel basket to the floor and place the wheel in it.
Attach the hook to the lid of the basket.
Raise the spare wheel under the vehicle by turning the winch nut with the wheel wrench.
Tighten to the stop and make sure that the wheel fits snugly on the entire surface of the rear floor.
Close the lid to block access to the winch.
Put the rest of the tool in the right compartment of the luggage compartment.
Security measures
For safety, when changing a wheel, follow these rules:
- park the vehicle on a firm, level, non-slip platform;
- tighten the parking brake lever, turn off the ignition;
- engage first or reverse gear (position «R» for automatic transmission);
- Place chocks under the wheels to prevent rolling.
Never crawl under a car that is on a jack (if necessary, place it on support stands).
After changing a wheel, the repaired wheel should be immediately installed on the vehicle.
Aluminum alloy wheels
Aluminum alloy wheel bolts are covered with decorative caps.
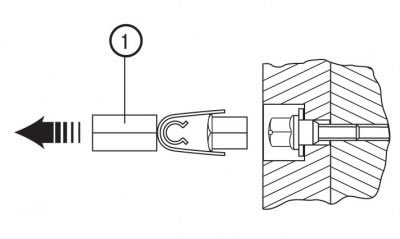
Pic. 1.64. Use of fixture (1) for removing decorative caps covering the wheel bolts
Remove them with tool 1 (pic. 1.64), before loosening the bolts.
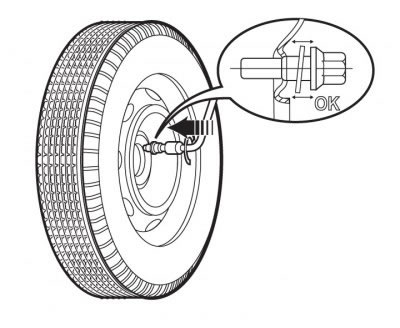
Pic. 1.65. Spare wheel bolt with stamped steel rim
If the vehicle is equipped with a stamped steel spare wheel, the lower flat surfaces of the bolt heads do not touch the surface of the wheel when it is installed (pic. 1.65). This is normal. The spare wheel is held in place by tapered bolts.
Installing wheels with winter tires
If it is necessary to install stamped steel wheels with winter tires on the car, it is necessary to use special wheel bolts sold in Peugeot branded stores.
Secret bolts to prevent wheel theft
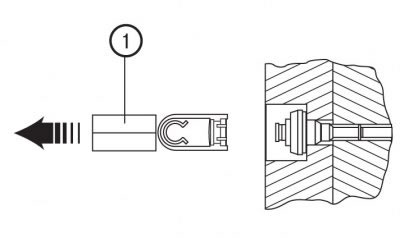
Pic. 1.66. Removing the plastic cover with a special tool (1)
If secret bolts are installed on the wheels of the car (one for each wheel), before unscrewing the bolt, it is necessary to remove the chrome-plated decorative cover from it and then the plastic cover using a special tool 1 (pic. 1.66). Then unscrew the bolt using one of the two special bushings (which are issued when buying a car along with duplicate keys) and key.
Attention! Write down the code engraved on the head of the sleeve to loosen the secret bolt. This will allow you to get a duplicate of the bushing at the service station in case it is lost.