
Upgraded center console (models up to 1992)
Removing
1. Remove the negative cable from the battery.
2. Move the front seats all the way back.
3. If present, unscrew the fixing screws and remove the side fenders from the front of the center console.
4. Remove the cassette box from the front of the center console and unscrew the exposed two screws securing the center console to the heater.
5. Move the front seats all the way forward.
6. Remove the plugs and unscrew the screws securing the rear of the center console.
7. Open the cover of the stowage compartment at the rear of the center console and unscrew the screw at the bottom of the compartment.
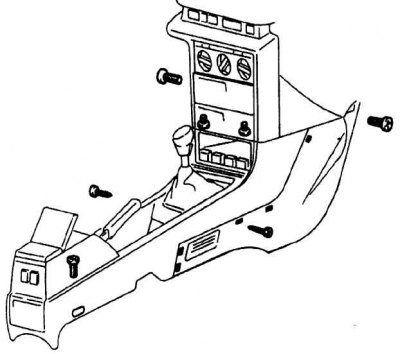
8. Unscrew two screws (one on each side) attaching the center console to the gear lever suspension.
9. Remove the dust cover for the handbrake lever from the center console.
10. Remove the protective cover from the gear lever.
11. Raise the center console, then disconnect all electrical wiring and release the wiring harnesses from the mounting brackets under the center console.
12. Remove the center console along the gear lever and handbrake lever.
Installation
Installation is made in sequence, return to removal.
Standard center console (models up to 1992)
Removal and installation
Operations are the same as removing and installing the upgraded center console (see higher). In doing so, the following points must be taken into account:
- the center console consists of two sections;
- There are no switches in the center console.
Upgraded center console (models since 1993)
Removing
1. If present, remove the front armrest.
2. To access the screws, remove the trim plate covering the center section of the center console. Loosen the fastening screws.
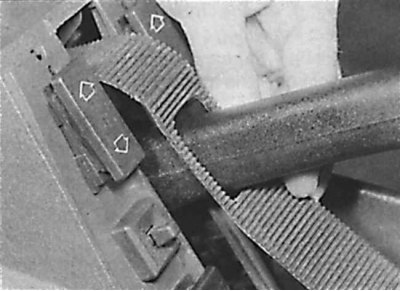
3. On models with a manual transmission, remove the transmission control lever cover from the center console, then remove the handle from the lever and remove the transmission control lever cover along with the handle.
4. On models with automatic transmission, perform the following steps.
5. Check that the selector lever is in the neutral position.
6. Unscrew the two screws from the selector lever mechanism (one on each side of the lever).
7. Rotate the selector lever a quarter of a turn clockwise, then remove the knob from the top of the lever.
8. Turn the selector lever a quarter of a turn back (to normal position), then remove the lever.
9. Remove the selector cover.
10. Unscrew the two fixing screws and remove the selector panel.
11. On all models, unscrew the mounting screws and remove the fenders from the front of the center console to access the heating ducts.
12. Unscrew the fixing screws and disconnect the air ducts on each side of the center console.
13. Working at the front of the center console, disconnect the electrical connectors.
14. Pull up the handbrake lever, then remove the center console along the handbrake lever.
Installation
1. Installation is made in sequence, return to removal.
2. On models with automatic transmission, install the selector lever as follows.
3. Check that the selector lever is in the neutral position.
4. Slide the lever over the shift shaft and turn a quarter of a turn clockwise.
5. Push the lever onto the shift rod until it stops.
6. Install the button on the top of the shift lever and check that the button locks into the groove on the top of the shift shaft.
7. Push the lever down, then turn the lever a quarter of a turn back (to normal position).
Standard center console (models since 1993)
Removing
1. Remove the negative cable from the battery.
2. Move the front seats all the way forward.
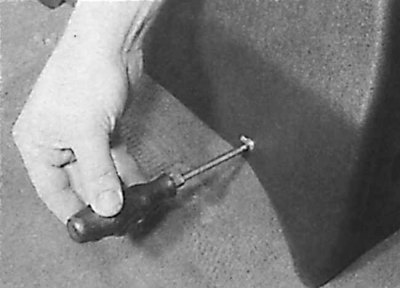
3. Unscrew the two screws securing the rear of the center console.
4. Remove the handbrake lever handle and switches from the top of the center console. Disconnect electrical connectors from switches.
5. Raise the hand brake lever.
6. Remove the ashtray block from the pocket in the panel.
7. Open the ashtray flap and remove the ashtray.
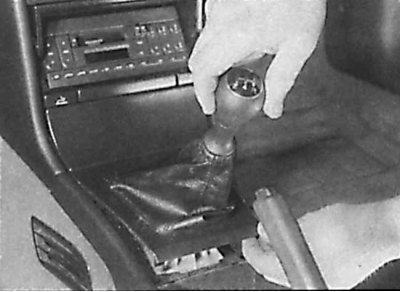
8. On manual transmission models, remove the gear lever guard from the center console, then remove the handle from the lever and remove the gear lever guard along with the handle.
9. On models with automatic transmission, perform the following steps.
10. Check that the selector lever is in the neutral position.
11. Unscrew the two screws from the selector lever mechanism (one on each side of the lever).
12. Rotate the selector lever a quarter of a turn clockwise, then remove the knob from the top of the lever.
13. Turn the selector lever a quarter of a turn back (to normal position), then remove the lever.
14. Remove the selector cover.
15. Unscrew the two fixing screws and remove the selector panel.
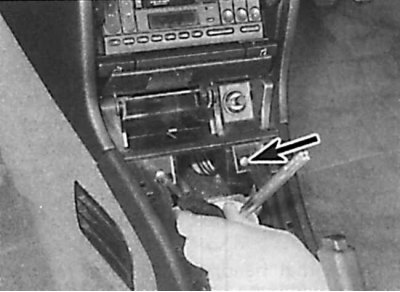
16. Unscrew the exposed two screws (indicated by an arrow) fixing the front part of the center console.
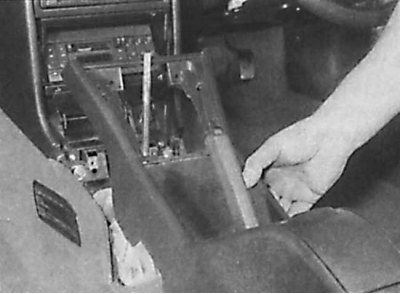
17. Then remove the center console along the handbrake lever.
Installation
1. Installation is made in sequence, return to removal.
2. On models with automatic transmission, install the selector lever as follows.
3. Check that the selector lever is in the neutral position.
4. Slide the lever over the shift shaft and turn a quarter of a turn clockwise.
5. Push the lever onto the shift rod until it stops.
6. Install the button on the top of the lever and check that the button is fixed in the groove of the shift rod.
7. Push the lever down, then turn the lever a quarter of a turn back (to normal position).