



Removal
Camshaft pulleys
1. Disconnect the negative battery terminal.
2. Align the mounting holes on the camshaft and crankshaft pulleys with the holes on the engine and secure the pulleys with rods.
1.6 liter engine models
3. Remove the upper timing belt cover.
4. Loosen the timing belt tensioner pulley by turning the pulley clockwise with a suitable square key installed in the pulley hub and retighten the pulley mounting bolt.
5. Remove the locking rod from the camshaft pulley. Remove the timing belt from the camshaft pulley.
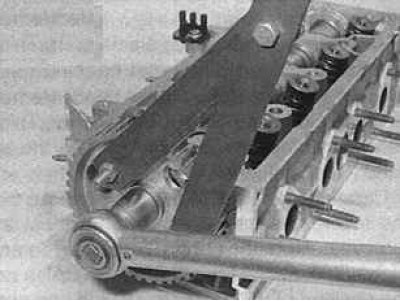
6. Unscrew the camshaft pulley mounting bolt. To prevent the camshaft from rotating when unscrewing the bolt, it is necessary to secure the pulley from turning with a special tool.
7. Remove the pulley from the camshaft.
Engine models 1.8 and 2.0 liters
8. Remove the upper and lower timing belt covers.
9. Move the wire harness if necessary.
10. Support the engine with a jack and remove the right engine mount.
11. Loosen the rear belt tensioner mounting bolt by turning the pulley clockwise.
12. Check that the dowel pins are still in the pulley bore. Remove the timing belt from the camshaft pulleys.
13. If the pulleys are removed without the hubs, unscrew the three mounting bolts and remove the pulley.
14. If the pulleys are to be removed with the hubs, unscrew the central hub mounting bolt. A special tool must be used to prevent the camshaft pulley from rotating.
15. Remove the three pulley mounting bolts and remove the pulley from the hub. Remove the hub mounting bolt and remove the hub. Note that the hubs are marked with a number on the front for identification. On 1.8L engine models, the camshaft hub that controls the intake valves is marked "1" and the camshaft hub that controls the exhaust valves is marked "2". On 2.0L engine models, the camshaft hub that controls the intake valves is marked "3" and the camshaft hub that controls the exhaust valves is marked "4".
Crankshaft pulleys
1. Disconnect the negative battery terminal.
2. Align the mounting holes on the camshaft and crankshaft pulleys with the holes on the engine and secure the pulleys with rods.
1.6 liter engine models
3. Remove the upper, center and lower timing belt covers.
4. Loosen the timing belt tensioner pulley mounting bolt, turn the pulley clockwise and tighten the mounting bolt.
5. Remove the timing belt from the crankshaft pulley and remove the pulley from the crankshaft. Also remove the woodruff key from the crankshaft.
6. Check the crankshaft seal for leaks and replace it if necessary.
Engine models 1.8 and 2.0 liters
7. Remove the upper and lower timing belt covers.
8. Move the wire harness if necessary.
9. Support the engine with a jack and remove the right engine mount.
10. Loosen the rear belt tensioner mounting bolt by turning the pulley clockwise.
11. Check that the dowel pins are installed in the camshaft pulleys. Remove the timing belt from the crankshaft pulley, then remove the crankshaft pulley with the key.
12. Check the crankshaft seal for leaks and replace it if necessary.
Tensioner pulleys and idler pulleys
1. Disconnect the negative battery terminal.
2. Align the mounting holes on the camshaft and crankshaft pulleys with the holes on the engine and secure the pulleys with rods.
1.6 liter engine models
3. Remove the upper and, if necessary, the center timing belt cover.
4. Unscrew the mounting bolt and remove the toothed belt tensioner pulley. Check the condition of the tensioner components and replace them if necessary.
Models 1.8 and 2.0 liters
5. Remove the upper and lower timing belt covers.
6. If necessary, relocate the wiring harness to improve access to the tensioner mechanism.
7. Support the engine with a jack and remove the right engine mount.
8. Loosen the rear timing belt tensioner pulley mounting bolt and, using a square key installed in the pulley hub, turn the pulley clockwise and retighten the mounting bolt.
9. Check that the locking pins are in the camshaft pulley mounting holes and remove the timing belt from the pulleys.
10. Unscrew the tensioner and idler pulley mounting bolts and remove them.
Examination
1. Clean all pulleys and inspect them for signs of wear.
2. When cleaning the tensioner pulleys, do not use solvents that can get into the pulley bearings and cause them to fail. The pulleys must rotate easily, without jamming or play.
Installation
Camshaft pulleys
1.6 liter engine models
1. Install the alignment mark on the rear side of the pulley. Install the pulley onto the camshaft so that the alignment mark is aligned with the camshaft.
(Information copied from the resource PeugeotBook.ru)
2. Tighten the pulley mounting bolt. Use a special pulley locking tool to prevent the pulley from turning.
3. Align the hole in the camshaft pulley with the hole in the head and install the locking rod. Make sure that the installation rod also locks the crankshaft pulley.
4. Install the timing belt.
5. Tighten the timing belt.
6. Install the timing belt covers.
Engine models 1.8 and 2.0 liters
7. If the pulleys and hubs were removed, install the hub onto the camshaft according to the hub identification marking.
8. Tighten the hub mounting bolt to the specified torque. Temporarily install the pulleys on the hub.
9. Rotate the hub so that the locking rod can be installed into the hole in the cylinder head pulley.
10. If only the pulleys were removed, install the pulleys and bolt them in place with three bolts.
11. Install and tension the timing belt.
Crankshaft pulleys
1.6 liter engine models
1. Install the gasket and woodruff key into the crankshaft groove.
2. Install the crankshaft pulley by aligning the groove on the pulley with the woodruff key.
3. Check that the dowel pin still locks the camshaft pulley. Temporarily install the accessory belt pulley onto the crankshaft and insert the dowel pin through it to check that the crankshaft is correctly positioned.
4. Remove the accessory belt pulley from the crankshaft. Install the timing belt on the crankshaft pulley, water pump pulley and tensioner pulley.
5. Tighten the timing belt.
6. Install the timing belt covers.
7. Install the accessory belt pulley onto the crankshaft. Connect the negative terminal to the battery.
Engine models 1.8 and 2.0 liters
8. Install the woodruff key into the crankshaft groove.
9. Install the crankshaft pulley by aligning the groove on the pulley with the woodruff key.
10. Install and adjust the timing belt tension.
Tensioner pulleys and idler pulleys
1.6 liter models
1. Install the tensioner pulley and screw in the mounting bolt without tightening it.
2. Check that the front belt is tensioned. Turn the tensioner pulley counterclockwise to remove all the gap between the pulley and the toothed belt.
3. Adjust the timing belt tension.
4. Install the timing belt guards.
Engine models 1.8 and 2.0 liters
5. Install the tensioner and idler pulleys and secure them with bolts.
6. Install the timing belt and adjust its tension.