
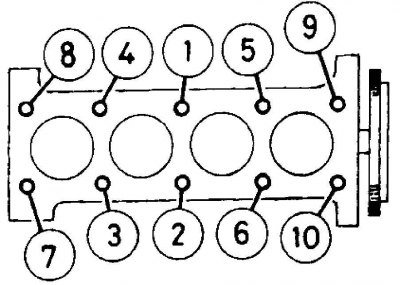
Cylinder head bolt tightening sequence
Removing
1. Disconnect the negative terminal from the battery.
2. Drain the coolant.
3. Install the timing gear drive until the mounting holes are aligned and block it in this position with the rods.
1.6 liter engine models
4. Remove the cylinder head cover.
5. Remove the air filter housing.
6. The following is a description of removing the cylinder head from the engine without removing the intake and exhaust manifolds from the head. Disconnect the exhaust pipe from the exhaust manifold. If there is a lambda probe, remove the electrical connector from it.
7. Do the following:
- depressurize the fuel system and remove the fuel supply and return hoses. Plug the ends of the hoses with plugs;
- remove the accelerator cable;
- disconnect the electrical connectors from the throttle body;
- remove the electrical connectors from the fuel injectors and release the wire braid from the manifold.
8. Loosen the clamps and remove the coolant supply hoses from the thermostat housing (on the left front side of the cylinder head).
9. Release the mounting brackets and remove the electrical connectors from the sensors that are screwed into the thermostat housing or on the left side of the cylinder head.
10. Unscrew the bolt securing the dipstick tube to measure the engine oil level from the left front side of the head and remove the tube.
11. Remove the connector from the ignition coil. If the head is being removed for a major overhaul, remove the ignition coil and high voltage wires. If necessary, mark the high voltage wires for proper re-installation.
12. Release the toothed belt tensioner and remove the toothed belt from the camshaft pulley.
Engine models 1.8 and 2.0 liters
13. Remove the air filter assembly and intake piping.
14. Remove the cylinder head cover.
15. Remove the intake manifold.
16. Remove the intake manifold from the exhaust manifold. If there is a lambda probe, remove the electrical connector from it.
17. Remove the radiator hose.
18. Remove all remaining hoses and electrical connectors from the cylinder head.
19. Release the toothed belt tensioner and remove the toothed belt from the camshaft pulleys.
All models
20. Gradually and evenly unscrew the cylinder head mounting bolts in reverse order as shown in fig. Cylinder head bolt tightening sequence. Remove the bolts, marking the correct location of the gasket oriented to the front left bolt on 1.6 liter models.
21. After removing the cylinder head bolts, it is necessary to separate the cylinder head from the engine. Doing so may damage the head gasket. On engines with removable cylinder liners, the cylinder liner can be pulled out by the gasket, as a result of which the tightness of the liner installation can be broken and coolant will leak through this leak.
22. To remove the cylinder head, use two metal rods with ends bent at right angles, which are installed in the holes for the cylinder head bolts and gently swing the head towards the front of the car. You can not turn the head in the other direction, because. the back of the head is mounted on guide pins.
23. After destruction of a lining or separation of a head from a lining remove a head of the block of cylinders. Remove the head gasket from the engine block. If the guide pins are installed in the cylinder block with a loose fit, remove them and store with the head.
24. On engines with replaceable cylinder liners, the crankshaft must not be turned with the head removed, otherwise the cylinder liners may be pushed up from their seats. If necessary, turn the crankshaft (for cleaning pistons) cylinder liners must be locked in their original position. In the absence of special sleeve clamps, the sleeves can be fixed by screwing bolts with large washers into the cylinder block, as shown in the figure.
25. If the cylinder head is being removed for overhaul, remove the camshaft.
Preparing for installation
1. The mating surfaces of the engine head and cylinder block must be thoroughly cleaned of gasket residue and carbon deposits using a plastic or wooden scraper. It is also necessary to clean the tops of the pistons. When cleaning, exclude the possibility of cleaning products getting into the oil channels of the cooling system. Thoroughly clean the inner surfaces of the cylinders.
2. Check the mating surfaces of the engine head and cylinder block for defects. Minor damage is eliminated by machining. Also, using a metal ruler and feeler gauge, check the flatness of the surfaces.
3. On engines with separate cylinder liners, check the amount of protrusion of the liners from the engine block.
4. When installing a new gasket, select a gasket of the appropriate thickness. Some models only use one thickness head gasket. However, on other models there are shims available in two different thicknesses - a standard shim that is installed at the factory and a thicker shim (+0.2 mm), which is used with a reground cylinder head. If the head is ground, it is marked with the letter "R", knocked out near the third inlet. The gasket must also be marked "R", printed on the top side of the gasket opposite the third cylinder. Gaskets can also be identified by the marks on the left front side of the gasket.
5. A standard 1.2mm thick gasket is identified by a single hole punched into the left front end of the gasket, while a thicker gasket (1.4mm) indicated by two or three holes knocked out in the same place.
6. Check up a condition of bolts of fastening of a head of the block of cylinders and, especially, their carving. Measure the length of each bolt (without puck) from the underside of the bolt head to the end of the bolt. If the bolt length is less than 176.5 mm (on 1.6 liter engine models) or less than 60mm (on 1.8 liter engines) or less than 112 mm (on 2.0 liter engines), they can be reused. However, if any bolt is longer than specified, all bolts in the kit must be replaced.
Installation
1. Wipe the mating surfaces of the head and cylinder block and install the two guide rods into the engine block. If used, remove cylinder liner retaining clips.
2. Install a new gasket on the cylinder block so that the identification marks are at the left end of the gasket.
1.6 liter engine models
3. Check that the crankshaft and camshaft pulleys are fixed with the dowel pins. Install the head on the cylinder block along the guide pins.
4. Lubricate the threads of the bolts and the underside of the bolt head with Molykote G Rapid Plus.
5. Install the bolts with washers in the cylinder head and, evenly and gradually, in a certain sequence, tighten the bolts (see fig. Cylinder head bolt tightening sequence).
6. After tightening the bolts, loosen them in the reverse order of tightening and re-tighten them in sequence to the correct torque.
7. Tighten all bolts by 300°in sequence.
8. Connect the ignition coil.
9. Install the timing belt on the camshaft pulley. Install the engine mount to the cylinder head.
10. Adjust belt tension.
11. Carry out the remaining operations for installing the cylinder head in the reverse order of removal, observing the following points:
- correctly connect the removed electrical connectors;
- connect the coolant hoses correctly and securely tighten them with clamps;
- check the correct connection of the vacuum and ventilation hoses;
- install the cylinder head cover;
- connect the exhaust pipe to the manifold, install the air filter and accelerator cable;
- fill the cooling system with coolant and connect the negative ground wire to the battery.
Engine models 1.8 and 2.0 liters
12. Check that the crankshaft and camshaft pulleys are fixed with the dowel pins. Install the head on the cylinder block along the guide pins. Lubricate the threads of the bolts and the underside of the bolt head with Molykote G Rapid Plus. Install the bolts with washers in the cylinder head and, evenly and gradually, in a certain sequence, tighten them (see fig. Cylinder head bolt tightening sequence).
13. After tightening the bolts, loosen them in the reverse order of tightening and re-tighten them in sequence to the correct torque. Tighten all bolts by 300° (1.8 liter engines) or at an angle of 160° (2.0 liter engines) in a certain sequence.
14. Install the toothed belt on the camshaft pulley and adjust its tension.
15. Perform the rest of the operations in the reverse order of removal, taking into account the recommendations for engines with a volume of 1.6 liters.