
English Русский
Български
Беларускі
Український
Српски
Hrvatski
Română
Polski
Slovenský
Magyar
Bookmark Articles Sitemap Contacts
Company Hyundai Company Opel Company Skoda Company Kia Company Mitsubishi Company LADA Company Audi
PeugeotBook.ru


Series 100   Series 200   Series 300   400-500   Series 600   Crossovers   Others
 
Peugeot 206 (1998-2012) Peugeot 207 (2006-2014)

Removal and installation of the cylinder head on a car (petrol engines 1.4 l and 1.6 l EP3, TU5) (Peugeot 207)

  • Main
  • 20X
  • Peugeot 207 (2006-2014)
  • Power unit
  • Engine repair
  • Removal and installation of the cylinder head on a car (petrol engines 1.4 l and 1.6 l EP3, TU5)
0
Table of contents: Removal 🠇 Installation 🠇

Removal
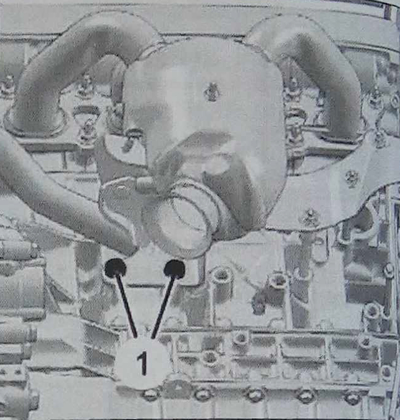


Removal


Loosen the bolts (1) and remove the decorative cover.

Disconnect the solenoid valve of the camshaft timing adjustment mechanism (WT).

Disconnect the oil vapor recirculation hose.

Remove the air cleaner. Disconnect the oil vapor recirculation hose that goes to the cylinder head cover.

Remove the camshaft timing (WT) control solenoid valve. Remove the cylinder head covers (4).

Note: Plug the variable valve timing control solenoid valve (VVI) and its hole on the cylinder head.


Caution: When disconnecting the quick release hose (3), wrap the connection area with a piece of cloth to prevent fuel from sloshing out (residual pressure in the fuel rail: 1 bar).


Connect the device to the valve for bleeding the fuel supply circuit.

Place a container to collect any leaking fuel.

Disconnect the fuel supply pipe (3).

Disconnect the injection nozzles (8). Disconnect and move aside the wiring harnesses, tubes and cables leading to the throttle body. Remove the wiring harness support (2). Disconnect the pipe (6), coolant hoses (5).

Loosen the mounting bolts and nuts and remove the intake manifold (7).


View the original on the website peugeotbook.ru
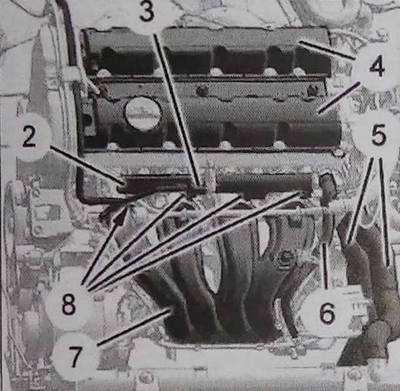
Loosen the mounting bolts and nuts and remove the intake manifold (7).


Close the inlet pipes with plugs.

Remove the mounting clamps, disconnect and move aside the connectors and electrical harnesses passing in the cylinder head area.

Remove the accessory drive belt (see the corresponding operation) and the timing belt tensioner roller. Unscrew the bolt (7) of the lower right engine support that goes to the cylinder head.

Install the right engine support (8).
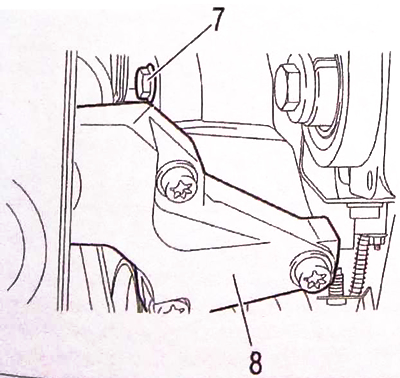
Install the right engine support (8).


Remove the lift.

Loosen the head bolts in sequence, moving in a spiral from the outside in.

Install the workshop crane.

Install accessories 1 and 2.
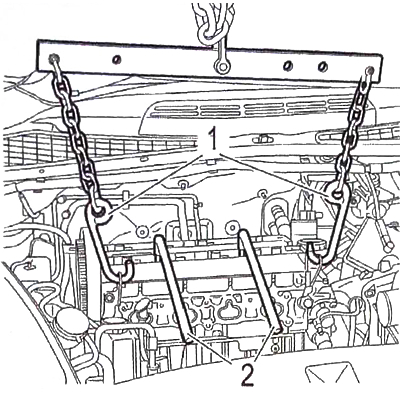
Install accessories 1 and 2.


Support the head assembly with the manifold using a lift. Turn over and remove the cylinder head using levers. Raise the head assembly with the manifold using a lift. Remove the cylinder head and head gasket.


Clean the connecting surfaces (do not use cutting or abrasive tools)

Attention: The surfaces to be connected must not have any traces of impacts or cracks.


Installation


Check for the presence of centering bushings.

Check the flatness of the cylinder head.

Fix the camshafts at the check points (see the corresponding operation).

Install the gasket and head assembly with the manifold using a mobile lift.

Attention. Install the head bolts, having previously lubricated the threads and the surface under the bolt head with Molykote e rapid plus E3 grease.


Reinstallation of the head is done with new bolts.

Re-tightening the head after disassembly is prohibited.
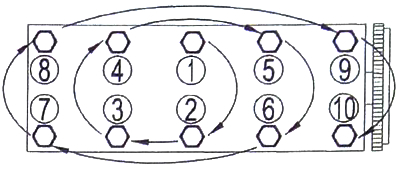
Re-tightening the head after disassembly is prohibited.


Support the engine with a crane.

Remove:
  • air supply channel plugs;
  • right engine support (8).

Tighten the bolt (7) of the right engine support.

Install:
  • accessory drive belt (see the corresponding operation);
  • head cover;
  • ignition coil unit;
  • air intake manifold;
  • intake manifold mounting bolts;
  • coolant outlet chamber;
  • engine wiring harness mounting support;
  • battery.

Connect the fuel vapor recirculation hose connected to the cylinder head cover and the fuel supply hose.


Install the air filter assembly and damper actuator.

Connect the exhaust manifold to the exhaust system.

Fill with coolant and blow out the circuit (see the corresponding operation).

Install the air cleaner housing.

Connect the battery.
This article is available at russian, bulgarian, belarusian, ukrainian, serbian, croatian, romanian, polish, slovak, hungarian
Article reviewed by editor: Matveev Demid
Share information:
Previous
Peugeot 207: Engine repair
Next

Replacement of camshafts (diesel engines)
Replacing camshafts (petrol engines)
Replacing the timing belt (1.6L diesel engines)
Timing chain replacement (petrol engines 1.6 l EP, EP6DT)
Removal and installation of the timing drive actuator (1.6 l…
Removal and installation of the cylinder head on a car (petrol…
Removal and installation of the cylinder head on a vehicle…
Cylinder head repair
Replacing the dual damper flywheel
Engine Cylinder Block Repair
See similar information for other Peugeot models

➨ Cylinder head (8-valve engines) — removal and refitting Peugeot 106 (1991-2003)
➨ Disassembling the cylinder head (XU series engines) Peugeot 305 (1977-1989)
➨ Removal and installation the cylinder head (1.9 l engines) Peugeot 406 (1995-2004)
➨ Cylinder head — installation Peugeot 605 (1989-2000)
➨ Cylinder head (1.9L engines) — removal and installation Peugeot Partner I (1996-2008)
Link to this article in different formats
Comments and feedback from visitors
No comments yet


Add two numbers 39 + 37


Peugeot 207 (2006-2014) 
  • General information
  • Car care
  • Governing bodies
  • Driving and operation
  • Power unit
  • Engine characteristics
  • Engine repair
  • Cooling system
  • Lubrication system
  • Ignition system
  • Control system (gasoline)
  • Fuel system (gasoline)
  • Control system (diesel)
  • Transmission
  • Clutch
  • Mechanical gearbox
  • Automatic gearbox
  • Drive shafts
  • Chassis, running gear
  • Car suspension
  • Steering
  • Brake system
  • Body and interior
  • Exterior (external elements)
  • Interior (internal elements)
  • Heating and air conditioning
  • Electrical equipment
  • Equipment and devices
  • Headlights and lighting
  • Power devices
  • Electrical circuits
Peugeot 206 (1998-2012) 
  • General information
  • User manual
  • Maintenance
  • Power unit
  • Gasoline engines
  • Diesel engines
  • Diesel power system
  • Engine management system
  • Transmission
  • Clutch
  • Mechanical gearbox
  • Automatic gearbox
  • Drive shafts
  • Chassis, running gear
  • Front suspension
  • Rear suspension
  • Steering
  • Brake system
  • Body and interior
  • Body elements
  • Doors, locks and windows
  • Electrical equipment
  • Equipment and devices
  • Electrical circuits
PeugeotBook.ru © 2018–2026 | Mobile version | Sitemap: EN BG BY UA RS HR RO PL SK HU | Write message | Site search | Add to bookmarks | Peugeot owners
106 (1991-2003) | 206 (1998-2012) | 207 (2006-2014) | 305 (1977-1989) | 306 (1993-2002) | 307 (2001-2008) | 405 (1987-1997) | 406 (1995-2004) | 605 (1989-2000) | Partner-I (1996-2008) | Eurovans-807 (2002-2014) | Eurovans-806 (1994-2002) | J5 (1981-1993) |
Cookies are used to ensure the correct display of pages on the site.