



Table of contents: Removal 🠇 Installation 🠇
Please note: On 2.1 liter engines, due to limited access in the engine compartment, the engine must be removed to remove the cylinder head.
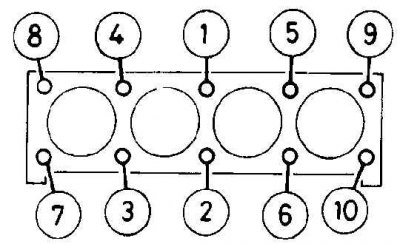
Cylinder head bolt tightening sequence
Removal
1. Disconnect the negative terminal from the battery.
2. Drain the coolant from the cooling system.
3. Remove the intake and exhaust manifolds. Alternatively, remove the intake manifold, unscrew the exhaust manifold mount and disconnect it from the head. In this case, the exhaust manifold can remain in place along with the turbocharger.
4. Remove the intake and exhaust manifolds. Alternatively, remove the intake manifold, unscrew the exhaust manifold mount and disconnect it from the head. In this case, the exhaust manifold can remain in place along with the turbocharger.
5. Secure the manifold with the turbocharger properly. Do not allow the tube supplying oil to the turbocharger to become deformed.
6. Disconnect and remove the fuel return hoses from the fuel injectors.
7. Disconnect the fuel supply lines from the fuel injectors and high pressure fuel pump and remove the lines.
8. Unscrew the mounting nut and remove the glow plug power wire.
9. Remove the coolant hose from the rear left end of the cylinder head.
10. Disconnect the small coolant hose from the front end of the cylinder head at the timing belt side.
11. Remove the fuel return hose from the cylinder head hangers and move it to the side.
12. Remove the accelerator cable from the high pressure fuel pump.
13. Remove the fuel filter/thermostat housing.
14. Remove the coolant hose hanger mounting nut or stand and move the hanger to the end of the cylinder head.
15. Remove the camshaft pulley.
16. Remove the timing belt tensioner and right engine mount.
17. Remove the timing belt guide roller.
18. Remove the bolt securing the front engine plate to the high pressure fuel pump mounting bracket.
19. Remove the nut and bolt securing the generator and high pressure fuel pump mount and remove the front engine plate.
20. Gradually loosen the cylinder head bolts in the reverse order to that shown in the figure Cylinder Head Bolt Tightening Sequence.
21. Remove the bolts together with the washers.
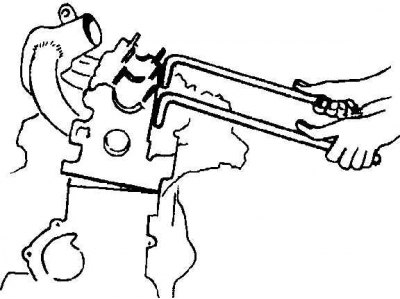
22. To separate the head from the cylinder block, insert two steel rods bent at right angles into the bolt holes and, pressing up and down, separate the head from the cylinder block. Do not separate the head from the cylinder block by inserting a lever between the mating surfaces, as this may damage the gasket and the mating surfaces on the head and cylinder block.
23. Remove the head from the cylinder block and the gasket.
Installation
1. Turn the crankshaft clockwise until all pistons are in the middle of their piston stroke.
2. Install the required gasket onto the cylinder block with the notches on the flywheel side. Check that the guide pin is in place.
3. Install the head onto the cylinder block.
4. Treat the threaded portion of the bolts and the base of the bolt heads with Molykote G Rapid Plus.
5. Place the bolts and washers into the head and screw them in.
6. Tighten the bolts gradually and sequentially to the specified torque (step 1; see the figure for the sequence of tightening the cylinder head mounting bolts).
7. Retighten the bolts to the specified torque (step 2).
8. Tighten the bolts to the required angle. Further installation is performed in the reverse order of removal.