English Русский
Български
Беларускі
Український
Српски
Hrvatski
Română
Polski
Slovenský
Magyar
Bookmark Articles Sitemap Contacts
Company Hyundai Company Opel Company Skoda Company Kia Company Mitsubishi Company LADA Company Audi
PeugeotBook.ru


Series 100   Series 200   Series 300   400-500   Series 600   Crossovers   Others
 
Peugeot 206 (1998-2012) Peugeot 207 (2006-2014)

Timing chain replacement (petrol engines 1.6 l EP, EP6DT) (Peugeot 207)

  • Main
  • 20X
  • Peugeot 207 (2006-2014)
  • Power unit
  • Engine repair
  • Timing chain replacement (petrol engines 1.6 l EP, EP6DT)
0
Place the car on a lift.

Disconnect the battery.

Raise and block the vehicle, raising the front wheels.

Remove the front right wheel, the protection under the engine, and the right front fender liner.

Unscrew bolts (1) and bolt (2).

Remove the air filter housing cover (3).

Remove the filter element.

Unscrew the bolt (4) and remove the air pipe (5).

Loosen the bolts (6).

Release the clips in area "a" and remove the decorative engine cover (7).
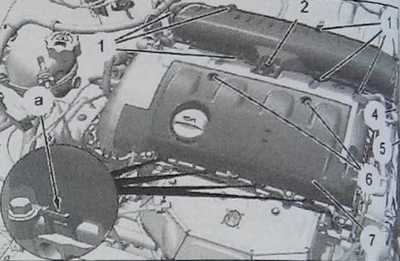
Release the clips in area «a» and remove the decorative engine cover (7).


Caution: Close the intake manifold opening in area "b".


Disconnect the electrical connector of the intake camshaft position sensor (in area "d").

Disconnect the exhaust camshaft position sensor electrical connector (in area "e").

Disconnect the engine power supply harness (in area "g").

Disconnect the electrical connectors supplying power to the ignition coils (8) (in area "j").

Remove the ignition coils (8).

Disconnect the crankcase ventilation system tube (9).

Release the engine electrical harness from the clamps (in zones "c", "f", "h").
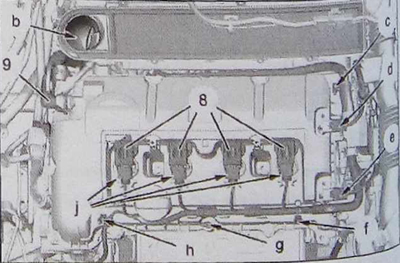
Release the engine electrical harness from the clamps (in zones «c», «f», «h»).


Lift and move aside the branch pipe (10).


Unscrew the lifting loop (11).

Loosen the bolts (12) and remove the cylinder head cover (13).

Tighten the lifting loop (11).
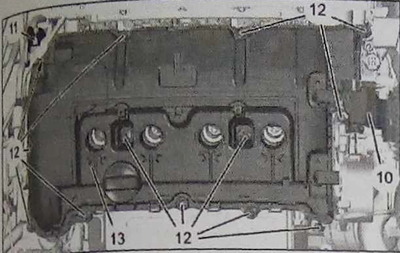
Tighten the lifting loop (11).


Raise the engine from below using a jack and place a wooden block under the oil pan. Remove the oil dipstick (14).

Unscrew bolts (15) and (16) and remove engine mounts (17) and (18).

Release the fuel pipes from the clamps (in zones "k", "l").
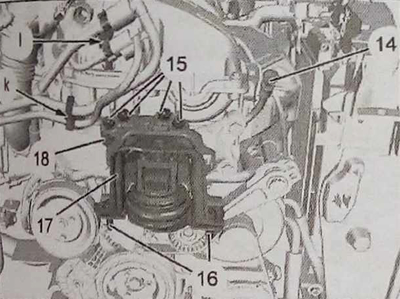
Release the fuel pipes from the clamps (in zones «k», «l»).


Loosen the bolt (19).

Release the power supply wire harness (22) from the clamps (in the "m" zone).

Loosen the bolts (20) and remove the engine mount bracket (21).

Remove the accessory drive belt (23).

Loosen the bolts (24) and remove the tensioner (25).
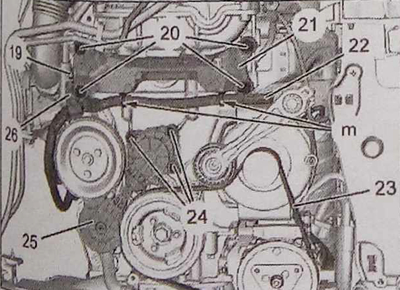
Loosen the bolts (24) and remove the tensioner (25).


Unscrew the three bolts (27) and remove the pulley (28).


Install the crankshaft calibration pin (in zone "n") in the hole [3] located on the crankshaft bearing cap housing.

Install the crankshaft calibration pin (in zone «n») in the hole [3] located on the crankshaft…


Turn the crankshaft clockwise using the bolt (29) to a position convenient for installing the engine flywheel locking pin (in the "p" zone).

Secure the flywheel using the tool [3].

Secure the flywheel using the tool [3].


Install the camshaft locking devices [1] and [2].

Install the camshaft locking devices [1] and [2].


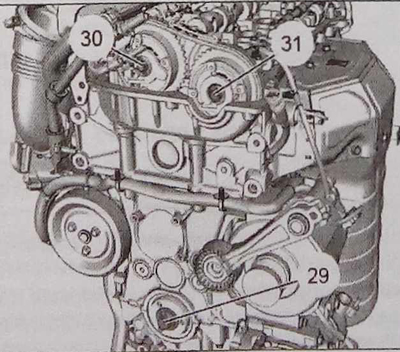
Unscrew bolts (30), (31) and (29).


Unscrew bolts (30), (31) and (29).


Unscrew the two bolts (32) and remove the timing chain tensioner shoe (33).

Remove the chain tensioner (34).
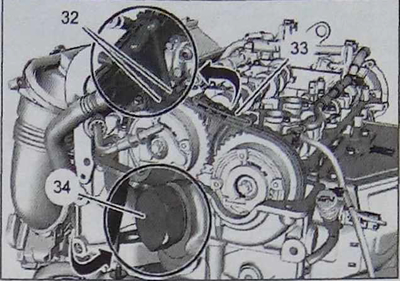
Remove the chain tensioner (34).


Caution: When removing sprockets (35), (36), do not drop the timing chain into the crankcase.


Loosen the bolt (30) and remove the intake camshaft sprocket (36).

Loosen the bolt (31) and remove the exhaust camshaft sprocket (35).
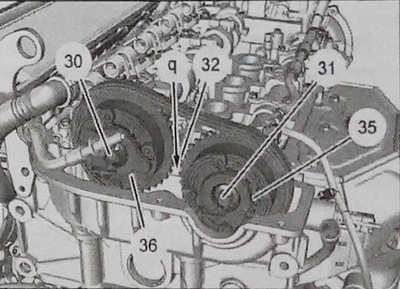
Loosen the bolt (31) and remove the exhaust camshaft sprocket (35).


Install the device [5] (in the area "q") using the bolt (32). Fasten the chain to the device [5].


Install the device [5] (in the area «q») using the bolt (32). Fasten the chain to the device [5].


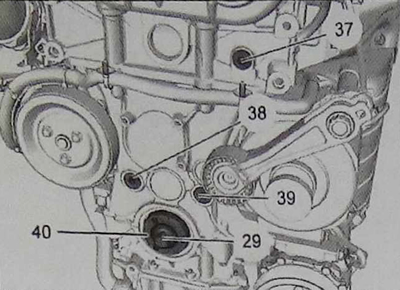
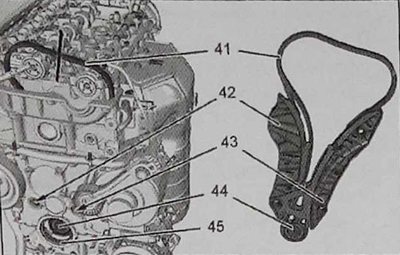
Loosen bolts (37), (38), (39), (29) and remove the crankshaft hub (40).

Remove the following parts:
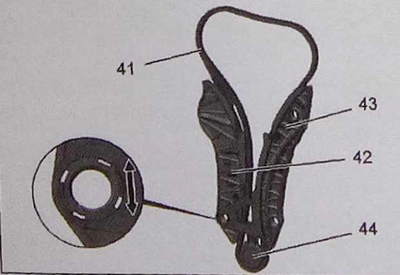
  • timing chain (41);
  • tensioner guide (42);
  • fixed guide (43);

fixed guide (43);

  • crankshaft gear (44);
  • gland (45).

gland (45).


Installation


Attention: Before installation and fastening, wipe and clean the parts from grease (in the "r" zones).
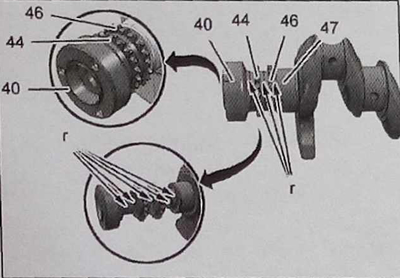

Attention: Before installation and fastening, wipe and clean the parts from grease (in the «r»…


Assemble the unit:


  • tensioner guide (42);
  • fixed guide (43);
  • timing chain (41);
  • timing belt pulley (44).

timing belt pulley (44).


Position the timing chain (41) complete with tensioner guide (42), fixed guide (43), timing sprocket (44) on the engine.

Install the timing chain (41) in the holding fixture [5]. Install the sprocket (44) onto the crankshaft (47).

Note: Replace the crankshaft pulley hub bolt (29).


Install the parts in reverse order.

Remove the intake manifold inlet plug.

Connect the battery.
This article is available at russian, bulgarian, belarusian, ukrainian, serbian, croatian, romanian, polish, slovak, hungarian
Article reviewed by editor: Matveev Demid
Share information:
Previous
Peugeot 207: Engine repair
Next

Removal and installation of the timing drive actuator (1.6 l…
Replacing the timing belt (petrol engines 1.4 and 1.6 l EPZ, TU5)
Timing drive adjustment (diesel engines)
Timing drive adjustment (petrol engines 1.6 l EP6, EP6DT)
Timing drive adjustment (petrol engines 1.4-1.6 l EPZ, TU5)
Replacing the timing belt (1.6L diesel engines)
Replacing camshafts (petrol engines)
Replacement of camshafts (diesel engines)
Removal and installation of the cylinder head on a car (petrol…
See similar information for other Peugeot models

➨ Servicing specifications — petrol models Peugeot 106 (1991-2003)
➨ Timing chain and sprockets — inspection and maintenance Peugeot 305 (1977-1989)
➨ Petrol engines 1.6-2.0 l — design description Peugeot 405 (1987-1997)
➨ Specification of cars with petrol engines of the ZPJ series Peugeot 605 (1989-2000)
➨ Timing Belt (1.9L Engines) — general information, removal and… Peugeot Partner I (1996-2008)
Link to this article in different formats
Comments and feedback from visitors
No comments yet


Add two numbers 49 + 35


Peugeot 207 (2006-2014) 
  • General information
  • Car care
  • Governing bodies
  • Driving and operation
  • Power unit
  • Engine characteristics
  • Engine repair
  • Cooling system
  • Lubrication system
  • Ignition system
  • Control system (gasoline)
  • Fuel system (gasoline)
  • Control system (diesel)
  • Transmission
  • Clutch
  • Mechanical gearbox
  • Automatic gearbox
  • Drive shafts
  • Chassis, running gear
  • Car suspension
  • Steering
  • Brake system
  • Body and interior
  • Exterior (external elements)
  • Interior (internal elements)
  • Heating and air conditioning
  • Electrical equipment
  • Equipment and devices
  • Headlights and lighting
  • Power devices
  • Electrical circuits
Peugeot 206 (1998-2012) 
  • General information
  • User manual
  • Maintenance
  • Power unit
  • Gasoline engines
  • Diesel engines
  • Diesel power system
  • Engine management system
  • Transmission
  • Clutch
  • Mechanical gearbox
  • Automatic gearbox
  • Drive shafts
  • Chassis, running gear
  • Front suspension
  • Rear suspension
  • Steering
  • Brake system
  • Body and interior
  • Body elements
  • Doors, locks and windows
  • Electrical equipment
  • Equipment and devices
  • Electrical circuits
PeugeotBook.ru © 2018–2026 | Mobile version | Sitemap: EN BG BY UA RS HR RO PL SK HU | Write message | Site search | Add to bookmarks | Peugeot owners
106 (1991-2003) | 206 (1998-2012) | 207 (2006-2014) | 305 (1977-1989) | 306 (1993-2002) | 307 (2001-2008) | 405 (1987-1997) | 406 (1995-2004) | 605 (1989-2000) | Partner-I (1996-2008) | Eurovans-807 (2002-2014) | Eurovans-806 (1994-2002) | J5 (1981-1993) |
Cookies are used to ensure the correct display of pages on the site.