



Table of contents: Removal 🠇 Installation 🠇
Removal
Place the car on a lift.
Disconnect the battery.
Drain the coolant from the system.
Caution: Install plugs on the air manifold inlet.
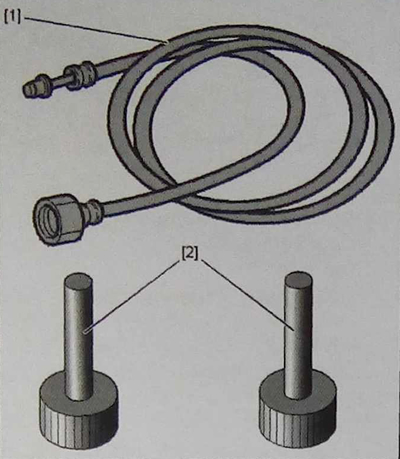
Auxiliary equipment:
1 - tube with tip for Schrader valve 0141-T1;
2 - set of plugs for quick-release connecting elements of pipeline 1520.
Release the vacuum system tube (in area "a") and the fuse box (6) from the clamps.
Remove the protection under the engine, the deflector (7), the air intake system resonator (8), and the air supply pipe (4).
Unscrew bolts (1) and (3).
Remove the air filter cover (2), the decorative battery cover (5) and the battery.
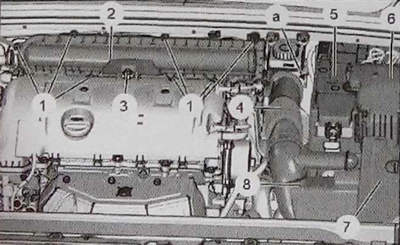
Release the electrical harnesses located near the battery tray from the clamps.
Remove the battery tray.
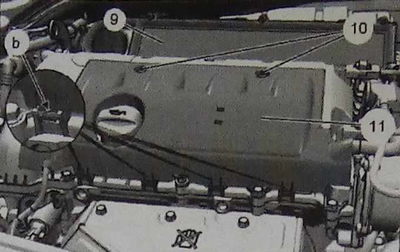
Remove the filter element (9) and detach the fasteners (10) from the engine cover (in area "b").
Remove the decorative engine cover (11).
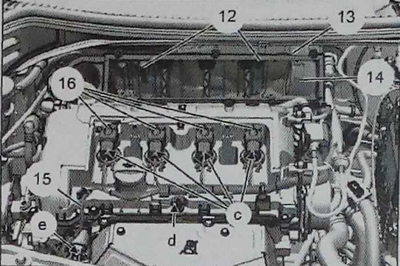
Loosen the bolts (12) and remove the intermediate support (13) and the air filter housing (14).
Disconnect the power supply harness (in area "d"), the connector (in area "e") and the ignition coil power supply harness (in area "c").
Unfasten and move aside the electrical wiring harness (15).
Remove the coils (16) and spark plugs.
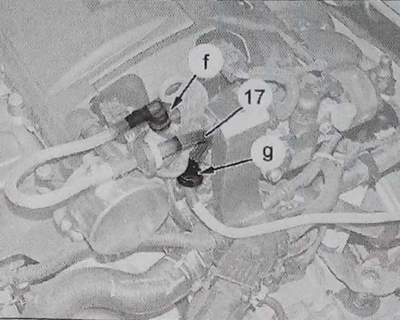
Release the vacuum system tube from the clamps (in zone "g").
Disconnect and move aside the vacuum system tube (17) (in area "f").
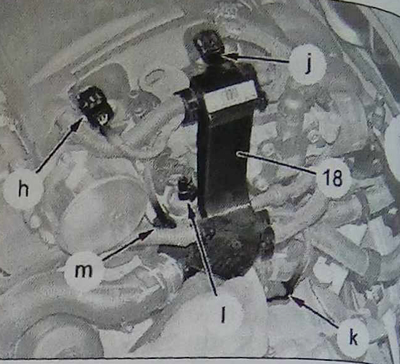
Disconnect the following components:
- electrical connector of the exhaust camshaft position sensor (in the "h" zone);
- electrical connector for intake camshaft position sensor (in area "j");
- power supply connector for the controlled thermostat in zone "k");
- coolant temperature sensor connector (in zone "l");
- oil pressure sensor connector (in the "m" zone).
Lift and move aside the engine wiring harness pipe (18) (in the direction of the arrow).
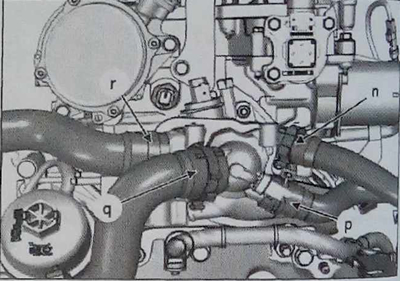
Disconnect the following components:
- cooling system hose (heat exchanger inlet) (in zone "n");
- cooling system hose (heat exchanger outlet) (in the "r" zone);
- cooling system hose (radiator outlet) (in the "q" zone);
- cooling system hose (radiator inlet) (in the "r" zone).
Source of the article is posted at peugeotbook.ru
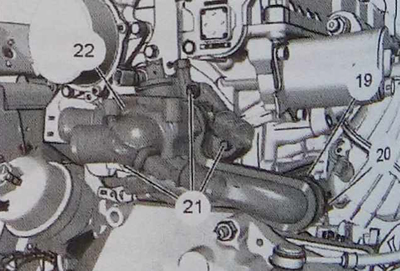
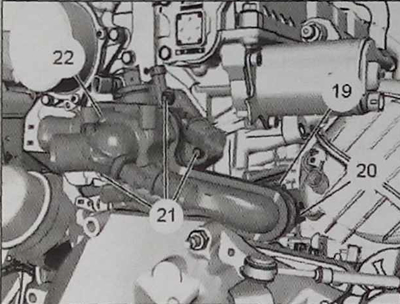
Remove the fastener (19) of the coolant outlet block pipe/intermediate pipe.
Loosen the bolts (21).
Disconnect and remove the coolant manifold (22) from the intermediate pipe (20).
Caution: Release the fuel pressure by connecting the end of the tool (1) to the SHRADER valve. Collect the leaking fuel in a container (tool connection in area "s").
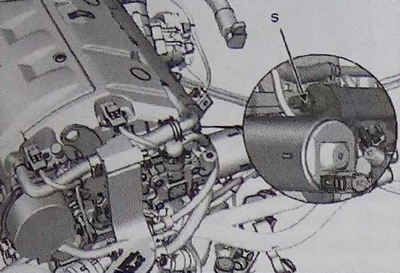
Remove the following components:
- fuel injectors;
- air intake distributor
- catalytic converter manifold of the exhaust system;
- timing chain.
Raise the engine using the lifting eye (23).
Place a wooden block under the oil pan.
Remove the oil dipstick (25).
Loosen bolts (24) and (26) and remove engine mounts (27) and (28).
Release the fuel pipes from the clamps (in the "t" and "u" zones).
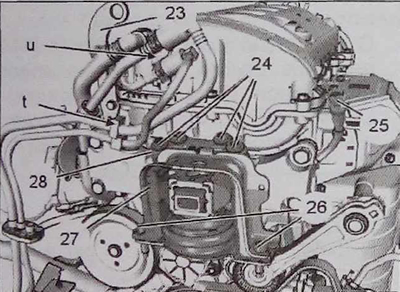
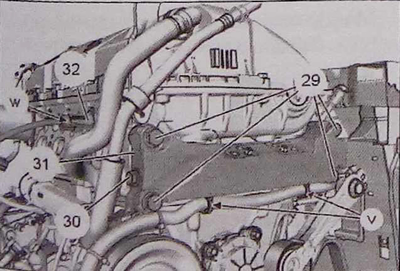
Unscrew bolts (29) and (30).
Release the power supply wire harness from the clamps (in the "v" area).
Remove the right intermediate engine mount (31).
Disconnect the power supply connector (solenoid valve) (32) (in zone "w").
Caution: Do not disassemble or repair the units (33). Any damage or malfunction of these parts will result in the replacement of the head assembly.
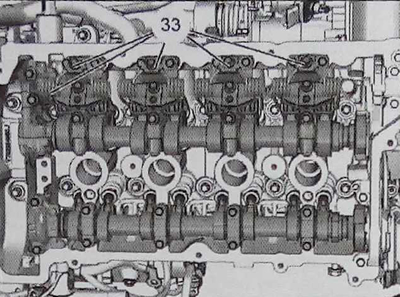
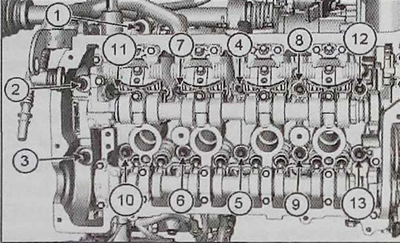
First, remove the cylinder head bolts (in sequence from 1 to 3), then unscrew the remaining bolts in sequence from 4 to 13. Remove the cylinder head and gasket.
Installation
Clean the mating surfaces of the head and gasket (do not use cutting or abrasive tools and devices).
Attention: The surfaces to be joined must not have any signs of impact or cracks.
Replace sealing gaskets regularly.
Check the flatness of the cylinder head surface (±0.05 maximum).
Install the head with the camshafts and crankshaft in the locked position with the locking devices inserted in place (see chapter "Adjusting the gas distribution mechanism").
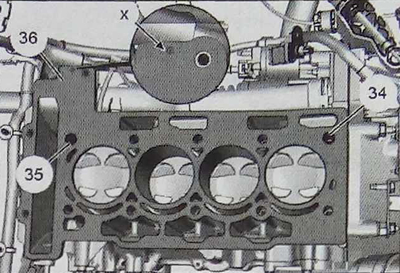
Make sure that the centering bushings (34) and (35) are present.
Install a new gasket (36) (engine mark in the "x" area) and the cylinder head.
Caution: When installing the cylinder head, use new bolts and washers.
Install the cylinder head mounting bolts in place, having previously lubricated their threads with the compound "MOLYKOTE G RAPID PLUS E3".
Replace and tighten the cylinder head bolts (in the reverse order of unscrewing).
Disconnect the power supply connector of the solenoid valve (32) (in the "w" zone).
Install the right intermediate engine support (31) into place.
Secure the power supply wiring harness (in the "V" area).
Replace bolts (29) and (30).
Install the timing chain, exhaust catalytic converter manifold and intake air distributor.
Install the fuel injectors.
Secure the fuel pipes (in areas "t" and "u").
Install the engine mounts (27) and (28), bolts (24) and (26) and the oil dipstick (25).
Raise the engine using the lifting eye (23).
Remove the insert under the engine oil pan.
Install the following parts in place:
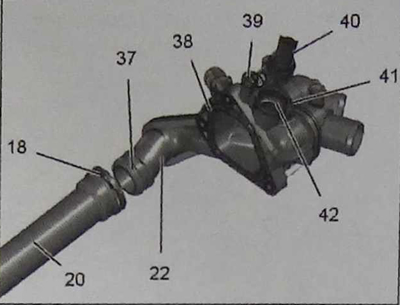
- sealing gaskets (37, 38) on the coolant outlet housing (22);
- bleeder bolt (39);
- sealing gasket (42);
- coolant temperature sensor (40);
- retainer (41).
Install the coolant outlet block (22) and connect the intermediate hose (20).
Install the coolant outlet block pipe/intermediate pipe bracket (19).
Tighten the fasteners (21) to a torque of 8 Nm.
Connect the cooling system hoses.
Install the remaining parts in reverse order.
Connect the battery.
Fill and bleed the engine cooling system.