



Note: To correctly adjust the timing belt tension, Peugeot/Citroen recommends the use of a special electronic tool (sEEM C.TRONIC belt tension measuring tool, type 105). The following procedure is based on the use of this equipment (or suitable alternative equipment calibrated to measure belt tension in SEEM units).
Accurate timing belt tensioning is very important and if electronic equipment is not available, it is recommended that this work be carried out by a Peugeot/Citroen dealer or a workshop equipped with the appropriate equipment.
General information
1. The timing belt drives the camshaft, high pressure fuel pump and coolant pump from a toothed pulley on the right end of the crankshaft. In addition, the belt drives the brake system's vacuum pump, but not directly, but from the camshaft on the flywheel side. If the belt breaks or slips during operation, the pistons can come into contact with the valve heads, causing extensive damage that can lead to costly repairs.
2. The timing belt should be replaced at the prescribed intervals or sooner if it is contaminated with oil or makes noise during operation (squealing/creaking noise due to uneven wear).
3. If the timing belt is removed, it is recommended to simultaneously check the condition of the coolant pump (check for signs of coolant leakage). This will help avoid having to remove the belt at a later stage if the coolant pump fails.
Removal
4. Remove the upper, intermediate and lower timing belt covers as described in paragraph 6.
5. Align the engine/camshaft timing assembly mounting holes as described in paragraph 3, and lock the camshaft timing pulley hub, high pressure fuel pump hub and flywheel. Do not attempt to crank the engine with the locking rods installed.
6. Loosen the three bolts securing the camshaft timing pulley to the timing pulley hub (figure 7.6).
Text taken from the website [PeugeotBook.ru]
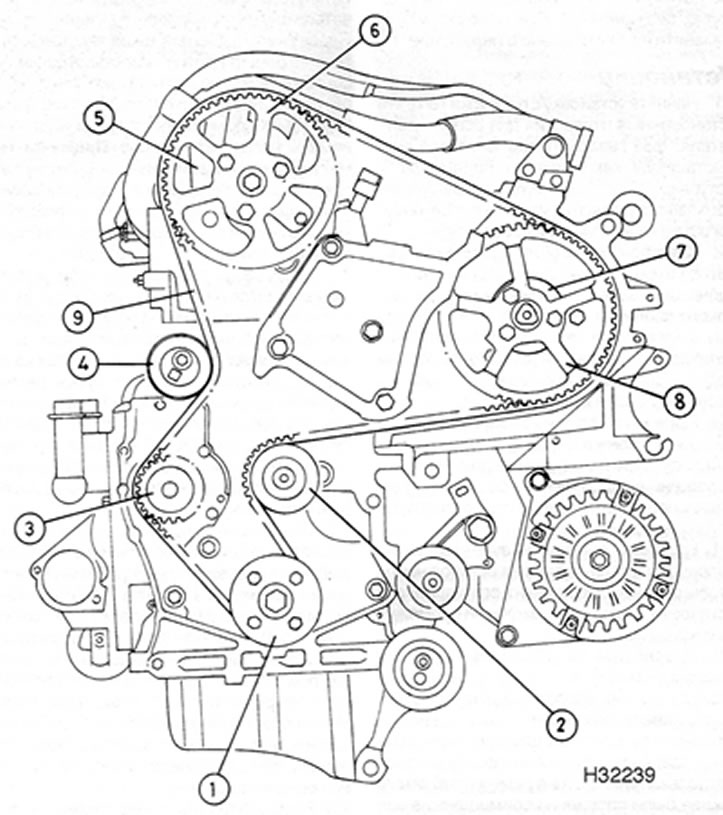
Figure 7.6. Timing belt, toothed pulley and tensioner (1.9 L engines)
1. Crankshaft toothed pulley
2. Intermediate pulley
3. Coolant pump toothed pulley
4. Tension pulley
5. Hub of the camshaft toothed pulley
6. Timing pulley of the camshaft
7. High pressure fuel pump toothed pulley hub
8. Toothed pulley of the high-pressure fuel pump
9. Timing belt
7. Similarly, loosen the three bolts securing the high-pressure fuel pump toothed pulley to the pump hub.
8. Loosen the timing belt tensioner pulley mounting bolt. Turn the pulley clockwise using a square wrench inserted into the hole in the pulley hub, then retighten the bolt.
Tip: If you're having trouble finding the right square tool to fit into the tensioner pulley, purchase an 8mm square rod from a hardware store, cut to the required length (A). Insert the rod into the pulley hub and rotate the pulley using an 8mm wrench (B).
9. If the timing belt is to be used further, mark the direction of rotation on the belt with white paint or a marker (if the standard markings are not visible). Remove the belt from the timing pulleys. Please note that you should not turn the crankshaft with the belt removed.
10. Carefully inspect the timing belt for signs of uneven wear, delamination or oil contamination. Pay special attention to the gullets of the teeth. Replace the belt if you have even the slightest doubt about its condition. If the engine undergoes a major overhaul, the belt must be replaced, regardless of its external condition. The cost of a new belt is incomparable to the cost of engine repair if the belt breaks. If signs of oil contamination are detected, locate the leak and correct the cause of the leak. Wash the engine in the timing belt area, as well as all related components, until all traces of oil are removed. Make sure the tensioner and pulleys rotate freely without binding. If necessary, replace them as described in paragraph 9.
Installation
11. Begin installation by checking that the engine assembly/camshaft timing alignment holes are still aligned as described in paragraph 3, and the hub of the camshaft toothed pulley, the hub of the high-pressure fuel pump and the flywheel are locked.
12. Lightly tighten the camshaft timing pulley and high pressure fuel pump timing pulley mounting bolts just enough so that the timing pulleys can still move within their respective elongated slots. Turn both toothed pulleys clockwise until the end of the grooves.
13. Bring the timing belt to its normal position, with the arrows on the belt facing the direction of belt rotation (clockwise when viewed from the right end of the engine).
14. Place the belt on the crankshaft timing pulley, being careful not to twist it sharply during installation, and place the belt on the idler pulley.
15. Make sure the front section of the belt is taut, then position the belt against the high pressure fuel pump sprocket. Rotate the timing pulley counterclockwise on the corresponding hub until the teeth of the belt and timing pulley are properly aligned, then place the belt on the timing pulley. Note: Do not turn the timing pulley counterclockwise more than necessary, and never turn it more than one tooth on the timing pulley.
16. Once the belt is correctly positioned on the fuel injection pump sprocket, ensure that the "front" and "top" sections are tensioned, then align the belt with the camshaft sprocket. Rotate the camshaft timing pulley counterclockwise on the corresponding hub until the teeth of the belt and timing gear are properly aligned, then place the belt on the timing pulley. Note: Do not turn the timing pulley counterclockwise more than necessary, and never turn it more than one tooth on the timing pulley.
17. Make sure that all the slack in the belt is on the side where the tensioner pulley is located, then place the belt on the coolant pump sprocket and behind the tensioner pulley.
18. Make sure the belt teeth are centered on the timing pulleys and loosen the tensioner pulley mounting bolt. Turn the pulley counterclockwise to completely remove any slack from the timing belt, then retighten the bolt.
19. Unscrew one of the bolts securing the toothed pulleys of the high-pressure fuel pump and the camshaft and make sure that the toothed pulleys are positioned against the stop in the grooves for the bolts (figure 7.19). If pulled out, the timing pulleys were turned more than one tooth when installing the belt. Remove the timing belt and repeat the installation procedure. If the timing belt pulleys are positioned correctly, tension the timing belt as described below.
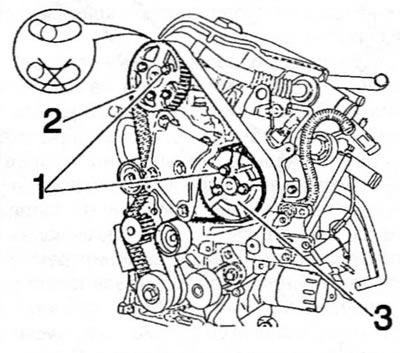
Figure 7.19. Unscrew one of the bolts (1) on the toothed pulleys of the camshaft (2) and the high-pressure fuel pump (3) and make sure that the toothed pulleys do not reach the stop in the corresponding grooves (see footnote) (1.9 L engines)
20. Position the electronic belt tension measuring equipment's sensor head against the upper portion of the timing belt, approximately midway between the high-pressure fuel pump and camshaft sprockets.
21. Turn the tensioner pulley counterclockwise until the measuring equipment displays an initial tension of 106±2 SEEM units. Hold the tensioner pulley in this position and retighten the bolt.
22. Make sure that the toothed pulleys have not been turned so far that the bolts reach the edge of the slots. If so, please repeat the installation procedure. If everything is normal, tighten the camshaft and high-pressure fuel pump toothed pulley mounting bolts to the specified torque.
23. Remove the belt tension measuring equipment and the tools for locking the crankshaft, camshaft timing pulley hub and high pressure fuel pump hub.
24. Turn the crankshaft 8 full turns clockwise (when viewed from the right end of the engine). Re-align the engine/camshaft assembly alignment holes and insert the crankshaft, camshaft and fuel injection pump locking tools.
25. Loosen the camshaft and high pressure fuel pump sprocket mounting bolts, tighten them by hand, and then loosen them all by one sixth of a turn.
26. Loosen the tension pulley mounting bolt again. Place the belt tension measuring equipment at the top of the belt and rotate the idler pulley to achieve a final setting of 42±2 SEEM. Hold the idler pulley in this position and tighten the bolt to the specified torque.
27. Tighten all toothed pulley mounting bolts to the specified torque.
28. Move the belt tension measuring equipment's sensor head back toward the belt and then back toward the belt, ensuring the reading is in the range of 38–46 SEEM units. Remove the measuring equipment.
29. Remove the locking tools, then rotate the crankshaft two more full turns clockwise. Re-align the engine/camshaft assembly alignment holes and insert the crankshaft locking tool.
30. Make sure that the tools for locking the camshaft timing pulley hub and the high pressure fuel pump hub can be inserted. If the tools cannot be inserted, ensure that the offset between the mounting holes in the toothed pulley hubs and the corresponding holes in the cylinder head and high-pressure fuel pump does not exceed 1.0 mm. If it does, repeat the entire timing belt installation and tensioning procedure.
31. Install the lower, intermediate and upper timing belt covers as described in paragraph 6.
32. Install the crankshaft pulley as described in paragraph 5.