



Removal
1. Disconnect the ground cable from the battery (see "Disconnecting the battery").
2. Align the engine/camshaft timing assembly mounting holes as described in paragraph 3, and lock the toothed pulley hub and flywheel.
Warning. Do not attempt to crank the engine with the locking rods installed.
3. Remove the timing belt as described in paragraph 7 or 8 (whichever is applicable), and then proceed as described under the appropriate subheading.
Timing pulley of the camshaft
4. As a safety precaution, remove the flywheel locking tool and then turn the crankshaft in the reverse direction (counterclockwise) 90°. This will bring the pistons to the mid-stroke position and eliminate the possibility of the valves hitting the pistons during subsequent operations.
5. Loosen the toothed pulley hub mounting bolt and the three toothed pulley to hub mounting bolts (if applicable). To prevent the camshaft from turning when the bolt is loosened, you will need to hold the timing pulley. If you don't have a special Peugeot/Citroen tool, you can make an acceptable replacement yourself. Do not attempt to use a tool inserted into the engine/timing assembly mounting hole to prevent the timing pulley from turning when the bolt is loosened.
6. Remove the timing pulley hub mounting bolt and remove the timing pulley and hub from the end of the camshaft. If the woodruff key is not secured, remove it and store it in a safe place. Inspect the camshaft oil seal for signs of oil leakage and replace it if necessary as described in paragraph 10.
7. If necessary, on engines with a two-piece toothed pulley, the pulley can be separated from the hub after removing these three bolts.
Toothed pulley of the high-pressure fuel pump (1.9 L engines)
8. Remove the three bolts and the toothed pulley from the corresponding hub; the hub is an integral part of the high-pressure fuel pump.
Toothed pulley of the high-pressure fuel pump (2.0 L engines)
9. Loosen the toothed pulley mounting nut while holding the toothed pulley from turning using a holding tool (see item 5).
10. The toothed pulley should then be removed from the high pressure fuel pump shaft using a puller. If a proper Peugeot/Citroen puller or suitable replacement is not available, an alternative can be made from a short steel plate.
11. Loosen the toothed pulley nut, and then secure the steel plate to the toothed pulley by screwing two M7 bolts into the provided threaded holes. Tighten the bolts evenly until the plate contacts the nut, then loosen the sprocket nut to remove the sprocket from the pump shaft. Once the toothed pulley is released, unscrew the bolts and remove the plate, then unscrew the nut and remove the toothed pulley (Figure 9.11, a-c).
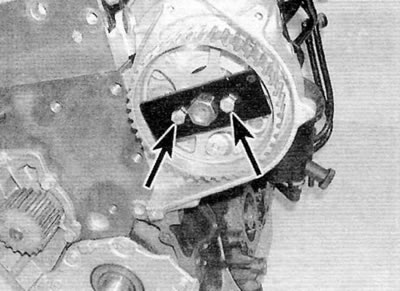
Figure 9.11, a. Place the plate on the toothed pulley nut and screw in two bolts (marked with arrows) (2.0 L engines)
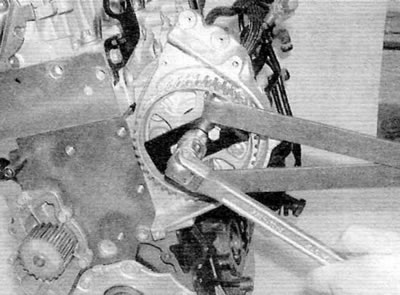
Figure 9.11, b. After installing the puller, hold the toothed pulley, and then unscrew the toothed pulley mounting nut to separate the pulley from the pump shaft (2.0 L engines)
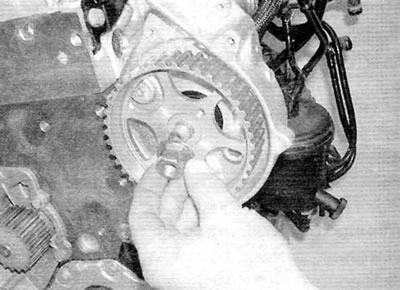
Figure 9.11, c. After releasing the toothed pulley, remove the puller, then unscrew the nut and remove the toothed pulley (2.0 L engines)
Crankshaft toothed pulley (1.9 L engines)
12. As a safety precaution, remove the flywheel locking tool and then turn the crankshaft in the reverse direction (counterclockwise) 90°. This will bring the pistons to the mid-stroke position and eliminate the possibility of the valves hitting the pistons during subsequent operations.
13. Loosen the crankshaft toothed pulley mounting bolt. To prevent the crankshaft from turning, select a high gear and have an assistant fully depress the brake pedal. Alternatively, the flywheel ring gear can be blocked using a suitable tool made from a steel strip.
14. Unscrew the bolt and remove it together with the corresponding washer, then remove the toothed pulley from the end of the crankshaft. If the woodruff key is not secured to the crankshaft, remove it and store it in a safe place along with the timing pulley. Inspect the crankshaft oil seal for signs of oil leakage and replace if necessary as described in paragraph 17.
Crankshaft toothed pulley (2.0 L engines)
15. Remove the toothed pulley from the end of the crankshaft. If the woodruff key is not secured to the crankshaft, remove it and store it in a safe place along with the timing pulley (figure 9.15, a, b). Inspect the crankshaft oil seal for signs of oil leakage and replace if necessary as described in paragraph 17.
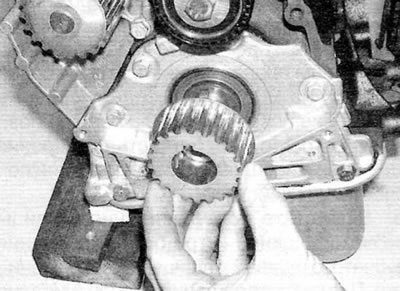
Figure 9.15, a. Remove the toothed pulley from the crankshaft...
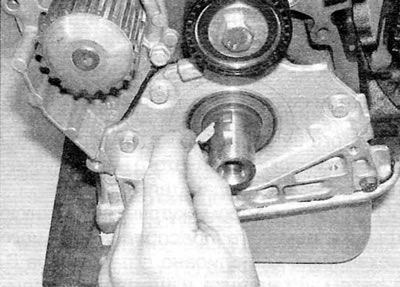
Figure 9.15, b....then remove the woodruff key (2.0 L engines)
Coolant pump toothed pulley
16. The coolant pump toothed pulley is integrated with the pump and cannot be removed from it. Remove the coolant pump as described in chapter 3.
Tension pulley
17. Unscrew the bolt and remove the pulley from the support stud. Inspect the support stud for signs of damage and replace it if necessary.
Intermediate pulley
18. Unscrew the bolt and remove the intermediate pulley from the cylinder block (figure 9.18).
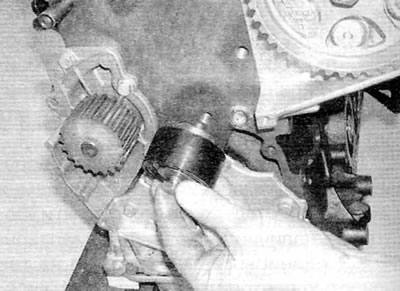
Figure 9.18. Unscrew the bolt and remove the intermediate pulley from the cylinder block
Inspection
19. Thoroughly clean the timing pulleys and replace any that show signs of wear, damage or cracks.
20. Clean the tensioner pulley and idler pulley, but do not use strong solvents that may penetrate the pulley bearings. Make sure that the pulleys rotate freely relative to their respective hubs, without any signs of binding or play. Replace the pulley if there is any doubt about its condition or if there are obvious signs of wear or damage.
21. Inspect the timing belt (see paragrapharagraph 7 or 8). Replace the belt if you have any doubts about its condition.
Installation
Timing pulley of the camshaft
22. On engines with a two-section pulley, install the toothed pulley onto the hub (if it was removed) and secure it with three bolts, tightening them at this stage only by hand force.
23. Install the woodruff key onto the end of the camshaft, then install the camshaft timing pulley and corresponding hub.
24. Screw in the toothed pulley hub mounting bolt (don't forget to install the corresponding washer). Tighten the bolt to the specified torque while holding the camshaft from turning as you did when removing it.
25. Align the mounting hole in the hub with the mating hole in the cylinder head and insert the locking tool. Turn the crankshaft 90° clockwise and lock the flywheel with a locking tool.
26. Install the timing belt (see paragraph 7 or 8).
Toothed pulley of the high-pressure fuel pump (1.9 L engines)
27. Install the toothed pulley onto the hub and lightly tighten the corresponding bolts.
28. Install the timing belt (see paragraph 7).
Toothed pulley of the high-pressure fuel pump (2.0 L engines)
29. Clean and dry the conical surfaces of the pump shaft and toothed pulley and install the toothed pulley on the pump. Install the timing pulley retaining nut and tighten it to the specified torque, using a holding tool to prevent it from turning.
30. Install the timing belt (see paragraph 8).
Crankshaft toothed pulley (1.9 L engines)
31. Install the woodruff key onto the end of the crankshaft (if removed).
32. Align the groove in the crankshaft pulley with the woodruff key and place it onto the end of the crankshaft.
33. Remove all traces of locking compound from the threads of the pulley and crankshaft mounting bolt. Apply a locking compound (peugeot/Citroen recommends using Loctite Frenetanch) onto the bolt threads and then screw the bolt in (don't forget to install the washer) into the crankshaft.
34. Tighten the bolt to the specified torque as per step 1, while preventing the crankshaft from turning as during removal.
35. Using a socket head and extension, tighten the pulley mounting bolts to the specified angle as per step 2. To ensure accuracy at this stage of tightening, it is recommended to use a protractor.
36. Turn the crankshaft 90° clockwise and lock the flywheel with a locking tool.
37. Install the timing belt (see paragraph 7).
Crankshaft toothed pulley (2.0 L engines)
38. Install the woodruff key onto the end of the crankshaft if removed.
39. Align the groove in the crankshaft pulley with the woodruff key and slide the pulley onto the end of the crankshaft.
40. Install the timing belt (see paragraph 8).
(Information copied from the resource Peugeotbook.ru)
Tension pulley
41. Install the tension pulley onto the support stud and screw in the corresponding bolt.
42. Install the timing belt (see paragraph 7 or 8).
Intermediate pulley
43. Install the intermediate pulley onto the cylinder block and tighten the corresponding mounting bolt to the specified torque.
44. Install the timing belt (see paragraph 7 or 8).