



Table of contents: Manifold Absolute Pressure Sensor…🠇 MAP sensor type 🠇 Influence of external factors 🠇 Checking the MAP sensor (general…🠇 Checking the operation of the MAP…🠇 Checking the MAP sensor using a…🠇 The output signal is unstable 🠇 There is no signal voltage 🠇 Signal voltage or supply voltage at…🠇
The main engine load sensor is the manifold absolute pressure sensor (see illustration 12.14). The vacuum hose connects the manifold absolute pressure sensor and the intake manifold. The pressure is converted by the electronic control unit into an electrical signal. The absolute air pressure in the intake manifold is calculated using the formula: atmospheric pressure minus the pressure in the intake manifold = absolute air pressure in the intake manifold (AP - MP = MAP).
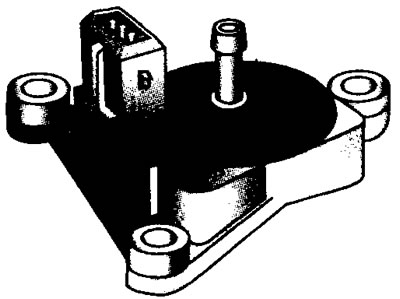
12.14 Manifold Absolute Pressure (MAP) Sensor
When the manifold vacuum is high (in idle mode), then the absolute air pressure in the manifold is very low, and the electronic control unit provides less fuel. When the manifold vacuum is low (the throttle is wide open), the manifold absolute pressure is high and the electronic control unit delivers more fuel.
The intake manifold on MPI models is a "dry" manifold. Because the fuel does not enter the manifold - the fuel injection occurs at the rear of the intake valve - fuel cannot enter the MAP sensor to contaminate the diaphragm, and a fuel trap is not used.
A 5-volt reference voltage is supplied via a wire to the sensor, the other end of which is connected to ground. A third wire is connected to a sensor that converts the intake manifold pressure signal into voltage. When the manifold pressure changes, the signal voltage is returned to the electronic control unit.
Manifold Absolute Pressure Sensor Voltage Values
Terminal numbers
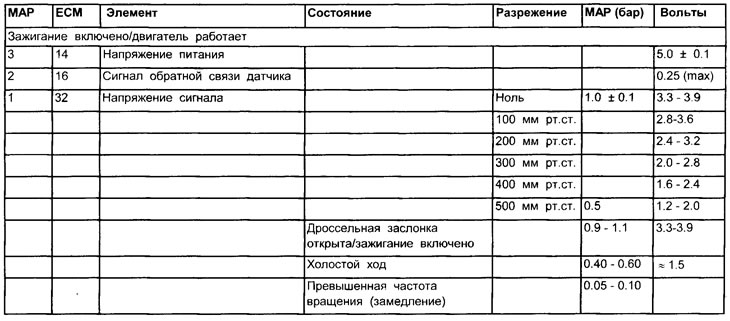
See illustration 12.11
MAP sensor type
Analog type (3-wire).
Influence of external factors
- Excess fuel in the fuel trap or vacuum hose
- Vacuum leak (intake manifold or other vacuum hoses)
- Vacuum leak in the manifold absolute pressure sensor hose
- The vacuum hose or connection is damaged
- The inlet or outlet valve is faulty
- Incorrect idle speed
- Incorrect ignition timing Defective spark plugs (large gaps)
Checking the MAP sensor (general check)
1. Inspect the manifold absolute air pressure sensor multi-pin connector for signs of corrosion or damage.
2. Make sure the connector terminal pins are properly installed and have good contact with the manifold absolute air pressure sensor multi-pin connector.
Checking the operation of the MAP sensor using an oscilloscope or voltmeter
1. Bend back the rubber insulation to the manifold absolute air pressure sensor multi-pin connector (where possible) or connect the output block (OB) between the ECU multi-pin connector and the ECU.
2. Connect the negative probe of the oscilloscope or voltmeter to ground at the engine or to the MAP sensor ground terminal #1.
3. Connect the positive probe of an oscilloscope or voltmeter to the signal wire terminal of the MAP sensor.
Checking the MAP sensor using a vacuum gauge
1. Disconnect the vacuum pipe from the manifold absolute pressure sensor.
2. Connect the vacuum pump to the sensor.
3. Turn on the ignition.
4. Compare the voltage at ignition with the value specified in the specifications.
5. Create a vacuum as indicated in the table and check the smoothness of the voltage change (see illustration 11.15).
6. If the voltage changes in steps, then see the subsection titled "Output signal is unstable"
7. Disconnect the vacuum pump and use a T-piece to connect the vacuum gauge to the intake manifold and the manifold absolute air pressure sensor.
8. Let the engine idle. If the engine vacuum is low, check:
- Vacuum leak.
- Vacuum tube clogged.
- An engine related fault, such as an incorrectly installed timing belt.
The output signal is unstable
1. An unstable output signal occurs when the output voltage changes stepwise, or drops to zero, or an open circuit occurs.
2. If the output signal is unstable, this usually indicates a faulty manifold absolute air pressure sensor.
3. Using the pump, create a vacuum of approximately 560 mmHg. The sensor diaphragm should hold the pressure for at least 30 seconds at this vacuum.
4. If there is no MAP sensor signal voltage, perform the following test titled "No Signal Voltage".
There is no signal voltage
1. Check the supply voltage (5 V).
2. Check for voltage at the ground terminal.
3. If the power cord and ground wire are in order, check the conductivity of the signal wire running between the intake manifold absolute air pressure sensor and the electronic control unit.
4. If there is no supply voltage and/or ground connection, check the electrical wiring between the intake manifold absolute air pressure sensor and the electronic control unit.
5. If the MAP sensor wiring is OK, check all power and ground contacts of the electronic control unit. If the contacts are OK, then the electronic control unit may be faulty.
Signal voltage or supply voltage at battery voltage level
Check for a short in the wire connected to the positive (+) battery terminal or the sensor supply circuit.