



The heating process consists of two phases:
- a) Warm-up. Its duration at a temperature of -25°C is 15 seconds, at -18°C - 10 seconds, at -10°C - 5 seconds, and at -1°C - 0.5 seconds;
- b) accompaniment. Its duration at a temperature of -25°C is 180 seconds.
The preheating system consists of a switching relay and glow plugs. The engine control unit performs an additional function of providing engine preheating depending on the coolant temperature via a switching relay, turning the power supply to the spark plugs on and off.
A defect in the engine preheating system is only noticeable at air temperatures below -10°C, because starting the engine is difficult. A malfunction of the engine preheating at a temperature above 0°C can be determined after starting the engine by the dark blue exhaust gas outlet.
It is impossible to check the control unit using the instruments available to the car owner. Only a workshop can do this. If the preheating system is suspected to be faulty, the car owner can only check the condition of the spark plugs and the power supply to them.
[Article based on material from the website Peugeotbook.ru]
1. Check the relevant fuses, including the on-board network fuse, and replace the blown one.
2. Check the voltage supply to the spark plugs if the fuse is normal.
3. Remove the tip of the power wire of one of the spark plugs and connect one wire of the tester with a control diode lamp to the removed power wire of the spark plug, and the second wire to the ground (-).
Caution: Before connecting the tester, disconnect the coolant temperature sensor plug to simulate a cold engine.
4. Turn the ignition key to the "Glow" position. The tester's LED should light and remain lit for approximately 10-15 seconds. This indicates that power to the glow plugs and glow duration control are normal. If the tester's LED does not light, the fuse has blown or the relay is faulty. If the warm-up time parameters are violated, the cause is a malfunction of the control unit.
5. Check the relay.
To check the glow plug itself, it must be removed.
Glow plugs - removal and installation
Removal
6. Remove the engine protective cover and the cover above the battery.
7. Disconnect the ground (-) wire terminal from the battery, as well as the 2-pin connector of the mass air flow sensor on the air filter pipe (see illustration).
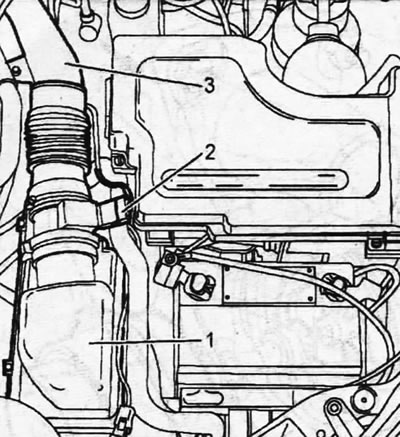
5.7. Disconnect plug 2 of the mass air flow sensor on the air filter pipe
8. Remove the air filter 1 together with the supply air duct 3, disconnecting it from the intake manifold (see illustration 5.7).
9. Unscrew bolts 4, 7 and 8, unscrew nut 5, and also release hose 9 (see illustration).
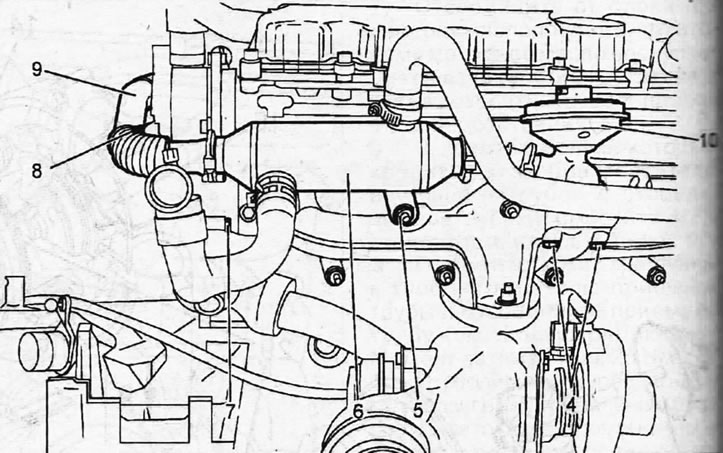
5.9. Unscrew bolts 4, 7 and 8, unscrew nut 5, and also release hose 9
10. Move aside the radiator 6 for cooling the supercharged air together with the pipeline 9 and the mechanical valve 10 of the exhaust gas recirculation system (see illustration 5.9).
Attention! The sealing gasket of the mechanical valve 10 of the exhaust gas recirculation system must be replaced with a new one.
Caution: Since the glow plugs are located on the rear of the engine near the firewall, it is recommended to use a mirror when performing the following steps.
11. Unscrew the four nuts 13 and disconnect the wires 11 from the glow plugs (see illustration).
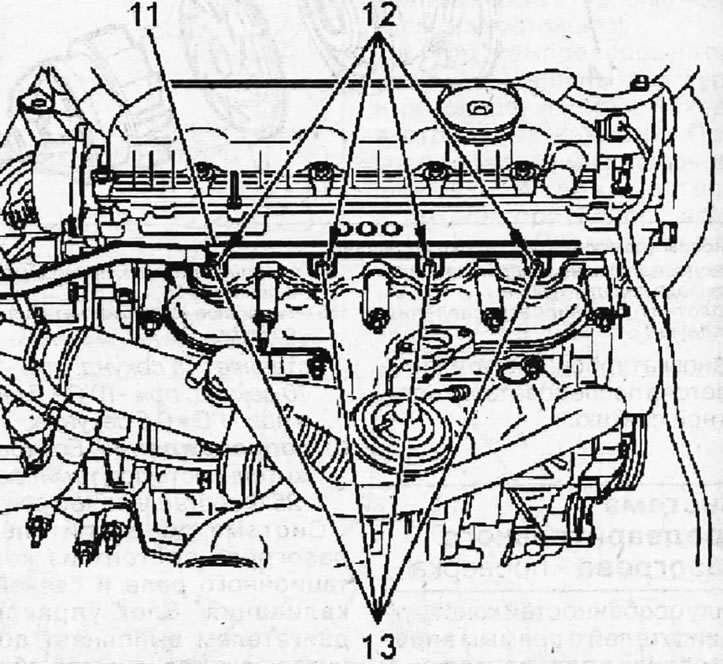
5.11. Unscrew the four nuts 13 and disconnect the wires 11 from the glow plugs
12. Unscrew all glow plugs and place them on a fireproof pad (see illustration 5.11)
13. Connect spark plugs 6 using auxiliary wires with a cross-section of at least 2.5 mm directly to the battery. Observe the spark plugs to determine which one is not working or is glowing weakly.
14. Replace all spark plugs, even if only one is faulty.
Installation of glow plugs is performed in the reverse order of removal.