
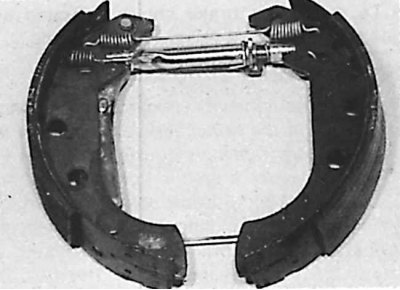
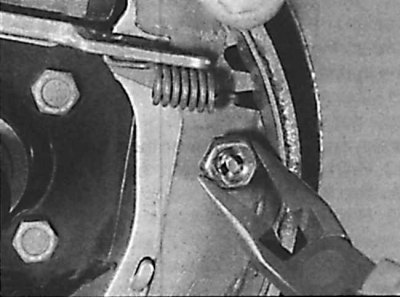
Rear view of an early type assembly of brake pads of the Bendix type
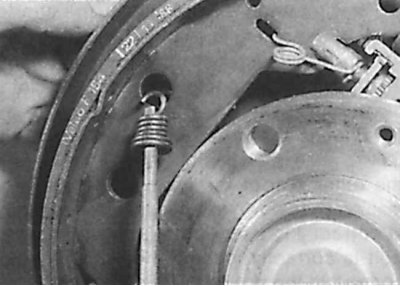
Front view of an early assembly of Bendix type brake pads
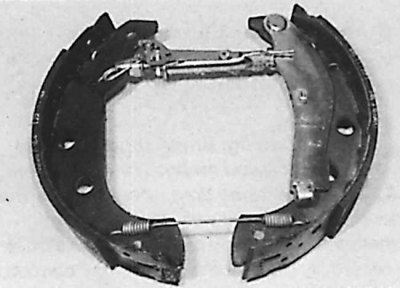
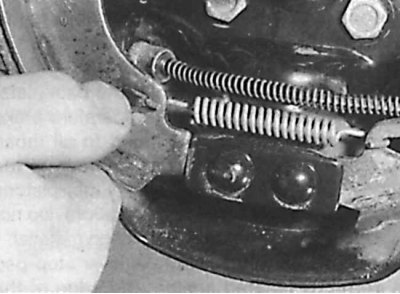
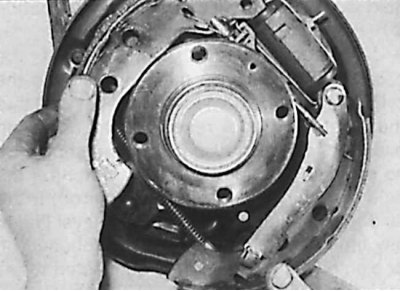
Late type brake pads brake type Bendix mounted on the brake shield
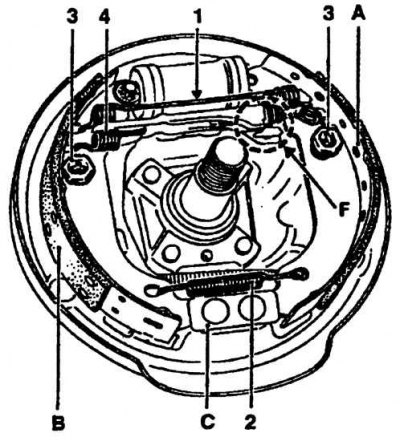
A - front brake shoe, B - rear brake shoe, C - lower shoe pivot point, F - governor rack mechanism
1 - upper return spring, 2 - lower return spring, 3 - mounting pin, spring and head, 4 - spring
Attention! It is imperative to replace all the pads on one axle of the vehicle, even if one pad has reached the wear limit.
Warning! Brake pads generate brake dust, which contains asbestos, which is harmful to health. Therefore, when cleaning the brake pads, do not use compressed air or inhale dust.
All models
1. Raise the car and remove the rear wheel.
2. Unscrew the drum fastening bolt and remove it.
3. Using care, remove brake pad wear dust from the brake drum, brake shield and pads.
4. Measure the thickness of the brake pads at several points, and if the pads at any point are worn to the minimum allowable limit or contaminated with oil, replace the brake pads.
Brakes
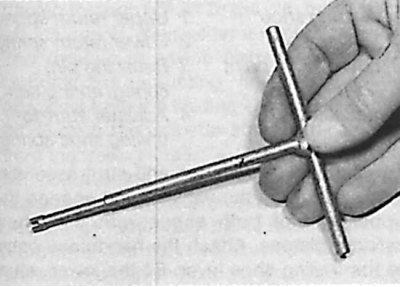
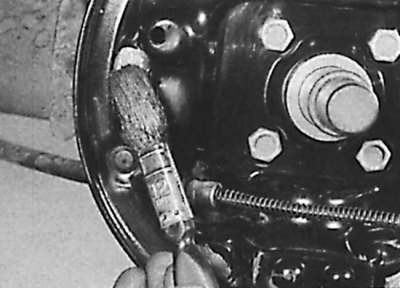
1. On early models, disconnect the shoe retainer springs from the drum brake shield using a tool like the one shown in the photo. The tool can be made by yourself using a notched screwdriver.
2. Push the special tool into the center of the spring and unhook the spring hook from the brake shield.
3. On later models, using pliers, remove the pad spring retainer heads by pressing and turning them 90°.
4. After removing the heads, raise the springs and remove the retainer pins.
5. Using a lever, remove the brake pads from their lower holder on the brake disc.
6. Remove the lower return spring.
7. Press both pads off the wheel brake cylinder and remove them. Do not damage the anthers while doing this.
8. Disconnect the handbrake cable from the brake shoe. To prevent the pistons from falling out of the working brake cylinder, secure the pistons with a suitable rubber band or wire.
9. Mark the location of the parts of the brake pad adjuster, remove the handbrake lever and disconnect the fixing spring of the adjuster bolt from the front (by location) brake pad.
10. Disconnect the upper return spring, separate the front brake shoe and return spring from the rear brake shoe.
11. Disconnect the spring securing the adjuster to the rear brake shoe.
12. Replace all return springs regardless of their condition.
13. Install the handbrake lever onto the new brake shoe and secure it with the new mounting bracket.
14. Remove the adjuster bolt from the strut, and carefully examine the strut for wear and damage.
Attention! Left and right uprights are not interchangeable and are marked "G" And "D" respectively. The strut adjuster bolts are also not interchangeable; The left strut bolt has a left hand thread and the right bolt has a right hand thread.
15. Place the regulator correctly.
16. Verify that all items at the end of the strut are properly seated, then apply high melting point grease to the threads of the adjuster bolt.
17. Screw the adjuster wheel onto the bolt so that there is a slight gap between the ring and the bolt head, and install the bolt in the rack.
18. Install the return spring on the rear (by location) brake shoe in such a way that the shorter hook of the spring connects to the shoe.
19. Install the adjusting bar to the end of the spring.
20. Insert the adjusting bar into the groove in the rear brake shoe.
21. Install the upper return spring to the rear brake shoe.
22. Install the second end of the spring on the front brake shoe and, moving, position the front shoe so that the head of the adjusting bolt is located in the groove.
23. After that, insert the retaining spring hook into the groove on the front brake shoe.
24. Raise the rubber protective boots of the brake cylinder and check the working brake cylinder for brake fluid leaks.
25. Clean rear brake parts.
26. Apply a lubricant with a high melting point to the contact points of the brake pads with the brake shield.
27. Check that the handbrake lever is located against the edge of the rear brake shoe and remove the rubber band that secures the pistons in the brake cylinder.
28. Stretch the brake shoes and install their upper ends on the piston of the working brake cylinder.
29. Connect the handbrake cable to the handbrake lever located on the rear brake shoe.
30. Install the lower return spring on both brake shoes and install the bottom of the brake shoes on the shoe support.
31. By moving the brake pads, center them in relation to the brake shield.
32. Install the pad retainer pins, springs and spring mounting heads.
33. Using a screwdriver, turn the adjusting bar wheel so that the brake pads are unclenched until they touch the brake drum.
34. Install the brake drum.
35. Replace the brake pads on the second rear wheel.
36. After replacing the brake pads, adjust the gap between them and the brake drum, for which press the brake pedal several times. When the pedal is pressed, during normal operation of the adjusting bar, clicks should be heard, emitted by the adjusting bar.
37. Check and, if necessary, adjust the handbrake.
38. Check the brake fluid level in the system.
Brakes Girling
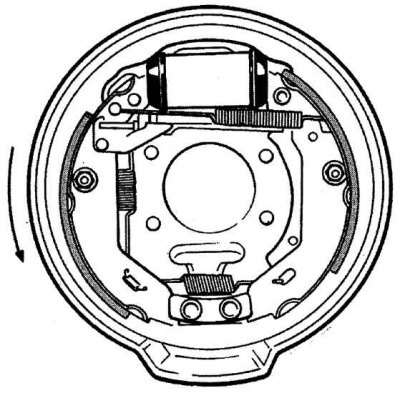
1. Mark the location of the springs and the regulator strut, for re-assembly (the arrow indicates the direction of rotation of the wheel).
2. Disconnect the upper and lower return springs and remove them from the brake pads.
3. Using pliers, remove the front brake shoe spring retainer heads by pressing and turning them 90°.
4. After removing the heads, raise the springs, remove the retainer pins and remove the block from the brake shield.
5. Disconnect the adjustment lever spring and remove it from the front brake shoe.
6. Disconnect the adjuster strut, and remove it from the rear brake shoe.
7. Using pliers, remove the rear brake pad spring retainer heads by pressing and turning them 90°.
8. After removing the heads, raise the springs, remove the retainer pins, then disconnect the handbrake cable and remove the shoe from the car.
9. Install the handbrake lever onto the new brake shoe and secure it with the new mounting bracket.
10. Replace all return springs regardless of their condition.
11. Remove the fork end from the adjuster post and examine the assembly for wear or damage.
Attention! Left and right struts are not interchangeable. The strut adjuster bolts are also not interchangeable; The left strut bolt has a left hand thread and the right bolt has a right hand thread.
12. Raise the rubber protective boots of the brake cylinder and check the working brake cylinder for brake fluid leaks.
13. Clean rear brake parts.
14. Apply a lubricant with a high melting point to the contact points of the brake pads with the brake shield.
15. Check that the handbrake lever is located against the edge of the rear brake shoe and remove the rubber band that secures the pistons in the brake cylinder.
16. Install the upper end of the rear brake shoe in the piston of the working brake cylinder, then install the retainer pin, spring and fix the head.
17. Connect the handbrake cable to the lever.
18. Screw the adjuster wheel onto the bolt so that there is a slight gap between the ring and the head of the bolt, install the bolt in the strut and install the strut in place in the rear brake shoe.
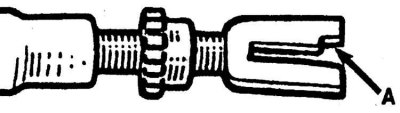
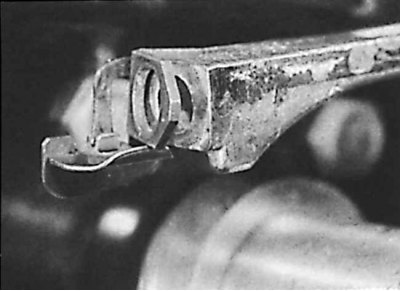
19. Turn the adjuster to set the end of the fork so that the fuse of the fork (A) aligned with the front brake shoe adjustment lever after the shoe was installed.
20. Install the spring on the front brake shoe adjuster lever so that the shorter spring hook engages with the lever.
21. Install the front brake shoe assembly on the brake shield so that it aligns with the adjuster post fork and that the fuse fork engages with the adjuster lever.
22. Check that the upper end of the shoe is located in the piston of the working brake cylinder, then secure the shoe with the retainer pin, spring and head.
23. Install the upper and lower return springs, and by moving the brake shoes, center them in relation to the brake shield.
24. Using a screwdriver, turn the adjusting bar wheel so that the brake pads are unclenched until they touch the brake drum.
25. Install the brake drum.
26. Replace the brake pads on the second rear wheel.
27. After replacing the brake pads, adjust the gap between them and the brake drum, for which press the brake pedal several times. When the pedal is pressed, during normal operation of the adjusting bar, clicks should be heard, emitted by the adjusting bar.
28. Check and, if necessary, adjust the handbrake.
29. Check the brake fluid level in the system.