
English Русский
Български
Беларускі
Український
Српски
Hrvatski
Română
Polski
Slovenský
Magyar
Bookmark Articles Sitemap Contacts
Company Hyundai Company Opel Company Skoda Company Kia Company Mitsubishi Company LADA Company Audi
PeugeotBook.ru


Series 100   Series 200   Series 300   400-500   Series 600   Crossovers   Others
 
Partner I (1996-2008) Peugeot 807 (2002-2014) Peugeot 806 (1994-2002) Peugeot J5 (1981-1993)

Gearbox — removal (Peugeot Eurovans 806)

  • Main
  • Пежо
  • Peugeot 806 (1994-2002)
  • Transmission
  • Mechanical gearbox
  • Gearbox — removal
0
The gearbox can be removed without removing the power unit from the vehicle if, for example, the need to remove the gearbox is caused by replacing the clutch or clutch disc. To carry out the work, you will need a mobile garage jack, which will need to be placed under the engine. The power unit itself will need to be released from the suspension supports and properly secured in a suspended state. In workshops, special devices are used for this purpose.

When doing the work yourself, you can relieve the engine mounts by installing a sufficiently strong beam or channel on the folds of both mudguards. The engine is covered from below with a cable or wire, the ends of which are fed onto the beam and tightened onto the beam using a crank (see illustration 2.0).
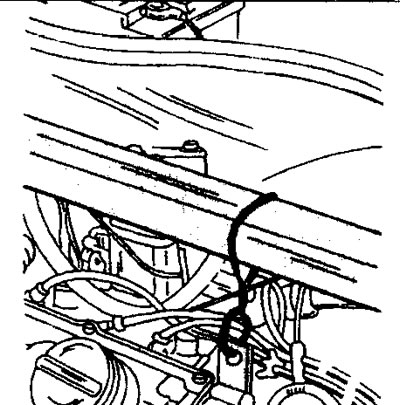
2.0 Fastening the engine in the engine compartment when removing it from the suspension mounts…

2.0 Fastening the engine in the engine compartment when removing it from the suspension mounts using a self-made device


Removing the gearbox is performed as follows. It is necessary to keep in mind, however, that each gearbox model has its own characteristics that do not affect the general procedure.

1. Place the hood vertically. Depending on the transmission model, it may be possible to remove the hood to remove the transmission from the engine compartment.


2. Disconnect both battery cable terminals from the battery. To remove some models of gearboxes, you need to remove the battery tray itself, because it will interfere with subsequent work.

3. Raise the front of the vehicle and place it on jack stands. The height of the sawhorses must be sufficient for working under the vehicle.

4. Remove both front wheels by unscrewing the mounting bolts before placing the vehicle on jack stands.

5. Unscrew the engine mudguard mounting bolts and remove the mudguard.

6. Disconnect both wheel drive axle shafts (see the relevant chapter).

7. Disconnect the front engine mount by unscrewing the mounting bolt.

8. Unscrew the bolt securing the exhaust pipe to the gearbox housing, and also disconnect the wiring harness plug holder.

9. Release the wiring harness secured to the battery holder in the engine compartment.

10. Loosen the electronic control unit mounting bolts and remove the unit.

11. Remove the air filter. If necessary, you can also remove the air intake box on the intake manifold.

12. Disconnect the accelerator cable from the throttle lever. To do this, pull the cable forward and remove it from the lever and from the counter support.

13. Disconnect the gear shift mechanism or remove the gear shift cable ends from the gear lever.

14. Disconnect (if any) from the gearbox, the ground wire (-), the reverse light switch wire, the speedometer drive shaft, the speedometer sensor plug. Depending on the engine type and fuel injection system, there may be other wires on the gearbox. All of them must be disconnected.


15. Remove the starter mounting bolts and disconnect the starter. Place the starter aside without disconnecting the wires from it. Do not hang the starter by the wires connected to it, even if the wires appear strong enough.

16. Unscrew the drain plug on the bottom of the gearbox from underneath the vehicle.

17. Drain the oil from the gearbox housing into a clean container and screw the plug back in. The container must have a volume of at least 2 liters.

18. Remove the clutch housing bolts. If present, remove the flywheel cover.

After completing all the above work, lift the engine to relieve the load on its supports. The load on the supports should be minimal.

19. Secure the gearbox to the cable and lift it with a crane.

20. Disconnect the gearbox mounting bracket.

Article republished from the website PeugeotBook

21. Remove the bolts securing the gearbox to the engine. Two bolts secure the box at the top and three at the bottom.

22. Make sure the gearbox is securely fastened with a cable and disconnect the engine and gearbox. The box sits on dowel pins, so it needs to be pushed from side to side to clear it from the engine (see illustration).
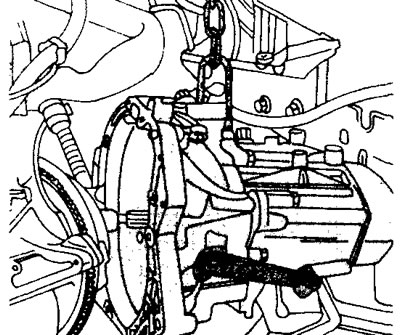
2.22 Removing the gearbox and extracting it from the engine compartment

2.22 Removing the gearbox and extracting it from the engine compartment


If, when pushing the gearbox away from the engine, one of the mounting pins comes out along with the gearbox, then put it back together with the bolts that secure the gearbox to the engine. If there is no crane to lift the gearbox, it can be removed by placing a mobile lift underneath it. When installing the box on the lift, place it on wooden slats.
This article is available at russian, bulgarian, belarusian, ukrainian, serbian, croatian, romanian, polish, slovak, hungarian
Article reviewed by editor: Shirokov Arseny
Share information:
Previous
Peugeot 806: Mechanical gearbox
Next

Manual transmission — general information
Transmission specifications
Gearbox — installation
Transmission oil — checking the level and replacing
See similar information for other Peugeot models

➨ Gearbox BE4/5 Peugeot 207 (2006-2014)
➨ Engine and gearbox — removal Peugeot 305 (1977-1989)
➨ Checking the gearbox oil level (60,000 km/3 years) Peugeot 405 (1987-1997)
➨ Checking the transmission fluid level in the gearbox Peugeot 605 (1989-2000)
Link to this article in different formats
Comments and feedback from visitors
No comments yet


Add two numbers 17 + 37


Partner I (1996-2008) 
  • General information
  • Introduction to the guide
  • Faults en route
  • Weekly checks
  • User manual
  • Maintenance (petrol)
  • Maintenance (diesel)
  • Power unit
  • Petrol engines
  • Diesel engines «XUD»
  • Diesel engines «DW»
  • Overhaul of petrol engines
  • Overhaul of diesel engines
  • Cooling and heating
  • Power and exhaust (petrol)
  • Power and exhaust (XUD diesels)
  • Power and exhaust (DW diesels)
  • Emission reduction
  • Starting and charging system
  • Transmission
  • Clutch
  • Mechanical gearbox
  • Drive shafts
  • Chassis, running gear
  • Brake system
  • Car suspension
  • Steering
  • Body and interior
  • Exterior (external elements)
  • Interior (internal elements)
  • Doors, locks and windows
  • Electrical equipment
  • Equipment and devices
  • Electrical circuits
Peugeot 807 (2002-2014) 
  • General information
  • Operating instructions
  • Maintenance
  • Troubleshooting
  • Power unit
  • Gasoline engines
  • Diesel engines
  • Cooling and heating
  • Fuel injection (petrol)
  • Fuel system (diesel)
  • Fuel system
  • Exhaust system
  • Ignition system
  • Transmission
  • Clutch
  • Manual gearbox
  • Automatic gearbox
  • Chassis, running gear
  • Brake system
  • Car suspension
  • Steering system
  • Body and interior
  • Exterior (external elements)
  • Interior (internal elements)
  • Electrical equipment
  • Power devices
  • Electrical circuits
Peugeot 806 (1994-2002) 
  • General information
  • User manual
  • Maintenance
  • Power unit
  • Petrol engines
  • Diesel engines
  • Lubrication system
  • Cooling system
  • Fuel injection (petrol)
  • Fuel system (diesel)
  • Ignition and exhaust systems
  • ECM Bosch Motronic MP 3.2
  • ECM Magneti-Marelli (MM)
  • Transmission
  • Clutch
  • Mechanical gearbox
  • Chassis, running gear
  • Brake system
  • Car suspension
  • Steering
  • Electrical equipment
  • Equipment and devices
  • Electrical circuits
Peugeot J5 (1981-1993) 
  • General information
  • Introduction to manual
  • Specifications
  • Gasoline engine
  • Engine repair
  • Lubrication system
  • Cooling system
  • Fuel system
  • Ignition system
  • Diesel engine
  • Engine repair (DB9)
  • Lubrication system (DB9)
  • Cooling system (DB9)
  • Fuel injection (DB9)
  • Engine repair (U25)
  • Lubrication system (U25)
  • Cooling system (U25)
  • Fuel injection (U25)
  • Transmission
  • Clutch
  • Gearbox
  • Drive shafts
  • Chassis, running gear
  • Steering system
  • Car suspension
  • Brake system
  • Electrical equipment
  • Power devices
  • Electrical circuits
PeugeotBook.ru © 2018–2026 | Mobile version | Sitemap: EN BG BY UA RS HR RO PL SK HU | Write message | Site search | Add to bookmarks | Peugeot owners
106 (1991-2003) | 206 (1998-2012) | 207 (2006-2014) | 305 (1977-1989) | 306 (1993-2002) | 307 (2001-2008) | 405 (1987-1997) | 406 (1995-2004) | 605 (1989-2000) | Partner-I (1996-2008) | Eurovans-807 (2002-2014) | Eurovans-806 (1994-2002) | J5 (1981-1993) |
Cookies are used to ensure the correct display of pages on the site.