
English Русский
Български
Беларускі
Український
Српски
Hrvatski
Română
Polski
Slovenský
Magyar
Bookmark Articles Sitemap Contacts
Company Hyundai Company Opel Company Skoda Company Kia Company Mitsubishi Company LADA Company Audi
PeugeotBook.ru


Series 100   Series 200   Series 300   400-500   Series 600   Crossovers   Others
 
Partner I (1996-2008) Peugeot 807 (2002-2014) Peugeot 806 (1994-2002) Peugeot J5 (1981-1993)

Gas distribution mechanism drive (Peugeot J5)

  • Main
  • Пежо
  • Peugeot J5 (1981-1993)
  • Diesel engine
  • Engine repair (U25)
  • Gas distribution mechanism drive
0
Timing drive components can be replaced without removing the engine.

20.8.1. Removing and installing the timing belt


When replacing the timing belt, the front right wheel must be raised.
  • Disconnect the ground wire from the battery.
  • Engage the highest gear to turn the crankshaft with the front wheel raised.
  • Remove the oil pan under the engine.
  • Using a 36 mm wrench, loosen the vibration damper nut (crankshaft belt pulley).
  • Remove the timing belt covers.
  • Unscrew the oil filler cap so that you can look into the hole. Turn the crankshaft to the position where the rocker arms of the first cylinder "intersect", that is, one rocker arm closes the valve, while the other rocker arm closes the corresponding valve. With the engine in this position, check that the line matches the mark on the cylinder block, as shown in Figure 355. The mark on the camshaft toothed pulley (A) in Figure 354 should be located opposite the bolt (2).
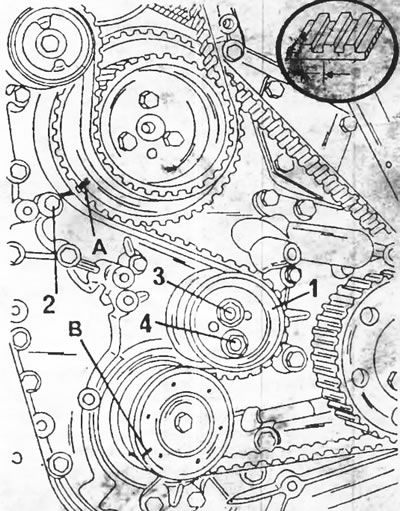
Figure 354 Timing belt application. References to numbers and letters are given in the text.
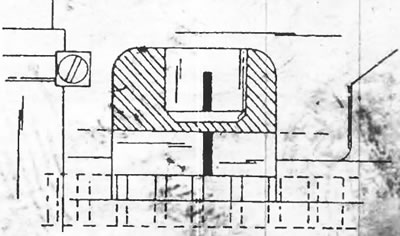
Figure 354 Timing belt application. References to numbers and letters are given in the text.


Figure 355 The marks on the flywheel and cylinder block must match.

Figure 355 The marks on the flywheel and cylinder block must match.


  • Loosen both tension rollers, push the rollers outward and tighten their fastening.
  • Remove the timing belts and high pressure fuel pump drive belts.
  • Installation of timing belts is carried out as follows.
  • Turn the engine until the marks on the flywheel and cylinder block align, as shown in Figure 355 (if the engine was turning in the meantime).
  • Turn the camshaft until the mark (A) in Figure 354 is positioned opposite the bolt (2).
  • Place the toothed belt on the toothed pulleys. In this case, use Figure 354. After placing the toothed belt on the tension roller (1), 35 belt teeth should be located between mark (A) and mark (B).
  • After this, tighten the timing belt. At service stations, a device is used that is inserted into the tension roller, as shown in Figure 356. In this case, the load is secured on the second groove. After releasing the device, it moves under the weight of the load and tightens the belt to a specified value. If such a device is not available, the roller should be moved so that the belt on the upper side can move a little more.
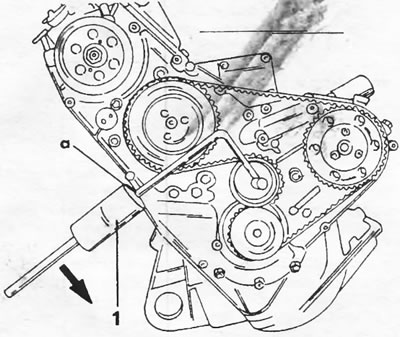
Figure 356. Tensioning the toothed belt to a specified value. The load (1) of the device must be…

Figure 356. Tensioning the toothed belt to a specified value. The load (1) of the device must be installed with its side "a" on the second groove of the rod. The bent end of the rod is inserted into the tension roller.


  • Tighten the top nut in Figure 356 to 32 Nm and then the bottom nut to 21 Nm.
  • Check that the high pressure fuel pump is in the injection timing position and apply the belt. The belt should be tight on the side opposite the roller. With the belt in this position, loosen the tension roller nut and press the roller against the belt. Tighten the nut to a torque of 20 Nm.
  • Turn the crankshaft two revolutions and check the position of all marks.
  • Install the lower and then the upper timing belt cover. Tighten all bolts to a torque of 10 Nm.
  • All other work is carried out in reverse order. The crankshaft pulley nut is tightened with a 36 mm socket wrench. Don't forget to install the oil pan.
This article is available at russian, bulgarian, belarusian, ukrainian, serbian, croatian, romanian, polish, slovak, hungarian
Article reviewed by editor: Bespalov Alexey
Share information:
Previous
Peugeot J5: Engine repair (U25)
Next

Flywheel — general information
Replacing the front oil seals
Installing the crankshaft
Measuring crankshaft axial play. Checking components
Crankshaft and crankshaft bearings
 
See similar information for other Peugeot models

➨ Clutch adjustment check and control mechanism lubrication Peugeot 106 (1991-2003)
➨ Drive mechanism — general information Peugeot 207 (2006-2014)
➨ Gas distribution mechanism drive Peugeot 306 (1993-2002)
➨ Checking the auxiliary drive belt (10,000 km/6 months) Peugeot 405 (1987-1997)
➨ Timing belt of the gas distribution mechanism drive — removal Peugeot 605 (1989-2000)
Link to this article in different formats
Comments and feedback from visitors
No comments yet


Add two numbers 34 + 38


Partner I (1996-2008) 
  • General information
  • Introduction to the guide
  • Faults en route
  • Weekly checks
  • User manual
  • Maintenance (petrol)
  • Maintenance (diesel)
  • Power unit
  • Petrol engines
  • Diesel engines «XUD»
  • Diesel engines «DW»
  • Overhaul of petrol engines
  • Overhaul of diesel engines
  • Cooling and heating
  • Power and exhaust (petrol)
  • Power and exhaust (XUD diesels)
  • Power and exhaust (DW diesels)
  • Emission reduction
  • Starting and charging system
  • Transmission
  • Clutch
  • Mechanical gearbox
  • Drive shafts
  • Chassis, running gear
  • Brake system
  • Car suspension
  • Steering
  • Body and interior
  • Exterior (external elements)
  • Interior (internal elements)
  • Doors, locks and windows
  • Electrical equipment
  • Equipment and devices
  • Electrical circuits
Peugeot 807 (2002-2014) 
  • General information
  • Operating instructions
  • Maintenance
  • Troubleshooting
  • Power unit
  • Gasoline engines
  • Diesel engines
  • Cooling and heating
  • Fuel injection (petrol)
  • Fuel system (diesel)
  • Fuel system
  • Exhaust system
  • Ignition system
  • Transmission
  • Clutch
  • Manual gearbox
  • Automatic gearbox
  • Chassis, running gear
  • Brake system
  • Car suspension
  • Steering system
  • Body and interior
  • Exterior (external elements)
  • Interior (internal elements)
  • Electrical equipment
  • Power devices
  • Electrical circuits
Peugeot 806 (1994-2002) 
  • General information
  • User manual
  • Maintenance
  • Power unit
  • Petrol engines
  • Diesel engines
  • Lubrication system
  • Cooling system
  • Fuel injection (petrol)
  • Fuel system (diesel)
  • Ignition and exhaust systems
  • ECM Bosch Motronic MP 3.2
  • ECM Magneti-Marelli (MM)
  • Transmission
  • Clutch
  • Mechanical gearbox
  • Chassis, running gear
  • Brake system
  • Car suspension
  • Steering
  • Electrical equipment
  • Equipment and devices
  • Electrical circuits
Peugeot J5 (1981-1993) 
  • General information
  • Introduction to manual
  • Specifications
  • Gasoline engine
  • Engine repair
  • Lubrication system
  • Cooling system
  • Fuel system
  • Ignition system
  • Diesel engine
  • Engine repair (DB9)
  • Lubrication system (DB9)
  • Cooling system (DB9)
  • Fuel injection (DB9)
  • Engine repair (U25)
  • Lubrication system (U25)
  • Cooling system (U25)
  • Fuel injection (U25)
  • Transmission
  • Clutch
  • Gearbox
  • Drive shafts
  • Chassis, running gear
  • Steering system
  • Car suspension
  • Brake system
  • Electrical equipment
  • Power devices
  • Electrical circuits
PeugeotBook.ru © 2018–2026 | Mobile version | Sitemap: EN BG BY UA RS HR RO PL SK HU | Write message | Site search | Add to bookmarks | Peugeot owners
106 (1991-2003) | 206 (1998-2012) | 207 (2006-2014) | 305 (1977-1989) | 306 (1993-2002) | 307 (2001-2008) | 405 (1987-1997) | 406 (1995-2004) | 605 (1989-2000) | Partner-I (1996-2008) | Eurovans-807 (2002-2014) | Eurovans-806 (1994-2002) | J5 (1981-1993) |
Cookies are used to ensure the correct display of pages on the site.