
General information
1. The timing belt drives the camshaft, high pressure fuel pump and coolant pump from the toothed pulley at the front end of the crankshaft. In addition, the belt drives the brake vacuum pump, not directly, but from the camshaft on the flywheel side. If the belt breaks or slips during operation, the pistons can come into contact with the valve heads, resulting in extensive damage resulting in costly repairs.
2. The timing belt should be replaced at prescribed intervals or sooner if it is contaminated with oil or makes noise when running (squeal/creak due to uneven wear).
3. If the timing belt is removed, it is recommended to check the condition of the coolant pump at the same time (check for signs of coolant leakage). This will help avoid the need to remove the belt at a later stage if the coolant pump fails.
Removing
4. Disconnect the ground wire from the battery (see «Disconnecting the battery»).
5. Remove the crankshaft pulley as described in paragraph 5.
6. Remove the timing belt covers as described in paragraph 8.
7. Temporarily install the crankshaft pulley to allow the engine to crank, and then align the engine/camshaft assembly mounting holes as described in paragraph 3, and lock the camshaft sprocket, injection pump sprocket and flywheel. Do not attempt to crank the engine with the pins inserted.
8. Remove the bracket for attaching the right engine mount to the body, as described in paragraph 9.
9. Loosen the timing belt tensioner axle nut and adjusting bolt, and then turn the tensioner bracket counterclockwise to release the tension. Tighten the adjusting bolt again to hold the tensioner in the released position. To rotate the tensioner bracket against the force of the spring, use a 10mm square head driver, which must be inserted into the hole provided (pic. 7.9).
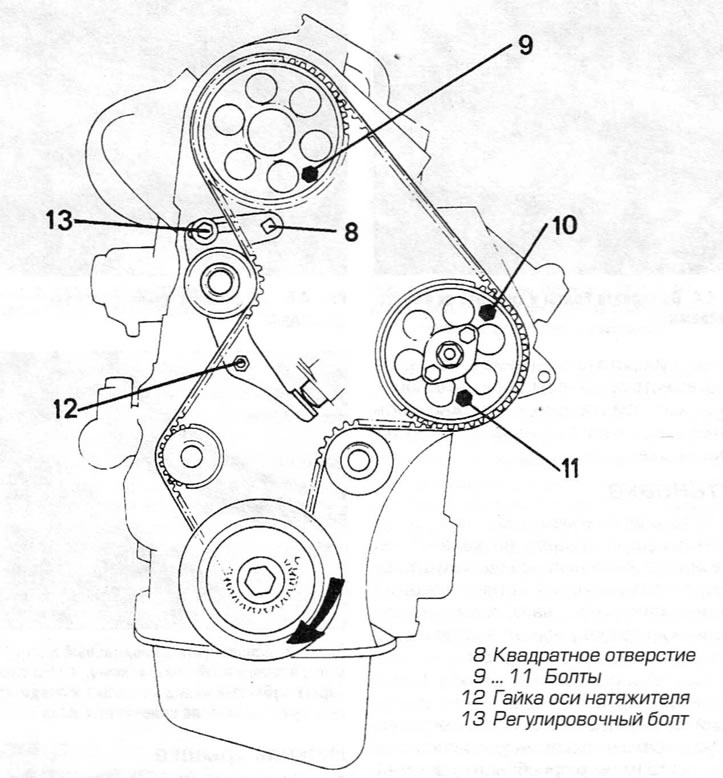
Pic. 7.9. Removing the timing belt
10. If the timing belt is to be used further, mark the direction of rotation on the belt with white paint or a marker (if the marking is not visible). Remove belt from toothed pulleys (pic. 7.10, a, b).
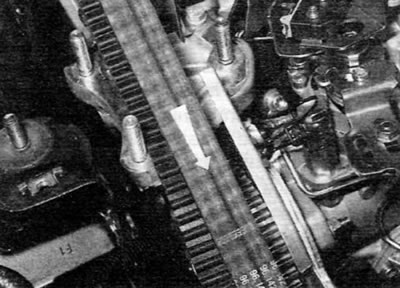
Pic. 7.10, a. Mark the timing belt with an arrow showing the direction of belt rotation
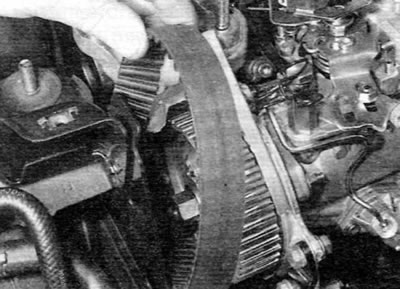
Pic. 7.10, b. Removing the timing belt
Inspection
11. Carefully check the timing belt for signs of uneven wear, separation or oil contamination. Pay special attention to tooth cavities. Replace the belt if there is even the slightest doubt about its condition. If the engine is being overhauled and the vehicle has more than 60,000 km with a particular belt, it is mandatory to replace the belt, regardless of its external condition. The cost of a new belt is not comparable to the cost of repairing an engine in the event of a broken belt. If signs of oil contamination are found, locate the leak and repair the cause of the leak. Wash the engine in the area of the timing belt, as well as all relevant elements until all traces of oil are completely removed. Check that the tensioner and idler pulley rotate freely without binding. If necessary, replace them as described in paragraph 9 and 10 (whichever is applicable).
Installation and tension
12. Begin installation by checking that the 8mm bolts are still in place in the camshaft and high pressure fuel pump sprocket and the pin/drill is in the pilot hole in the flywheel.
13. Put the timing belt on the crankshaft gear pulley, making sure that the arrow on the belt (in the presence of) facing in the correct direction of rotation of the belt.
14. Engage the timing belt with the crankshaft sprocket, hold it in place, and then put the belt on the remaining toothed pulleys in the following sequence:
- A) intermediate roller;
- b) high pressure fuel pump;
- V) camshaft;
- G) tensioner roller;
- d) coolant pump.
15. Do not sharply twist the belt when installing it. To ensure proper engagement, before fitting the belt onto the camshaft sprocket, slide the belt onto the injection pump sprocket only halfway across the belt width while keeping the belt taut and fully engaged with the crankshaft sprocket. Slide the timing belt completely over the toothed pulleys (pic. 7.15).
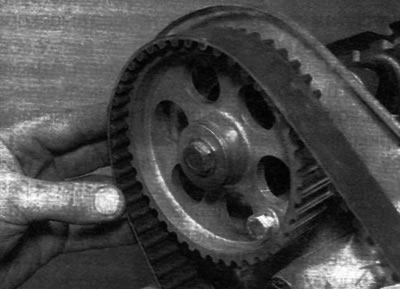
Pic. 7.15. Put the timing belt on the toothed pulleys
16. Turn out blocking bolts with a diameter of 8 mm and remove them from gear pulleys of a camshaft and the fuel pump of a high pressure, and also take a core/drill from an adjusting hole in a flywheel.
17. Loosen the nut on the axle and loosen the tensioner adjusting bolt while holding the bracket to counteract the spring force. Slowly release the bracket so that the roller is pressed against the timing belt. Retighten the adjusting bolt and axle nut.
18. Rotate the crankshaft two full turns in the normal direction of rotation (clockwise). Do not rotate the crankshaft in the opposite direction, as the tension of the timing belt between the crankshaft, high pressure fuel pump and camshaft pulleys must be maintained.
19. Loosen the tensioner adjusting bolt and axle nut to allow the tensioner spring to press the roller against the timing belt, and then tighten the adjusting bolt and axle nut to the specified torque.
20. Check that the mounting holes are still correctly positioned. To do this, insert the blocking bolts in the toothed pulleys and the rod/drill into the mounting hole in the flywheel, as the holes are not properly located, the timing belt has not been installed correctly (possibly missing one tooth on one of the toothed pulleys). In this case, repeat the installation procedure from the beginning.
21. Install the upper timing belt covers as described in paragraph 6.
22. Establish an arm of fastening of the right support of the engine to a body (see paragraph 9).
23. Install the crankshaft pulley as described in paragraph 5.