



Table of contents: Modifications to the timing case,…🠇 Timing belt - modification 🠇
1. The timing belt drives the camshaft, fuel injection pump and water pump and is controlled by a sprocket on the front end of the crankshaft. If it breaks while the engine is running, it will cause the pistons to hit the valves.
2. The timing belt should be replaced every 75,000 km, but if it is oily or makes noise during operation (a scraping sound caused by uneven wear of the belt), the belt needs to be replaced before the scheduled time. On models with Bosch injection pumps, excessive play in the front bearing can cause wear on the belt sidewalls.
3. Apply the handbrake and jack up the right front corner of the car until the wheel is just off the ground. Support the car and engage 4th or 5th gear. This will allow you to turn the crankshaft by turning the right wheel.
4. Remove the engine mudguard under the right front wheel arch. To create more room to work, drain the cooling system (see chapter 2) and disconnect the lower radiator hose from the water pump inlet.
5. Disconnect the negative cable from the battery.
6. Loosen the generator pivot bolt and its adjusting bolts, and then turn the tension bolt out enough to allow the drive belt to be removed from the pulleys.
7. With the transmission in 4th or 5th gear, ask an assistant to press the brake pedal and remove the crankshaft pulley bolt. Alternatively, you can lock the crankshaft by unscrewing the bolts securing the gearbox cover, removing the cover, and inserting a wide screwdriver into the starter ring gear.
8. Remove the pulley from the front end of the crankshaft.
9. Remove the bolts securing the lower timing case.
10. Suspend the engine on a lift or support it with a garage jack.
11. Loosen the nuts and remove the right engine support bracket.
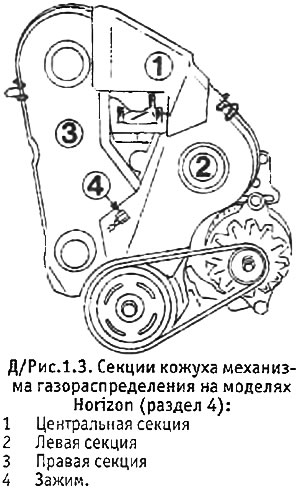
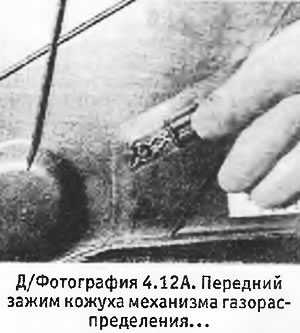
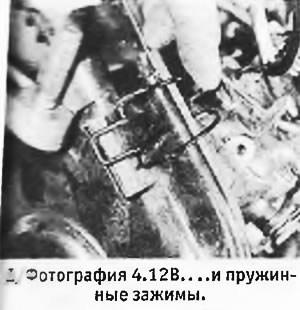
12. Pull up the front clamp, loosen the spring clamps and remove from the timing case section (see photos).
 |
 |
13. Turn the engine using the right front wheel so that the holes for the bolts in the camshaft and fuel injection pump sprockets are aligned with the corresponding holes in the front plate of the engine.
14. Insert a metal rod with a diameter of 8.0 mm into a special hole in the left rear flange of the cylinder block near the starter and then carefully turn the engine in any direction so that the rod enters the hole on the flywheel intended for setting TDC (see photo 22.26).
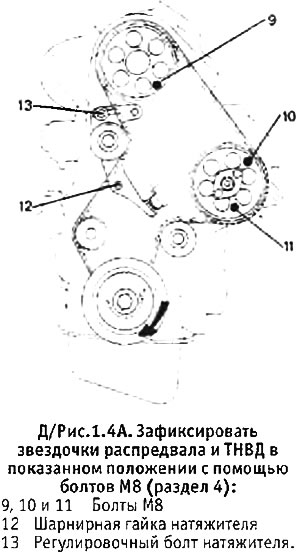
15. Insert 3 M8 bolts into the holes on the camshaft and fuel injection pump sprockets and manually screw these bolts into the front plate of the engine (see D/Figure 1.4A).
16. Loosen the timing belt tensioner pivot nut and adjusting bolt and turn the bracket counterclockwise to relieve tension on the belt. Tighten the adjusting bolt again to lock the tensioner in the released position.
17. Draw an arrow on the timing belt to show the normal direction of its rotation, and remove it from the camshaft sprockets, fuel injection pump, water pump and crankshaft.
13. Inspect the belt for cracks, wear and damaged teeth. Pay special attention to the base of the teeth. If there is any damage or if the belt is oily, it should be replaced (having first localized and eliminated the source of the oil leak).
19. Begin installing the belt by placing it on the crankshaft sprocket. Check that the arrow on the belt points in the correct direction.
20. Holding the belt on the crankshaft sprocket, place it on the roller and then on the fuel injection pump, camshaft and water pump sprockets, as well as on the tensioner roller. To ensure that the belt fits correctly in place, install it on the fuel injection pump sprocket only halfway across, then put it on the camshaft sprocket, keeping the belt taut, and push it all the way onto the crankshaft sprocket. After this, push the belt all the way onto the remaining sprockets (see photos 26.54A, 26.54B and 26.54C).
21. With the hinge nut loosened, loosen the tensioner adjusting bolt while holding the bracket against the spring pressure. Slowly release the bracket until the roller is pressed against the timing belt. Tighten the adjusting bolt again.
22. Unscrew the bolts from the camshaft and fuel injection pump sprockets and pull the metal rod out of the cylinder block.
23. Rotate the engine 2 full turns in the normal direction of its rotation. Do not rotate the engine backwards, as the timing belt will remain tensioned on the crankshaft, fuel injection pump and camshaft sprockets.
24. Loosen the tensioner adjusting bolt to allow the tensioner spring to press the roller against the timing belt, and then tighten the adjusting bolt and hinge nut.
25. Check the valve timing (see paragraphs 13 and 14) and pull out the metal rod.
26. Install the timing case sections in place and secure them with a special clamp and spring clamps. Install the lower timing case and tighten its mounting bolts.
27. Install the right engine support bracket and tighten the mounting nuts.
28. Disconnect the lift from the engine or remove the jack.
29. Place the pulley on the front end of the crankshaft.
30. Apply 3 drops of thread locking fluid to the crankshaft pulley bolt threads, insert the bolt and tighten it to the specified torque while holding the crankshaft from rotating as described in paragraph 7.
31. Install the alternator drive belt and tension it as described in chapter 10.
32. Connect the negative cable to the battery.
33. Install the engine mudguard under the right front wheel arch.
34. Where applicable, connect the lower radiator hose and fill the cooling system with fluid (see chapter 2).
35. Lower the car to the ground.
Modifications to the timing case, timing belt tensioner and related components - all models from 1988 onwards.
1. In early 1988. (more precisely since September 1987.) minor changes were made to the fasteners of the timing case. The retaining clip is no longer installed, the number of studs has been increased from one to two.
2. At the same time, changes were made to the tensioner roller, the fuel injection pump sprocket and (only on models with a Bosch pump) into the front bearing of the pump.
3. The old and new tensioner rollers are completely interchangeable. The remaining parts are not interchangeable.
Timing belt - modification
1. Since early 1992, the timing belt has been made of an improved material known as hydrogen-saturated nitrile (HSN). This material has increased resistance to oil and high temperatures.
You can find the original on the page: PeugeotBook.ru
2. Please note that some older models may already have a new type of belt installed during maintenance.
3. If you purchase a new belt to replace the old one, it will inevitably be of a new type. This is confirmed by the letters HSN stamped on the inside of the belt.