English Русский
Български
Беларускі
Український
Српски
Hrvatski
Română
Polski
Slovenský
Magyar
Bookmark Articles Sitemap Contacts
Company Hyundai Company Opel Company Skoda Company Kia Company Mitsubishi Company LADA Company Audi
PeugeotBook.ru


Series 100   Series 200   Series 300   400-500   Series 600   Crossovers   Others
 
Peugeot 305 (1977-1989) Peugeot 306 (1993-2002) Peugeot 307 (2001-2008)

Routine maintenance (Peugeot 305)

  • Main
  • 30X
  • Peugeot 305 (1977-1989)
  • Power unit
  • Diesel engines
  • Routine maintenance
0
Table of contents: Checking the oil level 🠇 Changing the oil and oil filter 🠇 Replacing the timing belt 🠇 Latest models 🠇
The following procedures must be performed at the frequency specified in the section "Routine maintenance" at the beginning of this Guide.

Checking the oil level


1. Place the car on a level surface, turn off the engine and wait about 10 minutes for the oil to stop circulating and drain into the pan.

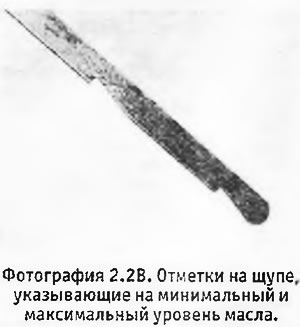
2. Remove the dipstick, wipe it with a clean cloth, reinsert it, remove it and check the oil level. The level should pass between the two notches on the dipstick corresponding to the maximum and minimum levels (see photos).
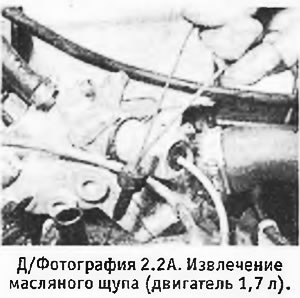
2. Remove the dipstick, wipe it with a clean cloth, reinsert it, remove it and check the oil level.…

3. There is no need to add oil to the engine until the level drops to the lower mark on the dipstick, but under no circumstances should it drop below it. There is 1 liter of oil between the two marks on the dipstick (1.7 L engine) or about 1.5 liters of oil (1.9 L engine).


4. Only clean motor oil of the correct type, preferably the same brand as that already filled, should be added to the engine. Remove the oil filler plug on the valve cover (or pull the dipstick out of the tube, depending on the design) (see photo) and pour in oil. Wait a little while for it to drain into the tray and check the level. When finished, replace the oil filler plug or dipstick.
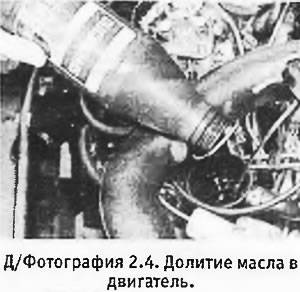
4. Only clean motor oil of the correct type, preferably the same brand as that already filled,…


5. Depending on the degree of wear and driving style, all engines consume a certain amount of oil. Some of the oil enters the cylinders and burns in them. It should be noted, however, that a diesel engine is less susceptible to this problem than a gasoline engine, since it does not have a vacuum suction that would suck oil through the piston rings or intake valve stems.

Changing the oil and oil filter


6. Oil change should be done on a hot engine (i.e. immediately after the trip) with the car parked on a level surface.

7. Place a suitable container under the tray. Wipe the area around the drain plug clean, unscrew it with an Allen key and allow the oil to drain (see photo). If the oil is very hot, be careful not to burn yourself.
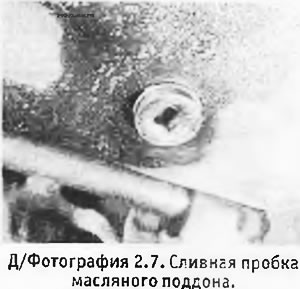


7. Place a suitable container under the tray. Wipe the area around the drain plug clean, unscrew it…


8. Remove the oil filler plug and wait at least 15 seconds for the oil to drain.

9. Inspect and replace the drain plug sealing washer if necessary. Wipe the pan clean, install the drain plug and tighten it.

10. Move the oil collection container under the oil filter at the front of the cylinder block. Unscrew the filter using a belt wrench and remove it (see photo). If you don't have a special key, you can pierce the filter with a screwdriver and use it as a lever to unscrew the filter.
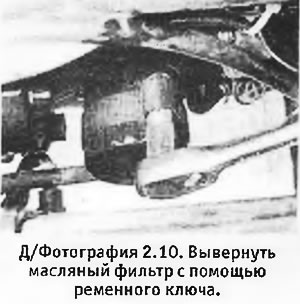
10. Move the oil collection container under the oil filter at the front of the cylinder block.…


11. Wipe clean the filter seat on the cylinder block or on the oil cooler (depending on the design). Apply a small amount of engine oil to the new filter's O-ring and screw the filter in until it just touches its seat. Manually tighten the filter another 2/3 turn (see photo).
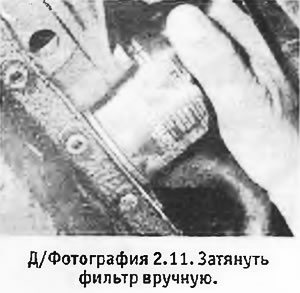


11. Wipe clean the filter seat on the cylinder block or on the oil cooler (depending on the…


12. Pour the required amount of oil into the engine.

13. Start the engine and let it idle. Check that the low oil pressure warning light goes out and look for oil leaks through the filter.

14. Turn off the engine and check the oil level.

15. Pour the old oil into a closed container and dispose of it. Cleaning the oil filler plug (where applicable)

16. Remove the oil filler plug from the valve cover, loosen the clamp and disconnect the crankcase ventilation hose.

17. Clean the wire filter in kerosene and let it dry. If it is clogged with sediment, the entire plug assembly will have to be replaced.

18. Reconnect the hose to the plug and install the plug on the valve cover.

Replacing the timing belt


19. See Section 4.

Latest models


Maintenance intervals


1. For models produced since 1989. (starting around September 1988.) routine maintenance should be performed less frequently (every 10,000 km instead of 7,500 km). Maintenance intervals (after six months, one year, etc.) remained unchanged.

Antifreeze - replacement


2. In the section "Routine maintenance" it is stated that antifreeze should be replaced every 2 years. However, if the new car (or a car with a new engine) if 20,000 km are covered within this two-year period, the antifreeze should be replaced upon reaching this mileage, without waiting for the two years to expire. Replacing the antifreeze is necessary to flush out corrosion products from the cooling system, which accumulate in high concentrations during the initial life of the engine.

3. After the first coolant change, it is sufficient to change it every 2 years, regardless of the mileage.
This article is available at russian, bulgarian, belarusian, ukrainian, serbian, croatian, romanian, polish, slovak, hungarian
Article reviewed by editor: Ostrovsky Fedor
Share information:
Previous
Peugeot 305: Diesel engines
Next

General information about diesel engines
Diesel engine specifications
Basic operations that can be carried out without removing the…
Timing belt — inspection, removal, installation and tensioning
Timing Belt Tensioner and Right Engine Mounting Bracket —…
Timing Belt Idler Roller — removal and installation
Cylinder head — disassembly, cleaning and assembly
See similar information for other Peugeot models

➨ Regular maintenance Peugeot 106 (1991-2003)
➨ Maintenance of fuses Peugeot 207 (2006-2014)
➨ Maintenance intervals Peugeot 405 (1987-1997)
➨ Maintenance — works Peugeot 605 (1989-2000)
➨ Routine maintenance Peugeot Partner I (1996-2008)
Link to this article in different formats
Comments and feedback from visitors
No comments yet


Add two numbers 42 + 18


Peugeot 307 (2001-2008) 
  • User manual
  • Keys, doors and alarm
  • Controls and instruments
  • Driving and operation
  • Maintenance
  • Power unit
  • Petrol engines TU3 and TU5
  • Petrol engines EW10
  • Diesel engines DV10
  • Diesel engines DW10
  • Transmission
  • Clutch and drive shafts
  • Mechanical gearbox
  • Automatic gearbox
  • Chassis, running gear
  • Front suspension
  • Rear suspension
  • Steering
  • Brake system
  • Body and interior
  • Exterior (external elements)
  • Interior (internal elements)
  • Doors, locks and windows
  • Heating and air conditioning
  • Electrical equipment
  • Equipment and devices
  • Power devices
  • Airbags
  • Electrical circuits
Peugeot 306 (1993-2002) 
  • General information
  • Introduction to manual
  • Specifications
  • Gasoline engine
  • Engine repair
  • Lubrication system
  • Cooling system
  • Fuel injection
  • Ignition system
  • Diesel engine
  • Engine repair
  • Lubrication system
  • Cooling system
  • Fuel injection
  • Transmission
  • Clutch
  • Gearbox
  • Drive shafts
  • Chassis, running gear
  • Steering system
  • Front suspension
  • Rear suspension
  • Brake system
  • Electrical equipment
  • Power devices
  • Electrical circuits
Peugeot 305 (1977-1989) 
  • General information
  • Maintenance
  • Power unit
  • Gasoline engines
  • Diesel engines
  • Cooling system (gasoline)
  • Cooling system (diesel)
  • Fuel system (gasoline)
  • Fuel system (diesel)
  • Ignition system
  • Transmission
  • Clutch
  • Mechanical gearbox BB8
  • Mechanical gearbox BE1
  • Automatic gearbox ZF4
  • Shafts, hubs and wheels
  • Chassis, running gear
  • Brake system
  • Car suspension
  • Steering
  • Body and interior
  • Exterior (external elements)
  • Interior (internal elements)
  • Electrical equipment
  • Equipment and devices
  • Headlights and lighting
  • Power devices
  • Electrical circuits
  • Wiring diagrams (diesel)
PeugeotBook.ru © 2018–2026 | Mobile version | Sitemap: EN BG BY UA RS HR RO PL SK HU | Write message | Site search | Add to bookmarks | Peugeot owners
106 (1991-2003) | 206 (1998-2012) | 207 (2006-2014) | 305 (1977-1989) | 306 (1993-2002) | 307 (2001-2008) | 405 (1987-1997) | 406 (1995-2004) | 605 (1989-2000) | Partner-I (1996-2008) | Eurovans-807 (2002-2014) | Eurovans-806 (1994-2002) | J5 (1981-1993) |
Cookies are used to ensure the correct display of pages on the site.