
English Русский
Български
Беларускі
Український
Српски
Hrvatski
Română
Polski
Slovenský
Magyar
Bookmark Articles Sitemap Contacts
Company Hyundai Company Opel Company Skoda Company Kia Company Mitsubishi Company LADA Company Audi
PeugeotBook.ru


Series 100   Series 200   Series 300   400-500   Series 600   Crossovers   Others
 
Partner I (1996-2008) Peugeot 807 (2002-2014) Peugeot 806 (1994-2002) Peugeot J5 (1981-1993)

Oil pump and drive chain — removal, inspection and installation (Peugeot Partner I)

  • Main
  • Пежо
  • Partner I (1996-2008)
  • Power unit
  • Diesel engines «XUD»
  • Oil pump and drive chain — removal, inspection and installation
0
Table of contents: Removal 🠇 Inspection 🠇 Installation 🠇

Removal


1. Remove the oil pan as described in paragraph 14.

2. If necessary, remove the two screws and the sprocket cover from the front of the oil pump.

3. Remove the three bolts securing the oil pump to the base of the cylinder block/engine crankcase. Disengage the pump sprocket from the chain and remove the oil pump (figure 15.3). If necessary, also remove the separator plate that is installed behind the oil pump.
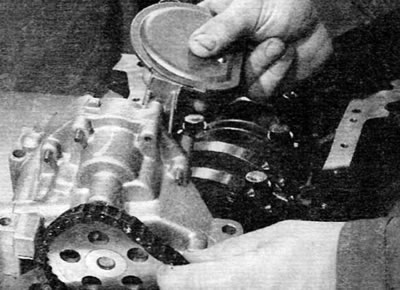
Figure 15.3. Removing the oil pump

Figure 15.3. Removing the oil pump


Inspection


4. Inspect the oil pump sprocket for signs of damage or wear, such as chipped or missing teeth. If the sprocket is worn, the pump assembly must be replaced as the sprocket is not supplied separately. In addition, it is recommended to simultaneously replace the chain and the drive sprocket located on the crankshaft. To replace the chain and drive sprocket, first remove the timing belt pulley from the crankshaft as described in paragraph 9. Unscrew the bolts and remove the cuff housing from the cylinder block. Then the asterisk, the spacer element (if available) and the chain can be removed from the end of the crankshaft. For more information, please contact chapter 2D.


5. Loosen and unscrew the bolts securing the mesh filter cover to the pump body (also remove the oil deflector plate, if present). Remove the mesh filter cover and take out the relief valve piston and spring, noting how they are installed (figure 15.5, a-c).
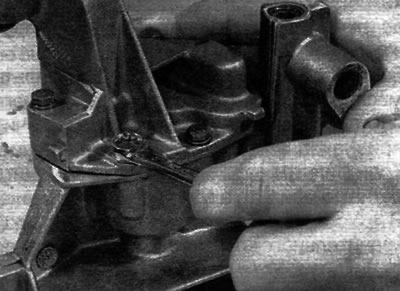
Figure 15.5, a. Remove the oil pump cover mounting bolts...
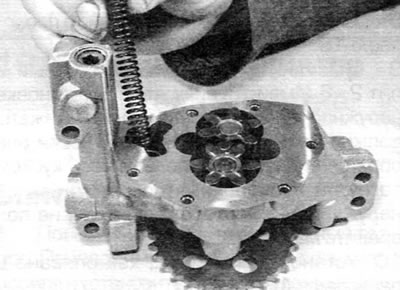
Figure 15.5, a. Remove the oil pump cover mounting bolts...


Figure 15.5, b....then remove the cover and take out the spring...
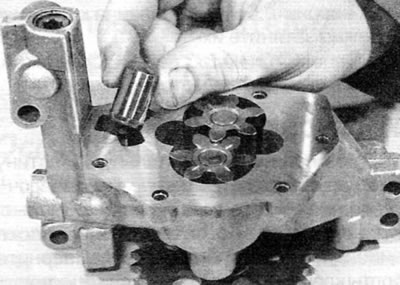
Figure 15.5, b....then remove the cover and take out the spring...


Figure 15.5, c....and the piston of the safety valve, noting how it is installed

Figure 15.5, c....and the piston of the safety valve, noting how it is installed


6. Inspect the impellers and pump housing for signs of wear and scoring. If there is wear, the pump assembly should be replaced.

7. Inspect the relief valve piston for signs of wear or damage and replace it if necessary. The condition of the safety valve spring can only be assessed by comparing it with a new one. If there is any doubt about the condition, it should also be replaced. The piston and spring are supplied separately.

8. Thoroughly clean the oil pump strainer with a suitable solvent and inspect it for any signs of blockage or damage. If the filter is damaged, the mesh filter assembly with the cover should be replaced.

9. Install the safety valve spring and piston into the mesh filter cover. Install the cover onto the pump body. Align the relief valve piston with the corresponding mounting hole in the pump. Install the oil deflector plate (if available), insert the cover mounting bolts and tighten them securely.

10. Fill the pump with clean engine oil before installation.

Installation


11. Install the separator plate (if available), and then install the pump sprocket along with its drive chain. Install the pump onto the base of the cylinder block/crankcase. Install the pump mounting bolts and tighten them to the specified torque.

12. If necessary, install the sprocket cover onto the pump. Screw in the appropriate bolts and tighten them securely.

13. Install the oil pan as described in paragraph 14.
This article is available at russian, bulgarian, belarusian, ukrainian, serbian, croatian, romanian, polish, slovak, hungarian
Article reviewed by editor: Nikonova Veronica
Share information:
Previous
Partner I: Diesel engines «XUD»
Next

Oil pan — removal and installation
Cylinder head — removal and installation
Valve clearances — checking and adjustment
Camshaft and tappets — removal, inspection and installation
Timing Belt Idler Roller — removal and installation
Cuffs — replacement
Flywheel — removal, inspection and installation
Engine oil cooler — removal and installation
Engine/Gearbox Mounts — inspection and replacement
See similar information for other Peugeot models

➨ Oil pump — removal, inspection and refitting Peugeot 106 (1991-2003)
➨ Replacing the accessory drive belt (petrol engines) Peugeot 207 (2006-2014)
➨ Water Pump Drive Belt — removal and installation Peugeot 305 (1977-1989)
➨ Checking the auxiliary drive belt (10,000 km/6 months) Peugeot 405 (1987-1997)
➨ Balance shaft drive chain — removal Peugeot 605 (1989-2000)
Link to this article in different formats
Comments and feedback from visitors
No comments yet


Add two numbers 22 + 39


Partner I (1996-2008) 
  • General information
  • Introduction to the guide
  • Faults en route
  • Weekly checks
  • User manual
  • Maintenance (petrol)
  • Maintenance (diesel)
  • Power unit
  • Petrol engines
  • Diesel engines «XUD»
  • Diesel engines «DW»
  • Overhaul of petrol engines
  • Overhaul of diesel engines
  • Cooling and heating
  • Power and exhaust (petrol)
  • Power and exhaust (XUD diesels)
  • Power and exhaust (DW diesels)
  • Emission reduction
  • Starting and charging system
  • Transmission
  • Clutch
  • Mechanical gearbox
  • Drive shafts
  • Chassis, running gear
  • Brake system
  • Car suspension
  • Steering
  • Body and interior
  • Exterior (external elements)
  • Interior (internal elements)
  • Doors, locks and windows
  • Electrical equipment
  • Equipment and devices
  • Electrical circuits
Peugeot 807 (2002-2014) 
  • General information
  • Operating instructions
  • Maintenance
  • Troubleshooting
  • Power unit
  • Gasoline engines
  • Diesel engines
  • Cooling and heating
  • Fuel injection (petrol)
  • Fuel system (diesel)
  • Fuel system
  • Exhaust system
  • Ignition system
  • Transmission
  • Clutch
  • Manual gearbox
  • Automatic gearbox
  • Chassis, running gear
  • Brake system
  • Car suspension
  • Steering system
  • Body and interior
  • Exterior (external elements)
  • Interior (internal elements)
  • Electrical equipment
  • Power devices
  • Electrical circuits
Peugeot 806 (1994-2002) 
  • General information
  • User manual
  • Maintenance
  • Power unit
  • Petrol engines
  • Diesel engines
  • Lubrication system
  • Cooling system
  • Fuel injection (petrol)
  • Fuel system (diesel)
  • Ignition and exhaust systems
  • ECM Bosch Motronic MP 3.2
  • ECM Magneti-Marelli (MM)
  • Transmission
  • Clutch
  • Mechanical gearbox
  • Chassis, running gear
  • Brake system
  • Car suspension
  • Steering
  • Electrical equipment
  • Equipment and devices
  • Electrical circuits
Peugeot J5 (1981-1993) 
  • General information
  • Introduction to manual
  • Specifications
  • Gasoline engine
  • Engine repair
  • Lubrication system
  • Cooling system
  • Fuel system
  • Ignition system
  • Diesel engine
  • Engine repair (DB9)
  • Lubrication system (DB9)
  • Cooling system (DB9)
  • Fuel injection (DB9)
  • Engine repair (U25)
  • Lubrication system (U25)
  • Cooling system (U25)
  • Fuel injection (U25)
  • Transmission
  • Clutch
  • Gearbox
  • Drive shafts
  • Chassis, running gear
  • Steering system
  • Car suspension
  • Brake system
  • Electrical equipment
  • Power devices
  • Electrical circuits
PeugeotBook.ru © 2018–2026 | Mobile version | Sitemap: EN BG BY UA RS HR RO PL SK HU | Write message | Site search | Add to bookmarks | Peugeot owners
106 (1991-2003) | 206 (1998-2012) | 207 (2006-2014) | 305 (1977-1989) | 306 (1993-2002) | 307 (2001-2008) | 405 (1987-1997) | 406 (1995-2004) | 605 (1989-2000) | Partner-I (1996-2008) | Eurovans-807 (2002-2014) | Eurovans-806 (1994-2002) | J5 (1981-1993) |
Cookies are used to ensure the correct display of pages on the site.