



Table of contents: General information 🠇 Right engine mount bracket to the…🠇 Timing belt tensioner and right…🠇
General information
1. The timing belt tensioner operates under the action of a spring and plunger located in the right engine support bracket, which is bolted to the end surface of the engine. The engine mount is attached to the support on the body using a suitable bracket.
Right engine mount bracket to the body
Removal
2. Before removing the bracket, support the engine. For this purpose, it is preferable to use a suitable lifting device, the slings/hooks of which should be connected to the rigging bracket on the right end of the engine. Alternatively, the engine can be supported with a trolley jack under the oil pan, with a wooden block between them. In this case, you should be prepared for the engine to tend to move backwards after removing the bracket.
3. Loosen the clamps and brackets and position the lift pump and associated hoses and wires away from the engine mount and upper suspension mount.
4. Remove the three nuts securing the support bracket to the engine support bracket and one nut securing the bracket to the rubber mount on the body, and then remove the bracket (figure 9.4).
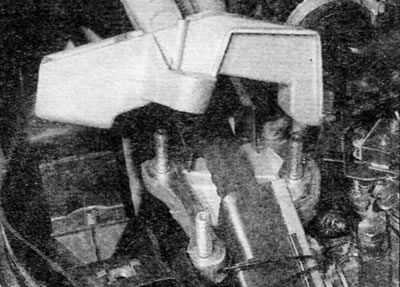
Figure 9.4. Removing the engine mount bracket from the body
Installation
5. Installation is performed in the reverse order of removal. Tighten nuts and bolts to the specified torque.
Timing belt tensioner and right engine mount bracket
Note: You will need the appropriate tool to hold the timing belt tensioner plunger while performing this procedure.
Removal
6. Remove the engine mount bracket to the body as described earlier in this paragraph and remove the accessory drive belt as described in chapter 1B.
7. If you have not already done so, support the engine with a trolley jack under the oil pan, using a wooden block.
8. If applicable, disconnect the engine support slings/hooks from the right rigging bracket (this is necessary because the rigging bracket is attached to the engine mount bracket and needs to be removed).
9. Remove the two bolts and engine rigging bracket.
10. Align the engine/camshaft assembly mounting holes as described in paragraph 3, and lock the camshaft timing pulley, high pressure fuel pump timing pulley and flywheel. Do not crank the engine with the rods installed.
11. Loosen the timing belt tensioner shaft mounting nut and adjusting bolt, then turn the tensioner bracket counterclockwise until the adjusting bolt is in the middle of the groove, and tighten the adjusting bolt again. To turn the tensioner bracket against the spring force, use a 10mm square head ratchet, inserted into the provided hole.
12. If the timing belt is to be continued, mark the direction of rotation on the belt. Remove the belt from the timing pulleys.
13. Now you need to get a tool to hold the tensioner plunger in the engine mount bracket.
14. There is a special Peugeot/Citroen tool designed to be inserted into the two holes for the lower mounting bolts of the support bracket. A similar tool can be easily made from sheet metal using 10mm bolts and nuts instead of metal rods
(You can find the original on the page PEUGEOTBOOK.ru)
Tip: Homemade tool for holding the tensioner plunger in the engine mount bracket.
15. Remove the two lower engine support bracket mounting bolts and install the special tool (figure 9.15, a, b). Lubricate the inside surface of the tool to prevent any damage to the end of the tensioner plunger. Loosen the axle mounting nut and adjusting bolt and remove the tensioner.
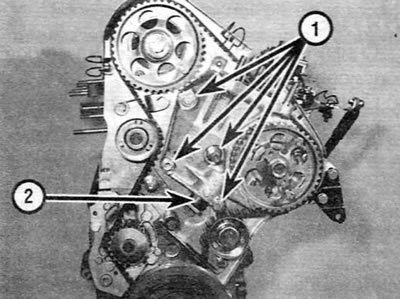
Figure 9.15, a. Side of the engine where the timing belt is located
1. Engine support bracket mounting bolts
2. Timing belt tensioner plunger
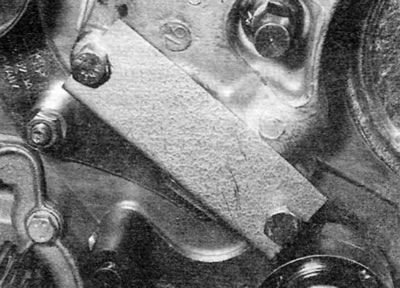
Figure 9.15, b. Tool for holding the tensioner plunger in the engine mount bracket (the timing belt has been removed for clarity)
16. Remove the two remaining engine support bracket mounting bolts and remove the bracket.
17. Compress the tensioner plunger in the engine mount bracket, remove the special tool, and then remove the plunger and spring.
Installation
18. Installation is carried out in the reverse order of removal, taking into account the following points:
- a) Tighten all nuts/bolts to the specified torque.
- b) Install and tension the timing belt as described in paragraph 7.
- c) Install and tension the accessory drive belt as described in chapter 1B.