



Note: Peugeot/Citroen requires the use of a special electronic tool (sEEM C. TRONIC belt tension measuring tool, type 105) for correct adjustment of the tension of the auxiliary drive belt equipped with a manually adjustable tensioner. This procedure varies greatly depending on engine type, model year, and belt type and condition. The procedure described below is an alternative method that does not require the use of electronic equipment. If any problems arise (for example, squealing when starting) the tension should be checked by a dealer using a special electronic tool at the earliest opportunity.
Examination
1. Place wheel chocks under the rear wheels. Raise the front of the vehicle and support it securely (see "Lifting and installing the car on supports"). Remove the right front wheel.
2. From under the front of the car, unscrew the screws, remove the fasteners and remove the mudguard (or a technological cover on it) wheel arch to gain access to the crankshaft sprocket/pulley bolt. If necessary, release the coolant hoses from the clamps on the fender for easier access later.
3. Using a suitable socket and extension, slowly rotate the crankshaft by the crankshaft sprocket/pulley bolt while inspecting the drive belt(s) along their entire length. Inspect the drive belt(s) for cracks, cuts, abrasions, or other damage. Also check the belt for signs of "glazing," which makes the belt shiny, and signs of delamination. If the belt is worn or damaged, replace it.
4. On 1.9L DW series engines with power steering (but without air conditioning), which are equipped with an automatic belt tensioner, check the position of the wear indicators on the tensioner pulley lever and shield (figure 12.4). The indicator mark on the shield should be located between these two marks on the tensioner lever. If this is not the case, the belt is stretched and should be replaced.
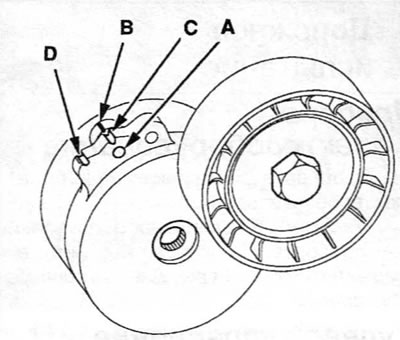
Figure 12.4. Automatic tensioner of the auxiliary drive belt
A. Hole for tensioner lever locking rod
B. Indicator mark on the shield and installation hole for the locking rod
C. Zero wear mark (right) on the tensioner lever
D. Maximum wear mark (left) on the tensioner lever
[The source is located on the website: PeugeotBook.ru]
5. If the belt condition is satisfactory, on models where the belt is adjusted manually, check its tension as described below, taking into account the Note given at the beginning of this paragraph. On models with an automatic spring-loaded tensioner, there is no need to check the drive belt tension.