



Table of contents: Checking the condition of the…🠇 Removal, installation and adjusting…🠇 Removal, installation and adjusting…🠇
Auxiliary V-belt tension adjustment elements (1.6 and 1.8 liter models without air conditioning)
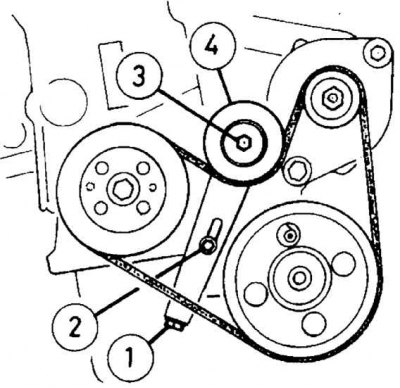
1. Adjusting bolt; 2. Tensioner mechanism fixing bolt; 3. Tensioner pulley mounting bolt; 4. Tension pulley
Auxiliary V-belt tension adjustment elements (2.0 liter models without air conditioning)
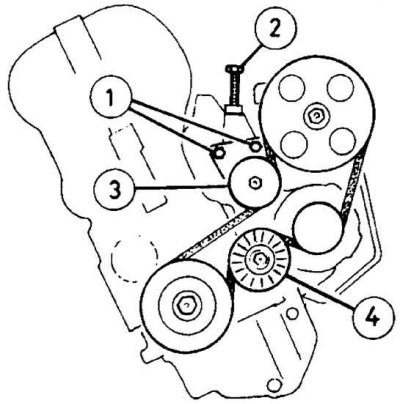
1. Tensioner mechanism fixing bolts; 2. Adjusting bolt; 3. Tension pulley; 4. Idler pulley
Auxiliary V-belt tension adjustment elements (models with air conditioning)
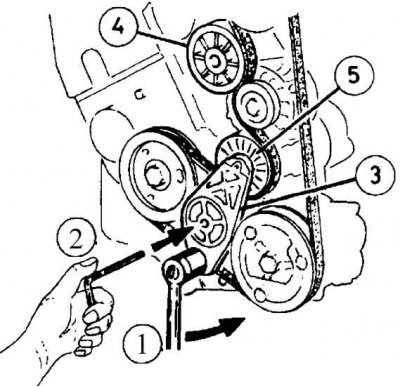
1. Square key for adjusting the tension mechanism; 2. Socket wrench 4.0 mm; 3. Tension mechanism bracket; 4. Idler pulley; 5. Tension pulley
Caution! Depending on the model and equipment installed, access to the accessory drive belt may be extremely limited. If more working space is required, the ignition/fuel injection electronic control unit (ECU) must be removed.
Please note: On models with manual drive belt tension adjustment, Peugeot recommends using a special electronic tool (SEEM C105. 5) to accurately set the drive belt tension. If this tool is not available, an approximate setting can be achieved using the method described below. When using the approximate belt tension method, the tension should be checked as soon as possible using an electronic tool.
On models equipped with a V-belt, tension is adjusted manually on models without air conditioning and automatically on models with air conditioning.
Checking the condition of the auxiliary drive belt
1. Apply the handbrake and raise the front of the car.
2. Remove the right front wheel.
3. Remove the screws, detach the brackets and remove the protective arch from under the right front fender to gain access to the crankshaft pulley bolt. Remove the front mudguard if necessary.
4. Using a socket wrench with an extension, installed on the crankshaft pulley mounting bolt, turn the crankshaft, examine the condition of the belt for cracks, delamination and oiling. Replace the belt if necessary.
5. If the belt condition is satisfactory, then on models without air conditioning, check the belt tension.
Removal, installation and adjusting the tension of the auxiliary drive belt (models without air conditioning)
Removal
1. Remove the negative cable from the battery.
2. Apply the handbrake and raise the front of the car.
3. Remove the right front wheel.
4. Remove the screws, detach the brackets and remove the protective arch from under the right front fender to gain access to the crankshaft pulley bolt. Remove the front mudguard if necessary.
5. Unscrew the two bolts (or one) that secure the tensioning mechanism. (see figure Elements for adjusting the tension of the auxiliary V-belt (1.6 and 1.8 liter models without air conditioning) or drawing Elements for adjusting the tension of the auxiliary V-belt (2.0 liter models without air conditioning)).
6. By turning the adjusting bolt, move the tensioner pulley away from the drive belt until it is completely loose.
Installation
7. Place the drive belt on the pulleys in the following order:
Article republished from the website [PeugeotBook.ru]
- power steering pump;
- crankshaft;
- generator;
- idler pulley (2.0 liter models):
- tension pulley.
8. Check that the belt is correctly installed on the pulleys without twisting. Remove belt slack by turning the belt tension adjusting bolt.
Tension
9. If the belt is not tensioned enough, it will slip on the pulleys and make a squealing noise. If the belt is too tight, the alternator bearings may fail.
10. The belt should be tensioned so that when pressing with the thumb on the long side of the belt, the deflection is approximately 5.0 mm.
11. To adjust the tension, unscrew the two bolts (or one) securing the tensioner mechanism and, by turning the adjusting bolt, move the tensioner pulley toward the drive belt. After adjusting the belt tension, turn the crankshaft four times and recheck the belt tension.
12. After the belt tension is adjusted, tighten the tensioner fixing bolt. Connect the negative cable to the battery.
13. Place the wheel arch under the wing, mudguard, wheel and lower the car.
Removal, installation and adjusting the tension of the auxiliary drive belt (models with air conditioning)
Removal
1. Remove the negative battery cable. Apply the handbrake and raise the front of the car. Remove the right front wheel. Remove the screws, detach the brackets and remove the protective arch from under the right front fender to gain access to the crankshaft pulley bolt. Remove the front mudguard if necessary.
2. Move the tensioner pulley away from the drive belt using a square key installed in the automatic tensioner bracket (see figure Auxiliary V-belt tension adjustment elements (models with air conditioning)). Once the tensioner is released, secure it in place by inserting a 4.0mm socket wrench into the hole. Remove the drive belt from all pulleys, noting the direction of rotation.
Installation and tensioning
3. Place the drive belt on the pulleys in the following order:
- tensioner pulley;
- crankshaft;
- air conditioning compressor;
- power steering pump;
- idler pulley;
- alternator.
4. If necessary, tighten the automatic tensioner fixing bolts.
5. Check that the belt is correctly installed on the pulleys without twisting. Release the tensioner by removing the square key. The tensioner spring will ensure the correct belt tension. Connect the negative cable to the battery.
6. Place the wheel arch under the wing, mudguard, wheel and lower the car.