
Removing
54. Follow the steps described in paragraphs 1 and 2, if you have not already done so.
55. Disconnect the wire «masses» from battery (refer to paragraph «Disconnecting the battery»).
56. Release the fasteners on the right side and on the top plane of the engine cover, and then remove the cover, being careful not to fall out of the corresponding rubber supports (pic. 4.6, a-c).
57. Loosen the bolt on the idler pulley guard and loosen the pulley adjuster nut located behind the power steering pump to move the pulley away from the drive belt (pic. 12.57). After obtaining enough slack in the belt to remove the latter, remove the belt from the pulleys, and then from the engine.
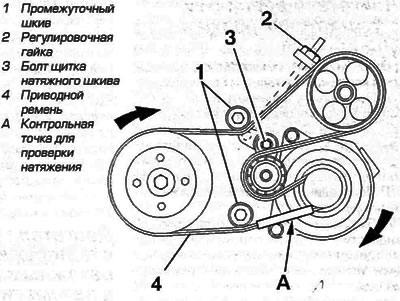
Pic. 12.57. Accessory drive belt and tensioner (DW series engines with power steering and manual tensioner)
Note. If the belt is to be reused, mark the direction of rotation on the belt before removing it. This will ensure that the belt is installed correctly.
Installation
58. When replacing a belt, make sure that the new belt is of the correct type, and if a removed belt is being installed, follow the marks made during removal to install it correctly. Put the belt on the pulleys in the following order:
- A) power steering pump;
- b) tension pulley;
- V) generator;
- G) lower intermediate pulley;
- d) crankshaft;
- e) upper intermediate pulley.
59. Slide the belt over the pulleys so that the ribs of the belt fit correctly into the grooves on the pulleys, and take up the slack in the belt by tightening the adjusting bolt. Then tension the belt as described below.
Stretching
60. Follow the steps described in paragraphs 1 and 2, if you have not already done so.
61. Proper drive belt tension ensures long belt life (see «Haynes advises» higher).
62. The belt should be tensioned so that there is a deflection of approximately 5.0 mm in the middle of the lower section between the alternator pulley and the intermediate pulley with strong thumb pressure in the middle of the lower section.
63. To make the adjustment, loosen the bolt on the idler plate and turn the adjusting nut just enough to give the correct tension. Once the belt tension is correct, rotate the crankshaft two turns and check the tension again.
64. After making sure that the belt tension is correct, securely tighten the bolt on the idler pulley guard and lightly tighten the adjusting nut.
65. Fix the coolant hoses in their original position (if applicable) and install locker (or technological cover). Install the wheel and lower the car.
66. Make sure that the rubber supports on the engine cover are correctly installed, install this cover and secure it in its normal position with the appropriate clamps.
67. Finally, connect the wire «masses» to the battery.
Advice. Attach the tensioner locking bolt/pin to a long, narrow metal plate. This allows the bolt/pin to be easily passed between the motor and inserted into the provided hole.