



Table of contents: Removal 🠇 Installation and tensioning 🠇
Note: A 6.0mm diameter bolt or rod is required to lock the spring loaded idler pulley.
Removal
76. Perform the actions described in paragraph. points 1 and 2, if you haven't done so yet.
77. Disconnect the ground cable from the battery (refer to paragraph "Disconnecting the battery").
78. Loosen the bolt on the manual tensioner pulley.
79. Using a square wrench inserted into the hole in the pulley hub, turn the manual idler pulley clockwise to move the spring-loaded pulley. Position the idler pulley so that the hole in its arm is aligned with the corresponding hole in the bracket, and then lock the pulley by inserting a 6.0mm diameter bolt/rod (figure 12.79). Make sure the spring-loaded idler pulley is securely locked, then release the manual idler pulley.
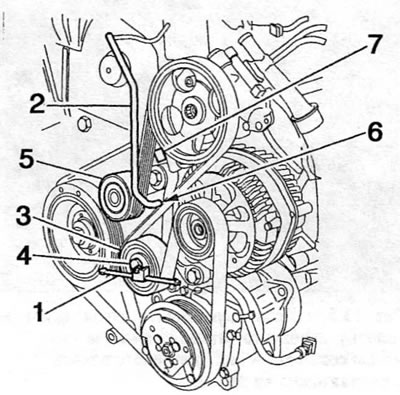
Figure 12.79. Accessory drive belt and tensioner (dW series engines with air conditioning)
1. Peugeot/Citroen special tool for moving the manual tensioner pulley
2. Peugeot/Citroen locking rod for spring-loaded tensioner
3. Drive belt
4. Manual tension pulley
5. Spring-loaded tension pulley
6. Hole for locking the spring-loaded tension pulley lever
7. Square hole in the spring tension pulley lever (accessible only with the drive belt removed)
80. Remove the belt from all pulleys, making sure it is routed correctly, and remove it from the engine.
Note: If the belt is to be reused, mark the direction of rotation on it before removing it. This will ensure that the belt is installed correctly.
Installation and tensioning
81. Make sure the spring-loaded idler pulley is locked.
Note: There is a square cutout in the pulley arm that allows the pulley to be moved with a ratchet/extension bar, but this hole is only accessible after the drive belt has been removed.
82. When replacing a belt, ensure that the new belt is the correct type, and if installing a removed belt, follow the marks made during removal to ensure it is installed correctly. Place the belt on the pulleys in the following order:
- a) power steering pump;
- b) manual tension pulley;
- c) generator;
- d) air conditioning compressor;
- d) crankshaft;
- e) spring-loaded tension pulley.
83. Make sure the belt ribs are properly seated in the pulley grooves, and then turn the manual tensioner pulley clockwise to completely remove any slack from the belt.
84. To properly tension the drive belt, position the manual tensioner pulley to completely remove spring force from the locking bolt/rod inserted into the spring tensioner arm. Once the manual tensioner pulley is positioned correctly, tighten its mounting bolt securely.
85. Remove the locking bolt/rod, then rotate the crankshaft four full turns. Make sure the locking bolt/rod can still be inserted easily. If not, loosen the manual tension pulley mounting bolt and repeat the adjustment procedure.
(Text taken from the website: peugeotbook.ru)
86. After ensuring the correct belt tension, remove the locking bolt/rod, fix the coolant hoses in the standard position (if applicable) and install the locker (or a technological lid). Install the wheel and lower the vehicle.
87. Finally, connect the ground wire to the battery.