
Removing
18. Follow the steps in steps 1 and 2 if you have not already done so.
19. Disconnect the wire «masses» from battery (refer to paragraph «Disconnecting the battery»).
20. Loosen the two bolts securing the idler pulley assembly to the engine (pic. 12.20).
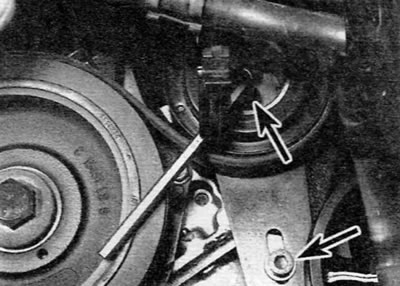
Pic. 12.20. Loosen the two screws securing the tension roller (marked with arrows)...
21. Turn the adjusting bolt to move the idler pulley away from the drive belt and provide enough slack in the belt to remove the belt, then remove the belt from the pulleys (pic. 12.21).
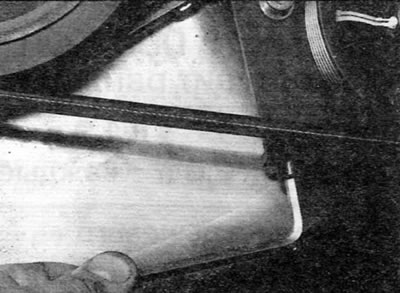
Pic. 12.21....then turn the idler adjusting bolt to relieve the tension on the belt (XUD series motors)
Note. If the belt is to be reused, mark the direction of rotation on the belt before removing it. This will ensure that the belt is installed correctly.
Installation
22. When replacing a belt, make sure that the new belt is of the correct type, and if a removed belt is being installed, follow the marks made during removal to install it correctly. Slide the belt over the pulleys so that the ribs of the belt fit correctly into the grooves on the pulleys and the belt is routed properly.
23. Take up the slack in the belt with the idler pulley adjusting bolt. Then tension the belt as described below.
Stretching
24. Follow the steps described in points 1 and 2, if you have not already done so.
25. Proper drive belt tension will ensure a long service life.
26. The belt should be tensioned so that there is approximately 5.0 mm deflection in the middle of the longest section between the pulleys when pressing hard with your thumb (see note at the beginning of this paragraph).
27. To make the adjustment, loosen the two screws securing the idler pulley assembly and turn the adjusting bolt just enough to give the correct tension. Once the belt tension is correct, rotate the crankshaft two turns and check the tension again.
28. After verifying that the belt tension is correct, securely tighten the idler pulley assembly mounting screws and connect the wire «masses» to the battery.
29. Fix the coolant hoses in their original position and install the locker (or technological cover). Install the wheel and lower the car.