



Examination
1. Place wheel chocks under the rear wheels. Raise the front of the vehicle and support it securely (see "Lifting and installing the car on supports"). Remove the right front wheel.
2. From under the front of the vehicle, remove the screws, remove the clips and remove the wheel arch liner to gain access to the crankshaft sprocket/pulley bolt. If necessary, release the coolant hoses from the clips on the fender for easier access later.
3. Using a suitable socket and extension, rotate the crankshaft using the crankshaft sprocket/pulley bolt while inspecting the drive belt along its entire length. Inspect the drive belt for cracks, cuts, abrasions, or other damage. Also check the belt for signs of "glazing," which makes the belt shiny, and signs of delamination. If the belt is worn or damaged, replace it.
4. Check the position of the wear indicators on the tensioner pulley lever and shield (figure 12.4). The indicator mark on the dashboard should be located between the two marks on the tensioner lever. If this is not the case, the belt is stretched and should be replaced.
5. If the belt condition is satisfactory, install the wheel arch liner and wheel. Lower the car.
Removal
Note: A 4.0mm diameter bolt or rod is required to lock the spring loaded idler pulley.
6. Follow the steps described in paragraph. points 1 and 2, if you haven't done so yet.
7. Disconnect the ground cable from the battery (refer to paragraph "Disconnecting the battery").
8. Using a wrench/socket on the center bolt of the spring loaded idler pulley, move the idler pulley away from the belt until the drive belt can be removed from one of the pulleys. After partially removing the belt, align the zero wear mark (right) on the tensioner lever (figure 12.4) with the indicator mark on the shield and lock the tensioner by inserting a bolt/rod with a diameter of 4.0 mm (figure 13.8, a, b). Make sure the bolt/rod is properly seated in the shield, then release the tensioner.
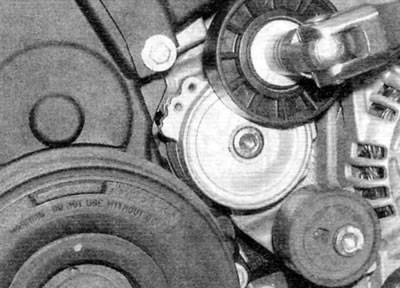
Figure 13.8, a. Using a wrench/socket head, turn the idler pulley by the bolt to align the zero wear mark with the indicator on the dashboard...
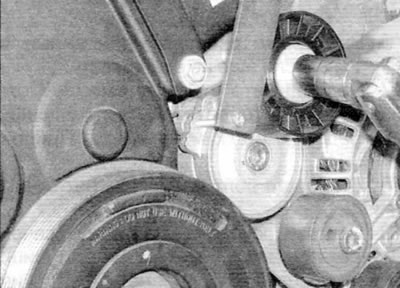
Figure 13.8, b....and lock it by inserting a bolt/rod through the holes in the lever and shield (2.0 L engine)
9. Remove the belt from all pulleys, noting how it is routed, and remove it from the engine.
Note: If the belt is to be reused, mark the direction of rotation on it before removing it. This will ensure that the belt is installed correctly.
Installation
Used belt
10. If installing a removed belt, follow the marks made during removal to ensure proper installation. Place the belt on the pulleys in the following order:
(Data published on the website: PeugeotBook)
- a) power steering pump;
- b) manual tension pulley;
- c) generator;
- d) air conditioning compressor/lower idler pulley (whichever is applicable);
- d) crankshaft.
11. Place a wrench/socket onto the spring tensioner pulley bolt. Move the idler pulley away from the belt enough to remove the locking bolt/rod, then slide the belt onto the pulley. Make sure the belt ribs are properly seated in the pulley grooves, and then slowly release the spring-loaded tensioner to tighten the drive belt.
12. Secure the coolant hoses in their normal position (if applicable) and install the locker. Install the wheel and lower the vehicle.
13. Finally, connect the ground wire to the battery.
New belt
14. Make sure that the spring-loaded tension pulley is positioned so that the zero wear mark (right) is correctly aligned with the indicator on the dashboard (see item 8).
15. Loosen the manual tensioner pulley bolt, then install the new drive belt onto the pulleys in the following order:
- a) power steering pump;
- b) manual tension pulley;
- c) generator;
- d) air conditioning compressor/lower idler pulley (whichever is applicable);
- d) crankshaft;
- e) spring-loaded tension pulley.
16. Make sure the belt ribs are properly seated in the pulley grooves, and then turn the manual tensioner pulley clockwise to completely remove any slack from the belt. To turn the pulley, use a square key inserted into the hole in the pulley hub.
17. To properly tension the drive belt, position the manual tensioner pulley so that the spring force is completely removed from the locking bolt/rod inserted into the spring-loaded tensioner pulley shield (figure 13.17). Once the manual tensioner pulley is positioned correctly, tighten its mounting bolt securely.
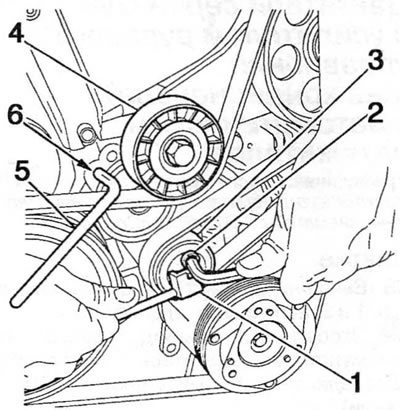
Figure 13.17. Adjusting the accessory drive belt (2.0 L engines)
1. Peugeot/Citroen special tool for moving the manual tensioner pulley
2. Manual tension pulley mounting bolt
3. Manual tension pulley
4. Spring-loaded tension pulley
5. Peugeot/Citroen locking rod for spring-loaded tensioner
6. Hole for locking the spring-loaded tension pulley lever
18. Remove the locking bolt/rod, then rotate the crankshaft four full turns. Make sure the holes in the idler pulley and shield are still aligned and you can now insert the 2.0mm diameter adjusting tool through both holes. If not, loosen the manual tension pulley mounting bolt and repeat the adjustment procedure.
19. After ensuring the correct belt tension, remove the adjusting tool and secure the coolant hoses in their normal position (if applicable) and install the locker. Install the wheel and lower the vehicle.
20. Finally, connect the ground wire to the battery.