
Models with 1.9L engine
Removing
1. Disconnect the ground wire from the battery (see «Disconnecting the battery»).
2. Release the fasteners on the right side and top plane of the engine cover, and then carefully, so as not to lose the rubber feet, remove the cover (pic. 3.1. a-c).
3. Loosen the clamp and disconnect the EGR pipe from the EGR valve. Release the clamp and disconnect the EGR pipe from the side of the EGR valve.
Note. If the piping is secured in place with a crimp-type clamp, discard the clamp and purchase a new one to use for installation.
4. Turn out bolts of fastening of the pipeline EGR to the top part of a final collector and to a cover of a head of cylinders. Disconnect the pipeline from the manifold and remove the appropriate gasket. Throw away the gasket; when installing, use a new one.
5. Disconnect the exhaust system downpipe from the manifold as described in paragraph 21.
6. Turn away nuts of fastening of a final collector and remove remote elements from collector hairpins.
7. Remove the exhaust manifold and then the manifold gaskets. Throw away the pads; when installing, use new ones.
Installation
8. Inspect all manifold studs for signs of damage and corrosion. Completely remove all traces of corrosion and repair or replace damaged studs.
9. Clean the mating surfaces and make sure they are not deformed. Install new manifold gaskets.
10. Install the manifold, and then install the spacers on the support studs and screw on the nuts. Tighten the nuts evenly and progressively to the specified torque.
11. Install a new gasket, and then connect the EGR pipe to the manifold and securely tighten the appropriate bolts. Connect the pipeline to the EGR valve, and then fix it in its original position with the appropriate clamp and screw the bolt securing the pipeline to the cylinder head cover.
12. Connect the downpipe of the exhaust system as described in paragraph 21.
13. Install the engine cover and connect the battery.
Models with 2.0L engine
Note. The exhaust manifold is removed together with the turbocharger and, while the engine is not removed from the car, access to all bolts / nuts securing the manifold (both below and above) very limited. There are two options: either remove the engine assembly with gearbox from the vehicle, as described in chapter 2D, or remove the front subframe as described in chapter 10. The choice of option largely depends on the tools, equipment, experience and available patience.
Removing
14. The following procedure is based on the premise that the engine/transmission assembly has been removed from the vehicle. If the front subframe was removed instead, the procedure is generally the same, but it may be necessary to disconnect and move to the side some additional elements, and be patient to remove elements from the engine compartment that are sometimes significantly difficult to access.
15. If the engine is in the car, disconnect the ground wire from the battery (see «Disconnecting the battery»).
16. If the engine is in the vehicle, remove the exhaust system as described in paragraph 21.
17. Remove the intake and exhaust air lines from the rear of the turbocharger as described in paragraph 3.
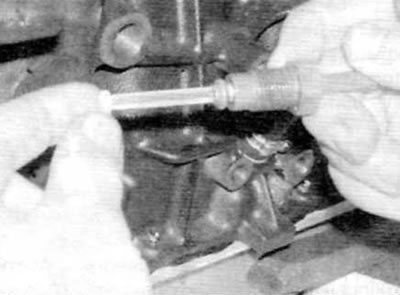
18. Unscrew the union nut securing the turbocharger oil supply line to the cylinder block, and then remove the pipeline from its normal position (pic. 18.18).

Pic. 18.18. Loosen the union nut of the turbocharger oil supply line (models with 2.0 l engine)
19. Remove the filter from the end of the oil supply line and inspect it for contamination (pic. 18.19). Clean or replace if necessary.
Pic. 18.19. Remove the oil supply line and filter (models with 2.0 l engine)
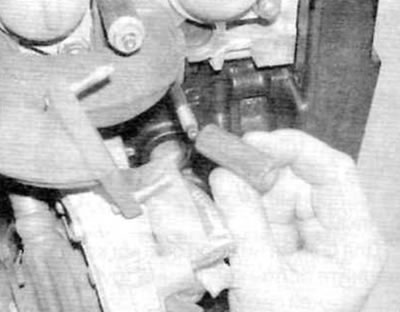
20. Turn out two bolts of fastening of a flange of a returnable oil pipeline to a turbocharger. Disassemble the flange connection and remove the gasket (pic. 18.20, a, b).

Pic. 18.20 a.m. Loosen the bolts on the flange connection of the oil return line (marked with arrows)...

Pic. 18.20 b....disassemble the flange connection and remove the gasket (models with 2.0 l engine)
21. Remove the EGR valve (EGR) and connecting pipe from the exhaust manifold, as described in paragraph 3 of chapter 4D.
22. Turn out 8 nuts of fastening of a final collector and remove remote elements from hairpins (pic. 18.22, a, b).
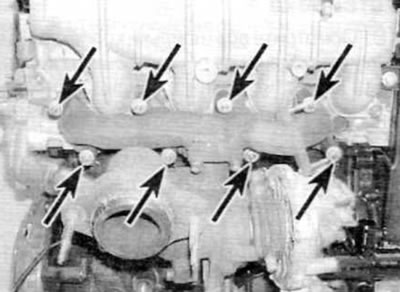
Pic. 18.22 a. Loosen the exhaust manifold nuts (marked with arrows)...
Pic. 18.22 b....and remove spacers (models with 2.0 l engine)
23. Turn away a nut and turn out a bolt of fastening of the basis of a turbocharger to a basic arm on the block of cylinders.
24 Remove the turbocharger and exhaust manifold from the support studs and remove the assembly from the engine. Remove the manifold gasket (pic. 18.24, a, 6).
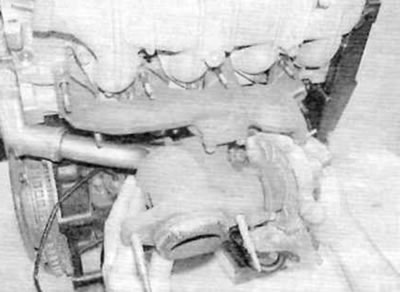
Pic. 18.24 a. Remove the turbocharger and manifold...
Pic. 18.24 b....and then a gasket (models with 2.0 l engine)
Installation
25. Installation is carried out in the reverse order of removal, taking into account the following points:
- A) Clean the mating surfaces of the manifold and cylinder head. Remove all traces of material «filmed» gaskets.
- b) Use new gaskets when installing the manifold to the cylinder head and in the flange connection between the oil return line and the turbocharger.
- V) Tighten the exhaust manifold mounting nuts to the specified torque.
- G) Install the EGR valve and connecting pipe as described in paragraph 3 of chapter 4D.
- d) Connect the intake and exhaust air lines to the rear of the turbocharger. as described in paragraph 3.
- e) If the engine is on the vehicle, install the exhaust system as described in paragraph 21.
- and) Install the engine/gearbox assembly or front suspension subframe (see chapter 2D or 10, whichever is applicable).