
English Русский
Български
Беларускі
Український
Српски
Hrvatski
Română
Polski
Slovenský
Magyar
Bookmark Articles Sitemap Contacts
Company Hyundai Company Opel Company Skoda Company Kia Company Mitsubishi Company LADA Company Audi
PeugeotBook.ru


Series 100   Series 200   Series 300   400-500   Series 600   Crossovers   Others
 
Peugeot 106 (1991-2003)

Track-rod — removal and refitting (Peugeot 106)

  • Main
  • 10X
  • Peugeot 106 (1991-2003)
  • Chassis, running gear
  • Steering
  • Track-rod — removal and refitting
0
Table of contents: Removal 🠇 Refitting 🠇
Note: A new track-rod outer end balljoint nut and a new track-rod-to-steering gear nut, must be used on refitting.


Removal


1. Chock the rear wheels then jack up the front of the vehicle and support it on axle stands (see "Jacking and vehicle support"). Remove the relevant front roadwheel.

2. Unscrew the nut securing the track-rod end to the steering arm on the suspension strut and recover the washer. Using a balljoint separator tool, separate the track-rod end from the steering arm.

3. Working in the engine compartment, unscrew the bolt securing the inner end of the track-rod to the steering gear (see illustration). It will be necessary to counterhold the nut as the bolt is unscrewed. Recover the washer from under the nut.
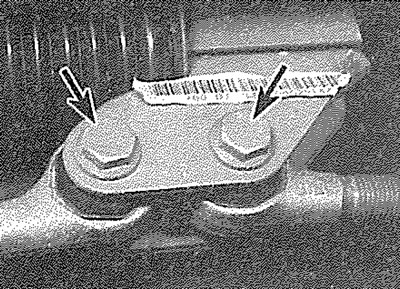
18.3. Track-rod-to-steerrng gear bolts (arrowed)

18.3. Track-rod-to-steerrng gear bolts (arrowed)


[Source can be seen at peugeotbook.ru]

4. Withdraw the track-rod through the wheel arch.

Refitting


5. Refitting is a reversal of removal, bearing in mind the following points:
  • a) Use a new track-rod outer end balljoint nut.
  • b) Use a new track-rod-to-steerlng gear nut.
  • c) Tighten all fixings to the specified torques.
  • d) On completion, have the front wheel alignment checked at the earliest opportunity (refer to Section 19 for details) and check that the steering wheel Is centralised (if necessary, the steering wheel position can be altered by removing the wheel and moving it the required number of splines on the column shaft before refitting - see Section 10).
This article is available at russian, bulgarian, belarusian, ukrainian, serbian, croatian, romanian, polish, slovak, hungarian
Article reviewed by editor: Matveev Demid
Share information:
Previous
Peugeot 106: Steering
Next

Track-rod balljoint — removal and refitting
Power steering pump — removal and refitting
Power steering hydraulic system — bleeding
Steering gear rubber gaiter — renewal
Steering gear assembly — removal, overhaul and refitting
Wheel alignment and steering angles — general information
Link to this article in different formats
Comments and feedback from visitors
No comments yet


Add two numbers 25 + 35


Peugeot 106 (1991-2003) 
  • General information
  • Introduction to manual
  • Weekly checks
  • Maintenance (petrol)
  • Maintenance (diesel)
  • Troubleshooting
  • Power unit
  • Petrol engines
  • Diesel engines
  • Engine overhaul
  • Cooling and heating
  • Fuel system (carburetor)
  • Single point injection (petrol)
  • Multipoint injection (petrol)
  • Fuel system (diesel)
  • Emission control system
  • Engine electrical equipment
  • Ignition system
  • Diesel heating
  • Transmission
  • Clutch
  • Manual gearbox
  • Automatic gearbox
  • Drive shafts
  • Chassis, running gear
  • Brake system
  • Car suspension
  • Steering
  • Body and interior
  • Exterior (external elements)
  • Interior (internal elements)
  • Doors, locks and windows
  • Electrical equipment
  • Equipment and devices
  • Electrical diagrams
PeugeotBook.ru © 2018–2026 | Mobile version | Sitemap: EN BG BY UA RS HR RO PL SK HU | Write message | Site search | Add to bookmarks | Peugeot owners
106 (1991-2003) | 206 (1998-2012) | 207 (2006-2014) | 305 (1977-1989) | 306 (1993-2002) | 307 (2001-2008) | 405 (1987-1997) | 406 (1995-2004) | 605 (1989-2000) | Partner-I (1996-2008) | Eurovans-807 (2002-2014) | Eurovans-806 (1994-2002) | J5 (1981-1993) |
Cookies are used to ensure the correct display of pages on the site.