
English Русский
Български
Беларускі
Український
Српски
Hrvatski
Română
Polski
Slovenský
Magyar
Bookmark Articles Sitemap Contacts
Company Hyundai Company Opel Company Skoda Company Kia Company Mitsubishi Company LADA Company Audi
PeugeotBook.ru


Series 100   Series 200   Series 300   400-500   Series 600   Crossovers   Others
 
Peugeot 405 (1987-1997) Peugeot 406 (1995-2004)

Adjusting the high pressure fuel pump (Peugeot 406)

  • Main
  • 40X
  • Peugeot 406 (1995-2004)
  • Power unit
  • Fuel system (diesel)
  • Adjusting the high pressure fuel pump
0
Table of contents: Adjusting the accelerator cable 🠇 Adjusting the idle speed 🠇 Adjusting the fuel dosage 🠇 Fast Idle Speed Adjustment 🠇 Shock absorber adjustment 🠇

Control lever adjustments
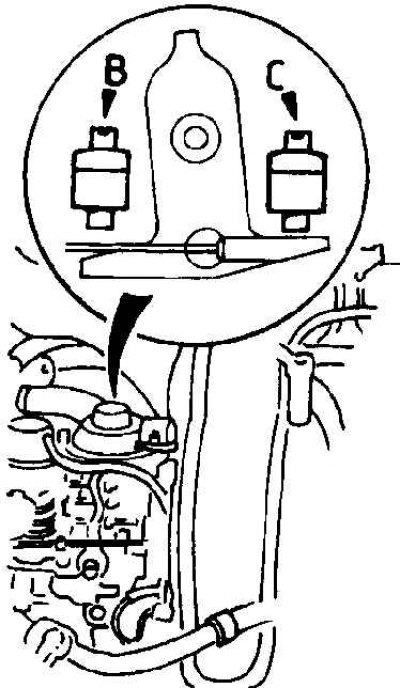


B. Idle speed adjustment screw

B. Idle speed adjustment screw
C. Fuel metering screw


Attention! The described adjustment applies only to the Bosch fuel pump. The Lucas fuel pump does not require adjustment, as it is controlled by the ECU electronic system.


Since the usual type of tachometer, which operates from the ignition system pulses, cannot be used on diesel engines, a diagnostic connector is installed on them for connecting special measuring equipment that is not available at home. If the idle speed differs from the required one, it is necessary to use a special tachometer or contact a Peugeot station.

Adjusting the accelerator cable


1. Before making adjustments, warm up the engine to normal operating temperature so that the radiator fan comes on at least twice.

2. Check the accelerator cable adjustment as follows.
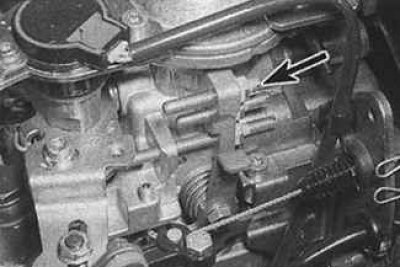
3. The lever on the fuel pump must come into contact with the maximum speed adjustment screw…


3. The lever on the fuel pump must come into contact with the maximum speed adjustment screw (indicated by the arrow), otherwise remove the accelerator cable adjusting clamp and install it in the required groove to ensure normal accelerator cable tension.


The source is located on the website [Peugeotbook.ru]

4. Remove the accelerator cable and check that the control lever is in contact with the fuel metering screw.

Adjusting the idle speed


1. Loosen the lock nut and back off the fuel metering screw until it clears the control lever.

2. Loosen the lock nut and turn the idle speed adjustment screw until the desired engine speed is set. Tighten the lock nut.

Adjusting the fuel dosage


1. Insert a 1mm thick spacer or feeler gauge blade between the pump control lever and the fuel metering adjustment screw.

2. Start the engine in idle mode. The engine speed should correspond to the required values.

3. If necessary, loosen the lock nut and set the required engine speed with the fuel metering screw. Retighten the lock nut.

4. Remove the gasket or dipstick blade and check the idle speed.

Fast Idle Speed Adjustment
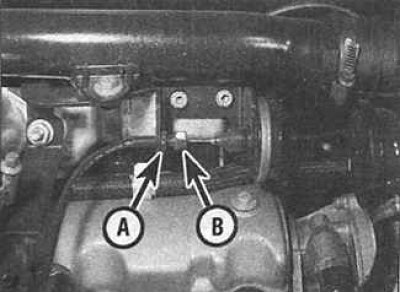


1. Turn off the engine and check that the lever is in contact with the adjusting screw. If…


1. Turn off the engine and check that the lever is in contact with the adjusting screw. If necessary, loosen the lock nut and move the nut (B) of the idle speed increase control cable. Tighten the lock nut (A).

2. Remove the vacuum hose from the idle speed increase control diaphragm and start the engine. Check that the engine runs at a high idle. If necessary, loosen the lock nut and move the idle speed increase control cable nut. Tighten the lock nut. Turn off the engine and reconnect the vacuum hose to the diaphragm.


3. Finally, turn off the tachometer.

4. If the idle speed increase adjustments are made, adjust the shock absorber.

Shock absorber adjustment


Bosch High Pressure Fuel Pump Adjustment Elements
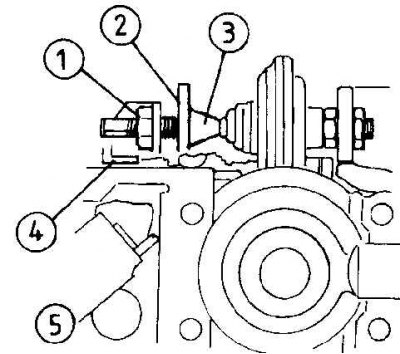


1. Lock nut; 2. Gasket; 3. Rod; 4. Adjusting screw; 5. Pump control lever

1. Lock nut; 2. Gasket; 3. Rod; 4. Adjusting screw; 5. Pump control lever


1. Make all adjustments described above.

2. Loosen the lock nut and remove the control arm damper adjustment screw located at the rear of the arm and insert a 1.0 mm thick spacer or feeler gauge blade between the damper rod and the adjusting screw (see figure Bosch high pressure fuel pump adjustment elements).

3. Turn the adjusting screw until the gap is set so that the blade of the feeler gauge can easily move between the shock absorber rod and the screw. Tighten the lock nut.
This article is available at russian, bulgarian, belarusian, ukrainian, serbian, croatian, romanian, polish, slovak, hungarian
Article reviewed by editor: Vinogradov Robert
Share information:
Previous
Peugeot 406: Fuel system (diesel)
Next

Accelerator pedal — removal and installation
Accelerator cable — removal, installation and adjustment
Air filter and air intake ducts
Filling and bleeding the fuel system
Fuel system specifications
Engine stop solenoid valve
Bosch High Pressure Fuel Pump — Removal and Installation
Lucas High Pressure Fuel Pump — Removal and Installation
Setting the injection timing
Setting the injection timing on a Bosch fuel injection pump
See similar information for other Peugeot models

➨ Fuel pump — testing, removal and refitting Peugeot 106 (1991-2003)
➨ Replacing the high pressure fuel pump (EP6DT engines) Peugeot 207 (2006-2014)
➨ Adjusting the high-pressure fuel pump Peugeot 306 (1993-2002)
➨ High pressure fuel pump — removal, installation and adjustment Peugeot 605 (1989-2000)
➨ Adjusting the high-pressure fuel pump Peugeot J5 (1981-1993)
Link to this article in different formats
Comments and feedback from visitors
No comments yet


Add two numbers 46 + 49


Peugeot 406 (1995-2004) 
  • General information
  • User manual
  • Maintenance (gasoline)
  • Maintenance (diesel)
  • Power unit
  • Gasoline engines
  • Diesel engines
  • Engine overhaul
  • Cooling and heating
  • Fuel system (gasoline)
  • Fuel system (diesel)
  • Engine electrical equipment
  • Transmission
  • Clutch and drive shafts
  • Mechanical gearbox
  • Automatic gearbox
  • Chassis, running gear
  • Brake system
  • Car suspension
  • Steering
  • Body and interior
  • Exterior (external elements)
  • Interior (internal elements)
  • Doors, locks and windows
  • Electrical equipment
  • Equipment and devices
  • Electrical circuits
Peugeot 405 (1987-1997) 
  • General information
  • User manual
  • Maintenance
  • Power unit
  • Petrol engines 1.4 l
  • Petrol engines 1.6-2.0 l
  • Diesel engines
  • Ignition system
  • Fuel system (carburetor)
  • Single point fuel injection
  • Multipoint fuel injection
  • Cooling and lubrication system
  • Exhaust system
  • Transmission
  • Clutch
  • Manual gearbox MA
  • Manual gearbox BE
  • Automatic gearbox
  • Drive shafts
  • Chassis, running gear
  • Steering
  • Front suspension
  • Rear suspension
  • Brake system
  • Body and interior
  • Exterior (external elements)
  • Interior (internal elements)
  • Doors, locks and windows
  • Electrical equipment
  • Equipment and devices
  • Electrical circuits
PeugeotBook.ru © 2018–2026 | Mobile version | Sitemap: EN BG BY UA RS HR RO PL SK HU | Write message | Site search | Add to bookmarks | Peugeot owners
106 (1991-2003) | 206 (1998-2012) | 207 (2006-2014) | 305 (1977-1989) | 306 (1993-2002) | 307 (2001-2008) | 405 (1987-1997) | 406 (1995-2004) | 605 (1989-2000) | Partner-I (1996-2008) | Eurovans-807 (2002-2014) | Eurovans-806 (1994-2002) | J5 (1981-1993) |
Cookies are used to ensure the correct display of pages on the site.