
English Русский
Български
Беларускі
Український
Српски
Hrvatski
Română
Polski
Slovenský
Magyar
Bookmark Articles Sitemap Contacts
Company Hyundai Company Opel Company Skoda Company Kia Company Mitsubishi Company LADA Company Audi
PeugeotBook.ru


Series 100   Series 200   Series 300   400-500   Series 600   Crossovers   Others
 
Peugeot 405 (1987-1997) Peugeot 406 (1995-2004)

Lucas High Pressure Fuel Pump — Removal and Installation (Peugeot 406)

  • Main
  • 40X
  • Peugeot 406 (1995-2004)
  • Power unit
  • Fuel system (diesel)
  • Lucas High Pressure Fuel Pump — Removal and Installation
0
Table of contents: Removal 🠇 Installation 🠇
Caution: Be careful not to allow dirt to enter the fuel pump or high pressure line when working on the fuel pump. Also, always use a new seal.


Removal


1. Disconnect the negative battery terminal.

2. Remove the fuel injection system electronic control unit (ECU) and ECU box.

3. Remove the intake manifold system and the upper portion of the intake manifold.

4. Remove the auxiliary drive belt.

5. Remove the alternator.

6. Unscrew the bolts and remove the intermediate bracket (power steering pump and generator) on the side of the cylinder block.

7. Remove the bolts securing the wiring harness to the engine and move the fastener away from the fuel pump. You may have to disconnect some electrical connectors to move the wiring harness far enough. Label all connectors that you disconnect.

8. Remove the timing belt cover that covers the fuel pump pulley.

9. Unscrew the fuel supply and return hoses from the pump. Close the open ends of the hoses with appropriate plugs.

10. Disconnect the electrical wires from the pump and the hose clamps.
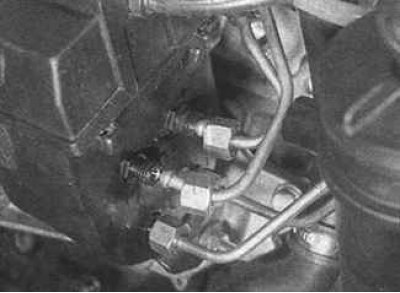
11. Unscrew the nuts securing the injector pipes to the fuel pump.


11. Unscrew the nuts securing the injector pipes to the fuel pump.


12. Using the crankshaft pulley, turn the crankshaft in the direction of engine rotation until the two bolt holes in the high-pressure fuel pump pulley align with the corresponding holes in the engine. The engine will turn more easily if the glow plugs are removed.
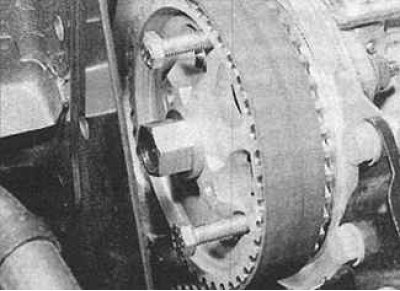
13. Insert two M8 bolts through the holes in the fuel pump pulley. These bolts will hold the pulley…


13. Insert two M8 bolts through the holes in the fuel pump pulley. These bolts will hold the pulley in place while the high pressure fuel pump is removed, so you don't have to remove the timing belt.
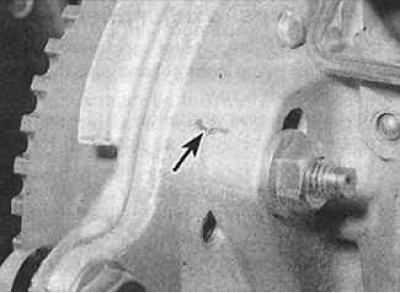
14. Mark the position of the high pressure fuel pump relative to the installation mount using a…


14. Mark the position of the high pressure fuel pump relative to the installation mount using a scriber or felt-tip pen (the mark is indicated by an arrow). This will ensure that the fuel injection timing is maintained when reinstalled in the same location.
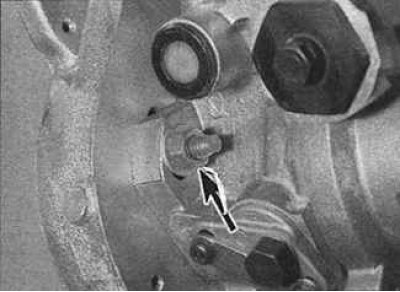


15. Unscrew the three front nuts (arrow) securing the pump.
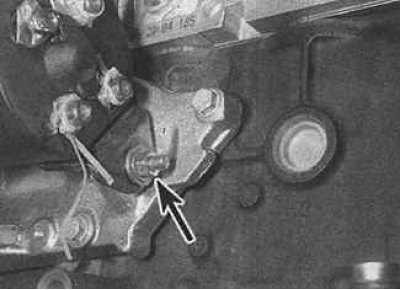

15. Unscrew the three front nuts (arrow) securing the pump.

16. Unscrew and remove the rear nut and bolt (indicated by an arrow), marking the location of the…


16. Unscrew and remove the rear nut and bolt (indicated by an arrow), marking the location of the washers, and support the fuel pump on the beam.

17. Separate the fuel pump pulley from the pump shaft.

18. Remove the pump carefully.

Installation


1. Replace the woodruff key on the pump shaft.

2. Place the pump in place and support it on a block as you did when removing it.

3. Install the pulley onto the fuel pump shaft.

4. Align the marks made on the pump and the unit hanger before removal. Install and lightly tighten the pump mounting nuts and bolt.

5. Set the fuel pump injection timing.

6. Install and re-tighten the lines connecting the fuel pump to the injectors.


7. Connect the fuel supply and return hoses.

8. Connect the high idle speed cable to the pump lever.

9. Install the timing belt cover.

10. Install the wiring harness retainer to the engine and reconnect the previously disconnected connectors.

11. Install the intermediate bracket to the cylinder block.

12. Install the alternator, power steering pump and accessory drive belt.

13. Install the upper intake manifold.

14. Install the ECU box and ECU unit.

15. Connect the negative battery terminal.

16. Remove air from the fuel system.
This article is available at russian, bulgarian, belarusian, ukrainian, serbian, croatian, romanian, polish, slovak, hungarian
Article reviewed by editor: Vinogradov Robert
Share information:
Previous
Peugeot 406: Fuel system (diesel)
Next

Bosch High Pressure Fuel Pump — Removal and Installation
Engine stop solenoid valve
Adjusting the high pressure fuel pump
Accelerator pedal — removal and installation
Accelerator cable — removal, installation and adjustment
Setting the injection timing
Setting the injection timing on a Bosch fuel injection pump
Setting the injection timing on the Lucas fuel injection pump
Fuel injectors — removal, inspection and installation
Sensors and actuators of the Bosch AS3 system
See similar information for other Peugeot models

➨ Fuel pump — testing, removal and refitting Peugeot 106 (1991-2003)
➨ Replacing the high pressure fuel pump (EP6DT engines) Peugeot 207 (2006-2014)
➨ Lucas high pressure fuel pump Peugeot 306 (1993-2002)
➨ High pressure fuel pump — removal, installation and adjustment Peugeot 605 (1989-2000)
➨ Fuel injection advance (Lucas high-pressure fuel pump) —… Peugeot Partner I (1996-2008)
Link to this article in different formats
Comments and feedback from visitors
No comments yet


Add two numbers 18 + 38


Peugeot 406 (1995-2004) 
  • General information
  • User manual
  • Maintenance (gasoline)
  • Maintenance (diesel)
  • Power unit
  • Gasoline engines
  • Diesel engines
  • Engine overhaul
  • Cooling and heating
  • Fuel system (gasoline)
  • Fuel system (diesel)
  • Engine electrical equipment
  • Transmission
  • Clutch and drive shafts
  • Mechanical gearbox
  • Automatic gearbox
  • Chassis, running gear
  • Brake system
  • Car suspension
  • Steering
  • Body and interior
  • Exterior (external elements)
  • Interior (internal elements)
  • Doors, locks and windows
  • Electrical equipment
  • Equipment and devices
  • Electrical circuits
Peugeot 405 (1987-1997) 
  • General information
  • User manual
  • Maintenance
  • Power unit
  • Petrol engines 1.4 l
  • Petrol engines 1.6-2.0 l
  • Diesel engines
  • Ignition system
  • Fuel system (carburetor)
  • Single point fuel injection
  • Multipoint fuel injection
  • Cooling and lubrication system
  • Exhaust system
  • Transmission
  • Clutch
  • Manual gearbox MA
  • Manual gearbox BE
  • Automatic gearbox
  • Drive shafts
  • Chassis, running gear
  • Steering
  • Front suspension
  • Rear suspension
  • Brake system
  • Body and interior
  • Exterior (external elements)
  • Interior (internal elements)
  • Doors, locks and windows
  • Electrical equipment
  • Equipment and devices
  • Electrical circuits
PeugeotBook.ru © 2018–2026 | Mobile version | Sitemap: EN BG BY UA RS HR RO PL SK HU | Write message | Site search | Add to bookmarks | Peugeot owners
106 (1991-2003) | 206 (1998-2012) | 207 (2006-2014) | 305 (1977-1989) | 306 (1993-2002) | 307 (2001-2008) | 405 (1987-1997) | 406 (1995-2004) | 605 (1989-2000) | Partner-I (1996-2008) | Eurovans-807 (2002-2014) | Eurovans-806 (1994-2002) | J5 (1981-1993) |
Cookies are used to ensure the correct display of pages on the site.