



Table of contents: Fuel injectors 🠇 Injector voltage values 🠇 Injector resistance values 🠇 Injector Duty Cycle Table 🠇 Nozzle type 🠇 Influence of external factors 🠇 Checking injectors (general check) 🠇 Checking the injector's performance…🠇 Checks with the engine off 🠇 Clear waveform or sufficient signal 🠇 Unclear or missing waveform or no…🠇 A Pulse duration that is too long or…🠇 Checks on a running engine 🠇 A Pulse duration that is too long or…🠇 Resistance tests 🠇
The Bosch Motronic electronic control unit determines the moment and duration of opening of the injectors depending on the engine speed and engine load. This information is received by the electronic control unit from various sensors, such as the manifold absolute pressure sensor, crankshaft angle sensor, coolant temperature sensor, and throttle position sensor. Based on this information, the electronic control unit will calculate the duration and correct moment of opening of the injectors for fuel injection depending on the engine speed, engine load and temperature range.
The Bosch Motronic MP3.2 system is a sequential multi-point fuel injection system, where all injectors inject fuel directly into the cylinders in sequence and once per engine cycle.
Fuel injectors
Fuel injectors (see illustration 11.36) have electromagnetic control. The electronic control unit operates the injectors. Voltage to the injectors comes from the main relay. The injector opening time is between 1.5 and 10 milliseconds. The fuel injection duration depends on engine temperature, engine load, engine speed and operating conditions.
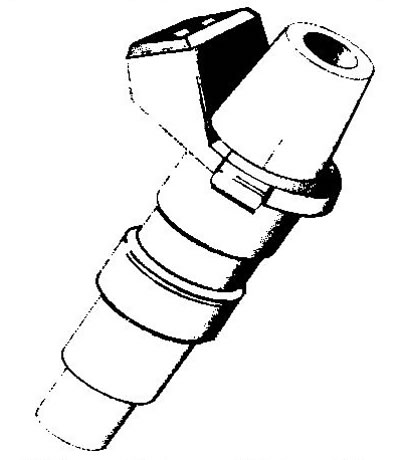
11.36 Fuel injector
When the solenoid valve closes, a reverse electromagnetic field voltage of up to 60 volts is created.
Injector voltage values
Terminal numbers
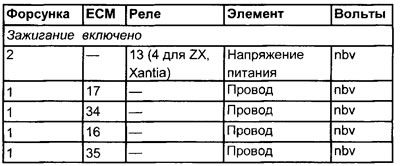
(Source available on the website www.peugeotbook.ru)
See illustration 11.37
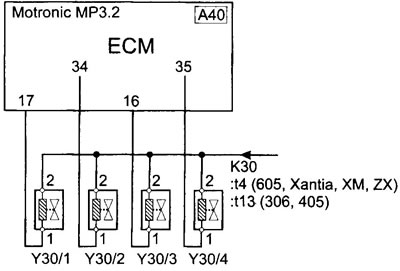
11.37 Electrical connection diagram of fuel injectors
Injector resistance values
Terminal numbers

Injector Duty Cycle Table
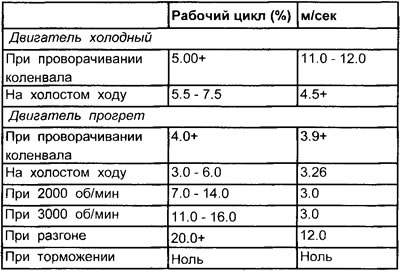
Nozzle type
Sequential fuel injection
Influence of external factors
- Vacuum leaks
- Ignition system malfunction
- The air filter is clogged
- The engine oil is contaminated
- Fuel tank ventilation malfunction
Checking injectors (general check)
1. Inspect the injector multi-pin connectors for signs of corrosion or damage.
2. Make sure the multi-pin connector terminal pins are properly installed and have good contact with the injectors.
3. Check for corrosion on the relay and injector terminals, as well as on the ECU and injector terminals. Corrosion on the terminals is the cause of poor injector performance.
Checking the injector's performance using an oscilloscope or a contact duration meter
1. Two wires are routed to the injector multi-pin connector: a power wire and a signal wire.
2. Bend back the rubber insulation (where possible) to the injector multi-pin connector, remove the protective cover or connect the output block (OB) between the electronic control unit multi-pin connector and the electronic control unit.
3. Connect the negative probe of the oscilloscope or breaker duration meter to ground on the engine.
4. Connect the positive probe of an oscilloscope or a contact duration meter to terminal #1 of the injector signal wire. Since the injectors inject fuel sequentially, they should be tested individually.
Note: The contact duration meter reading will only be obtained on the wire connecting the injector to the electronic control unit. If it is not possible to obtain a reading, connect the probe to a different terminal and repeat the test.
Checks with the engine off
1. Turn the crankshaft.
2. The device will display either a waveform or a duty cycle reading (pulse duration). If the device can measure readings in milliseconds, then this is the most successful measurement (see illustration 5.38).
3. Measure the pulse frequency. After a few seconds of cranking the crankshaft, the initial value should decrease.
Clear waveform or sufficient signal
1. There are three main points to consider:
- Does the signal waveform match the sample?
- Is the pulse signal length suitable for temperature?
- Does the pulse frequency increase over a few seconds when cranking?
2. If the answer to all three questions is "yes", then the reason for the engine not starting is unlikely to be related to the fuel injection system. However, a fuel pressure check should be performed.
3. If the primary winding signal of the ignition coil is sufficient, then the fault is unlikely to be related to the electronic control unit.
Unclear or missing waveform or no signal
1. Check the opening time of other injectors.
2. Check for sufficient signal from the crankshaft angle sensor.
3. Check the voltage supply to the injector multi-pin connector.
4. If there is no voltage, check the injector resistance and the voltage supply to the injector.
Note: If the oscilloscope shows a voltage at the battery's nominal voltage level, but there is no waveform, then voltage is reaching the injector, but the circuit is not turning on.
5. Disconnect the ECU multi-pin connector (see warning #3).
6. Turn on the ignition.
7. Using a jumper wire, very quickly touch each injector contact pin in the ECU multi-pin connector to ground.
8. If the injector fires, check the voltage supply to the electronic control unit and its grounding. If the power supply and ground are OK, then the electronic control unit may be faulty.
9. If the injector does not fire, check for battery voltage at the contact pin of the electronic control unit.
10. If there is voltage, the injector may be faulty.
11. If there is no voltage, check the continuity of the wiring between the injector multi-pin connectors and the electronic control unit multi-pin connector.
A Pulse duration that is too long or too short
1. Check the coolant temperature sensor (CTS).
2. Check the manifold absolute pressure (MAP) sensor.
Note: If the ECU used LOS mode due to a failed sensor, the engine may run properly while it is warm. However, starting the engine from a cold state may be difficult.
Checks on a running engine
1. Run the engine at different speeds. Record the values obtained at the following engine speeds.
- Idle speed
- At 2000 rpm
- At 3000 rpm
- When the throttle valve is opened slowly When the throttle valve is opened quickly
- When braking: Increase engine speed to approximately 3000 rpm and release the throttle.
2. Make sure that the pulse duration from each injector is similar to the pulse duration from other cylinders (within 0.1 ms).
3. Compare the results with the values stated in the specifications, both on a cold and on a warm running engine.
4. The pulse duration as a percentage (%) should increase as the engine speed increases.
5. The pulse duration in ms should not change significantly with a gradual increase in engine speed.
6. During acceleration, the pulse duration should increase.
7. When braking, when the engine is warm, the oscilloscope should not display the pulse duration, or it should drop to zero (digital measuring instrument) and reappear at engine speeds below 1200 rpm.
8. If the instrument reading does not drop to zero, check that the throttle valve is adjusted correctly and that the throttle position sensor (TPS) is working properly.
9. The noise from the injectors should also temporarily disappear as the fuel shut-off valve is activated.
A Pulse duration that is too long or too short
1. Check the coolant temperature sensor (CTS).
2. Check the manifold absolute pressure (MAP) sensor.
Note: If the ECU used LOS mode due to a failed sensor, the engine may run properly while it is warm. However, starting the engine from a cold state may be difficult.
Resistance tests
- Remove the injector multi-pin connectors and measure the injector resistance between the two terminals.