



Table of contents: Idle Air Control Valve (ISCV)…🠇 Idle Air Control Valve (ISCV)…🠇 Idle Air Control Valve (ISCV) Duty…🠇 Idle Air Control Valve (ISCV) Type 🠇 Checking the idle air control valve…🠇 Mechanical engine failure 🠇 Idle Air Control Valve (ISCV) Tests 🠇 Checking the functionality of the…🠇 Idle Air Control Valve Waveform or…🠇 Accurate signal, but idle speed does…🠇
Idle Air Control Valve (1SCV) (see illustration 11.32) is used by the Bosch Motronic MP3.2 electronic control unit to automatically control the idle speed at normal idle speed and during engine warm-up. The idle air control valve is located in the hose that connects the intake manifold to the air cleaner. The Bosch Motronic MP3.2 electronic control unit controls the 3-pin idle speed control valve via contact pins No. 22 and No. 4 of the electronic control unit.
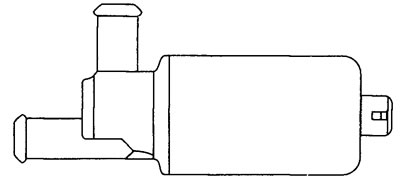
11.32 Idle Speed Control Valve (ISCV)
The idle air control valve is a DC motor that can be rotated either clockwise or counterclockwise by the electronic control unit. Rotation in one direction opens the valve, and rotation in the opposite direction closes it.
The duty cycle on each ground circuit can be measured to determine when the valve opens or closes.
When additional power consumers are turned on, such as headlights or a heater fan, the idle speed will decrease.
The normal idle speed must be maintained under all operating conditions of the engine: both cold and warm.
Idle Air Control Valve (ISCV) Voltage Values
Terminal numbers
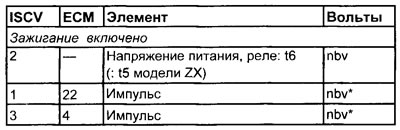
See illustrations 11.2, 11.3, 11.4, 11.5, 11.6
* With the ignition on, the device should indicate the nominal battery voltage (NBV). When the engine is running, the voltage will decrease, and as the engine load increases, the voltage will decrease further.
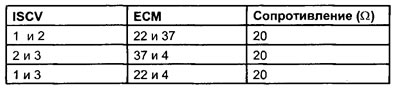
Idle Air Control Valve (ISCV) Resistance Values
Idle Air Control Valve (ISCV) Duty Cycle Chart
| Terminal | Frequency Hz | Duty cycle % |
| 1 | 31 | |
| 3 | 69 |
Idle Air Control Valve (ISCV) Type
- Rotating
- Influence of external factors
- Basic throttle valve installation
- Vacuum leak
- Throttle valve sticking
- Poorly adjusted or stuck throttle cable
- Incorrect CO adjustment
- Incorrect ignition timing
- Ignition system malfunction
- Inaccurate signal from the coolant temperature sensor
Checking the idle air control valve (ISCV) (general check)
1. Inspect the idle air control valve multi-pin connector for signs of corrosion or damage.
2. Make sure the connector terminal pins are properly installed and have good contact with the idle air control valve multi-pin connector.
3. Before diagnosing the idle air control valve, the following components must be checked.
Mechanical engine failure
- Incorrect ignition timing Incorrectly adjusted throttle valve
- The throttle position sensor (TPS) is not adjusted correctly
- The throttle valve is contaminated with carbon deposits
- Vacuum leak through the induction valve
- Incorrect CO level
- The air filter is clogged
Idle Air Control Valve (ISCV) Tests
1. Allow the engine to idle.
2. Make sure that the idle speed is within the nominal values.
3. Increase engine load by turning on the headlights, rear window defroster and heater fan. The idle speed should change.
4. Quickly squeeze one of the air hoses. The idle speed should increase and then return to the nominal value.
5. If the idle speed is higher than the nominal values, this does not indicate a malfunction.
Checking the functionality of the ISCV valve using an oscilloscope, voltmeter, or contact duration meter
1. Three wires are connected to the idle air control valve multi-pin connector: a power wire and two signal wires.
2. Bend back the rubber insulation (where possible) connect to the WF1 multi-contact connector of the idling control valve, or connect the output unit (BB) between the multi-contact connector of the electronic control unit and the electronic control unit.
3. Connect the negative probe of an oscilloscope, voltmeter, or breaker duty cycle meter to ground on the engine.
4. Connect the positive probe of an oscilloscope, voltmeter, or contact duration meter to one of the terminals of the idle air control valve signal wire.
5. The engine is running. The instrument shall display a square wave, alternating voltage or duty cycle in accordance with the values stated in the specifications (see illustration 11.33).
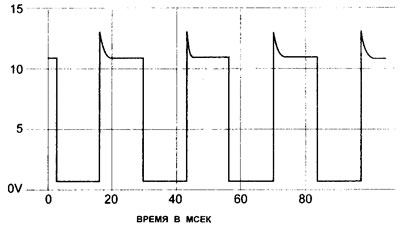
11.33 Typical waveform of the idle speed control valve signal from the electronic control unit
Note: The digital voltmeter will display average voltage.
6. Increase engine load by turning on the headlights, rear window defroster and heater fan. Average voltage and duty cycle will change. The pulse frequency must remain constant.
Idle Air Control Valve Waveform or Signal Missing
1. Turn on the ignition and check for battery voltage at the power wire terminal.
2. If there is no voltage, trace the wiring back to the appropriate terminal on the ECU.
3. Check for continuity in the wires between the idle speed control valve and the terminals of the electronic control unit.
Accurate signal, but idle speed does not correspond to nominal values
1. Disconnect the idle air control valve multi-pin connector.
2. Check the resistance between the indicated terminals.
Note: Make the following connections very quickly.
3. Using a jumper wire, connect the battery to one of the terminals of the idle air control valve power wire.
4. Using a second jumper wire, connect the IAC valve switch wire terminal to ground. The idle air control valve should work.
5. Move the second jumper wire to connect the other terminal of the idle air control valve to ground. The idle air control valve should operate in the reverse direction.
6. If the idle air control valve does not operate or its operation is reduced, the idle air control valve may be faulty.