
English Русский
Български
Беларускі
Український
Српски
Hrvatski
Română
Polski
Slovenský
Magyar
Bookmark Articles Sitemap Contacts
Company Hyundai Company Opel Company Skoda Company Kia Company Mitsubishi Company LADA Company Audi
PeugeotBook.ru


Series 100   Series 200   Series 300   400-500   Series 600   Crossovers   Others
 
Partner I (1996-2008) Peugeot 807 (2002-2014) Peugeot 806 (1994-2002) Peugeot J5 (1981-1993)

Removal and installation a BOSCH pump (Peugeot J5)

  • Main
  • Пежо
  • Peugeot J5 (1981-1993)
  • Diesel engine
  • Fuel injection (DB9)
  • Removal and installation a BOSCH pump
0
The Bosch pump is removed in the same way as the Lucas pump. However, the injection timing adjustment on both types of pumps is fundamentally different. The Bosch pump is adjusted according to the following instructions. It is assumed that the right front side of the car is raised, the wheel and mudguard are removed. The engine must be in the same condition as before the valve timing adjustment. A special tool kit designed for adjusting Bosch high-pressure fuel pumps must be available.
  • Remove the timing belt cover.
  • Unscrew the plug of the hole (1) for checking the top dead center in Figure 289.
  • Disconnect the injection pipes from the rear of the pump. A plug is visible between the injection tube connection points (position 2 in figure 296), closing the hole for adjusting injection timing. Unscrew this plug.
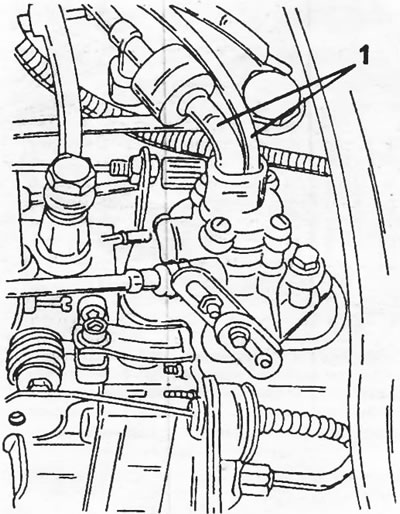
Figure 295 Disconnect both hoses (1) from the top of the high pressure fuel pump.
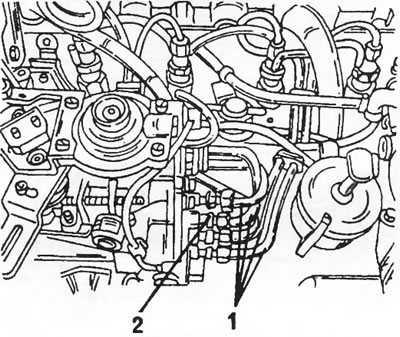
Figure 295 Disconnect both hoses (1) from the top of the high pressure fuel pump.


Figure 296. After removing the injection tubes (1), unscrew the plug (2) from the rear side of the…

Figure 296. After removing the injection tubes (1), unscrew the plug (2) from the rear side of the pump.


  • Screw in the dial indicator from the tool kit with an extension and stand in place of the plug, and install the measuring probe with a pre-tension of 1.0 mm. Figure 297 shows how to install the measuring instruments.
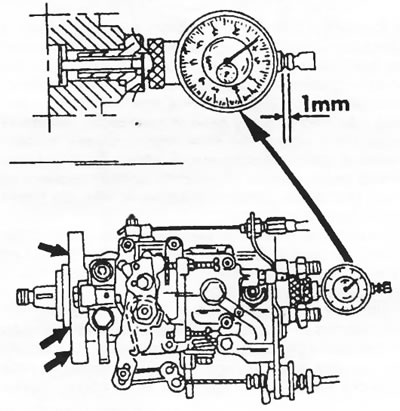
Figure 297. Adjusting the Bosch high-pressure fuel pump. The mounting bolts are indicated by arrows.

Figure 297. Adjusting the Bosch high-pressure fuel pump. The mounting bolts are indicated by arrows.

  • Determine the top dead center position of the fourth cylinder by rotating the crankshaft in both directions and finding the maximum reading on the dial indicator scale in Figure 297. The initial tension of the measuring gauge should be 1.0 mm. When checking, observe the scale as shown in Figure 298. Dimension "X" is the value to be set.
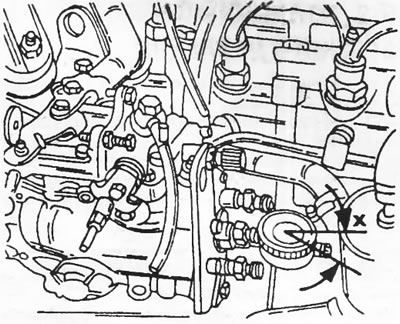
Figure 298. To obtain the dimension «X», you can read the arrow on the scale in the manner shown.

Figure 298. To obtain the dimension "X", you can read the arrow on the scale in the manner shown.


  • Reset the dial indicator scale to zero by turning the outer ring of the device.
  • Turn the engine in the operating direction to a position where the locking rod can be inserted into the cylinder block, as shown in Figure 293.
  • Take a reading from the dial indicator scale. It may vary for different engine types and is taken from the engine specification tables ("static injection timing"). Two possible values for different engine types are 0.83 mm or 0.90 mm, with a tolerance of plus or minus 0.03 mm. If the scale reading deviates from the specified value, adjustment is required.
  • Remove the front pump bolts (arrows in figure 297) and the support bolts from the rear side and tilt the pump away from the motor and outward.
  • Slowly turn the pump towards the engine until the dial gauge reading is equal to the specified value. Tighten the front bolts to a torque of 20 Nm and the rear bolts to a torque of 22 Nm. While tightening the bolts, observe the dial indicator readings in Figure 298, as they should not change (a change in readings means that the adjusted position of the pump is violated).
  • Check the pump adjustment again as described above and remove all instruments and devices. Screw the plugs into the cylinder head (30 Nm) and the back of the pump (20 Nm).
  • Connect the injection pipes. Tighten the union nuts to a torque of 20 Nm.
  • Screw in the glow plugs with a tightening torque of 22 Nm. Connect the wires.
  • Install the timing belt cover.
  • All other work is carried out in reverse order. Start the engine. Check engine operation and possibly make additional adjustments.
  • It is possible to check the adjustments described in section 19.6 and, if necessary, adjust them according to the relevant instructions. Be sure to read the section on the Bosch high-pressure fuel pump.
This article is available at russian, bulgarian, belarusian, ukrainian, serbian, croatian, romanian, polish, slovak, hungarian
Article reviewed by editor: Bespalov Alexey
Share information:
Previous
Peugeot J5: Fuel injection (DB9)
Next

Removal and installation a Lucas pump
High pressure fuel pump
Fuel filter
Precautions when working with fuel injection devices
Diesel fuel injection unit — d9b engine
Injectors — checking, removal and installation
Glow plugs
Adjusting the high-pressure fuel pump
Bosch high pressure fuel pump
Lucas high pressure fuel pump
See similar information for other Peugeot models

➨ Oil pump — removal, inspection and refitting Peugeot 106 (1991-2003)
➨ Turbocharger Cooling Pump Replacement (EP6DT Engines) Peugeot 207 (2006-2014)
➨ Fuel injection pump (Bosch) — checking and adjusting injection… Peugeot 305 (1977-1989)
➨ Installation of high pressure fuel pump BOSCH Peugeot 405 (1987-1997)
➨ Oil pump — removal Peugeot 605 (1989-2000)
Link to this article in different formats
Comments and feedback from visitors
No comments yet


Add two numbers 37 + 27


Partner I (1996-2008) 
  • General information
  • Introduction to the guide
  • Faults en route
  • Weekly checks
  • User manual
  • Maintenance (petrol)
  • Maintenance (diesel)
  • Power unit
  • Petrol engines
  • Diesel engines «XUD»
  • Diesel engines «DW»
  • Overhaul of petrol engines
  • Overhaul of diesel engines
  • Cooling and heating
  • Power and exhaust (petrol)
  • Power and exhaust (XUD diesels)
  • Power and exhaust (DW diesels)
  • Emission reduction
  • Starting and charging system
  • Transmission
  • Clutch
  • Mechanical gearbox
  • Drive shafts
  • Chassis, running gear
  • Brake system
  • Car suspension
  • Steering
  • Body and interior
  • Exterior (external elements)
  • Interior (internal elements)
  • Doors, locks and windows
  • Electrical equipment
  • Equipment and devices
  • Electrical circuits
Peugeot 807 (2002-2014) 
  • General information
  • Operating instructions
  • Maintenance
  • Troubleshooting
  • Power unit
  • Gasoline engines
  • Diesel engines
  • Cooling and heating
  • Fuel injection (petrol)
  • Fuel system (diesel)
  • Fuel system
  • Exhaust system
  • Ignition system
  • Transmission
  • Clutch
  • Manual gearbox
  • Automatic gearbox
  • Chassis, running gear
  • Brake system
  • Car suspension
  • Steering system
  • Body and interior
  • Exterior (external elements)
  • Interior (internal elements)
  • Electrical equipment
  • Power devices
  • Electrical circuits
Peugeot 806 (1994-2002) 
  • General information
  • User manual
  • Maintenance
  • Power unit
  • Petrol engines
  • Diesel engines
  • Lubrication system
  • Cooling system
  • Fuel injection (petrol)
  • Fuel system (diesel)
  • Ignition and exhaust systems
  • ECM Bosch Motronic MP 3.2
  • ECM Magneti-Marelli (MM)
  • Transmission
  • Clutch
  • Mechanical gearbox
  • Chassis, running gear
  • Brake system
  • Car suspension
  • Steering
  • Electrical equipment
  • Equipment and devices
  • Electrical circuits
Peugeot J5 (1981-1993) 
  • General information
  • Introduction to manual
  • Specifications
  • Gasoline engine
  • Engine repair
  • Lubrication system
  • Cooling system
  • Fuel system
  • Ignition system
  • Diesel engine
  • Engine repair (DB9)
  • Lubrication system (DB9)
  • Cooling system (DB9)
  • Fuel injection (DB9)
  • Engine repair (U25)
  • Lubrication system (U25)
  • Cooling system (U25)
  • Fuel injection (U25)
  • Transmission
  • Clutch
  • Gearbox
  • Drive shafts
  • Chassis, running gear
  • Steering system
  • Car suspension
  • Brake system
  • Electrical equipment
  • Power devices
  • Electrical circuits
PeugeotBook.ru © 2018–2026 | Mobile version | Sitemap: EN BG BY UA RS HR RO PL SK HU | Write message | Site search | Add to bookmarks | Peugeot owners
106 (1991-2003) | 206 (1998-2012) | 207 (2006-2014) | 305 (1977-1989) | 306 (1993-2002) | 307 (2001-2008) | 405 (1987-1997) | 406 (1995-2004) | 605 (1989-2000) | Partner-I (1996-2008) | Eurovans-807 (2002-2014) | Eurovans-806 (1994-2002) | J5 (1981-1993) |
Cookies are used to ensure the correct display of pages on the site.