
English Русский
Български
Беларускі
Український
Српски
Hrvatski
Română
Polski
Slovenský
Magyar
Bookmark Articles Sitemap Contacts
Company Hyundai Company Opel Company Skoda Company Kia Company Mitsubishi Company LADA Company Audi
PeugeotBook.ru


Series 100   Series 200   Series 300   400-500   Series 600   Crossovers   Others
 
Peugeot 106 (1991-2003)

Fuel filter renewal — carburetor models (Peugeot 106)

  • Main
  • 10X
  • Peugeot 106 (1991-2003)
  • General information
  • Maintenance (petrol)
  • Fuel filter renewal — carburetor models
0
Warning: Before carrying out the following operation, refer to the precautions given in "Safety first!" at the beginning of this manual, and follow them implicitly. Petrol is a highly-dangerous and volatile liquid, and the precautions necessary when handling it cannot be overstressed.


1. The fuel filter is situated underneath the rear of the vehicle, adjacent to the fuel tank. To gain access to the filter, chock the front wheels, then jack up the rear of the vehicle and support it on axle stands (see "Jacking and vehicle support").

2. Seal off the fuel hoses leading to and from the filter, using proprietary hose clamps, with rounded jaws - do not use G-clamps, Mole Grips or similar with flat or square jaws as these could damage the hose internally, causing leakage later.

3. Unclip the filter retaining strap from the lefthand side of the fuel tank (see illustration).
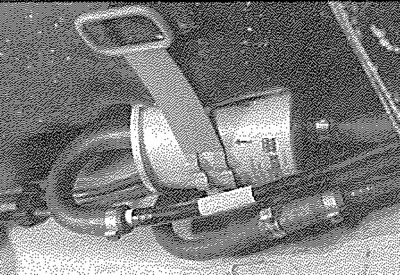
10.3. Release the fuel filter strap from the tank...

10.3. Release the fuel filter strap from the tank...


4. Noting the direction of the arrow marked on the filter body, release the retaining clips or quick-release fittings and disconnect the fuel hoses from the filter (see illustration). Where the original Peugeot crimped-type clips are still fitted, cut and discard them; replace them with standard worm-drive hose clips on installation.
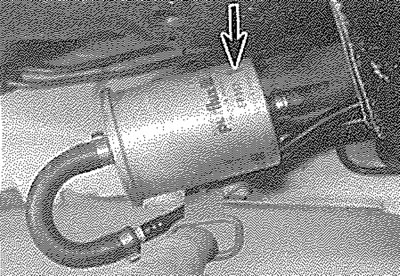


10.4. ... then detach the hoses and remove the filter. Note the direction of the arrow on the…

10.4. ... then detach the hoses and remove the filter. Note the direction of the arrow on the filter body (arrowed)


5. Remove the filter from the vehicle. Dispose safely of the old filter; it will be highly inflammable, and may explode if thrown on a fire.

6. Slide the new filter into position, ensuring that the arrow on the filter body is pointing in the direction of the fuel flow, as noted when removing the old filter. The flow direction can otherwise be determined by tracing the fuel hoses back along their length.

7. Connect the fuel hoses to the filter, securing them in position with their retaining clips (where applicable). Where quick-release hose unions are fitted, press each hose onto its respective filter port until it "snaps" into position.

(Article republished from the website PeugeotBook.ru)

8. Clip the filter strap back onto the fuel tank then lower the vehicle to the ground.

9. Start the engine and check the filter hose connections for leaks.
This article is available at russian, bulgarian, belarusian, ukrainian, serbian, croatian, romanian, polish, slovak, hungarian
Article reviewed by editor: Matveev Demid
Share information:
Previous
Peugeot 106: Maintenance (petrol)
Next

Spark plug renewal
Air conditioning system refrigerant check
Automatic transmission fluid level check
Driveshaft gaiter check
Steering and suspension check
Fuel pick-up filter cleaning — fuel-injected models
Automatic transmission fluid renewal
Ignition system check
Idle speed and mixture check and adjustment
Emission control systems check
See similar information for other Peugeot models

➨ Fuel filter Peugeot 207 (2006-2014)
➨ Fuel filter housing — modifications Peugeot 305 (1977-1989)
➨ Air Filter — Carburetor Models Peugeot 405 (1987-1997)
➨ Replacing the fuel filter Peugeot 605 (1989-2000)
➨ Thermostat/Fuel Filter Housing (1.8L and 1.9L Diesel Models) Peugeot Partner I (1996-2008)
Link to this article in different formats
Comments and feedback from visitors
No comments yet


Add two numbers 39 + 27


Peugeot 106 (1991-2003) 
  • General information
  • Introduction to manual
  • Weekly checks
  • Maintenance (petrol)
  • Maintenance (diesel)
  • Troubleshooting
  • Power unit
  • Petrol engines
  • Diesel engines
  • Engine overhaul
  • Cooling and heating
  • Fuel system (carburetor)
  • Single point injection (petrol)
  • Multipoint injection (petrol)
  • Fuel system (diesel)
  • Emission control system
  • Engine electrical equipment
  • Ignition system
  • Diesel heating
  • Transmission
  • Clutch
  • Manual gearbox
  • Automatic gearbox
  • Drive shafts
  • Chassis, running gear
  • Brake system
  • Car suspension
  • Steering
  • Body and interior
  • Exterior (external elements)
  • Interior (internal elements)
  • Doors, locks and windows
  • Electrical equipment
  • Equipment and devices
  • Electrical diagrams
PeugeotBook.ru © 2018–2026 | Mobile version | Sitemap: EN BG BY UA RS HR RO PL SK HU | Write message | Site search | Add to bookmarks | Peugeot owners
106 (1991-2003) | 206 (1998-2012) | 207 (2006-2014) | 305 (1977-1989) | 306 (1993-2002) | 307 (2001-2008) | 405 (1987-1997) | 406 (1995-2004) | 605 (1989-2000) | Partner-I (1996-2008) | Eurovans-807 (2002-2014) | Eurovans-806 (1994-2002) | J5 (1981-1993) |
Cookies are used to ensure the correct display of pages on the site.