English Русский
Български
Беларускі
Український
Српски
Hrvatski
Română
Polski
Slovenský
Magyar
Bookmark Articles Sitemap Contacts
Company Hyundai Company Opel Company Skoda Company Kia Company Mitsubishi Company LADA Company Audi
PeugeotBook.ru


Series 100   Series 200   Series 300   400-500   Series 600   Crossovers   Others
 
Peugeot 206 (1998-2012) Peugeot 207 (2006-2014)

Removal and installation the fuel level sensor (Peugeot 206)

  • Main
  • 20X
  • Peugeot 206 (1998-2012)
  • Power unit
  • Gasoline engines
  • Removal and installation the fuel level sensor
0
Table of contents: Removal 🠇 Installation 🠇
When removing and installing the fuel level sensor at Peugeot service centers, the following special tool is used:
  • key for removing and installing the bushing-nut of the fuel level sensor/fuel pump 1601-Z;
  • tube with tip for valve 0141-T1.

Removal


Remove the fuel level sensor in the following order:
  • relieve excess pressure in the fuel line by connecting the end of the device to the SHRADER valve and collect gasoline in a container;
  • fold down the back seat;

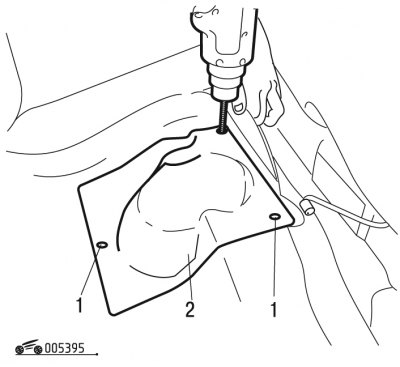
Figure 3.95. Removing the plate: 1 - rivet; 2 - plate

Figure 3.95. Removing the plate: 1 - rivet; 2 - plate

  • drill out the rivets 1 (figure 3.95) drill d 5 mm;

Attention! Drill holes, limiting the drill penetration depth to 10 mm using a stop.

  • remove plate 2;

Figure 3.96. Removing the protective cover: 1 - fuel supply pipe; 2 - fuel return pipe; 3-pin…

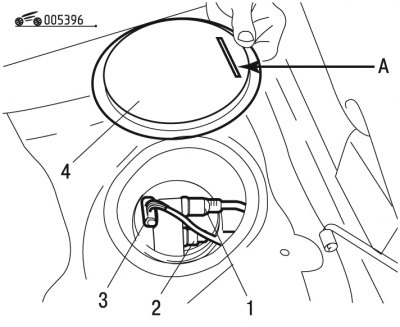
Figure 3.96. Removing the protective cover: 1 - fuel supply pipe; 2 - fuel return pipe; 3-pin connector; 4 - protective cover; A - groove


  • remove protective cover 4 (figure 3.96);
  • disconnect pin connector 3;
  • disconnect fuel supply pipe 1;
  • disconnect fuel return pipe 2;

The source is located on the website peugeotbook.ru
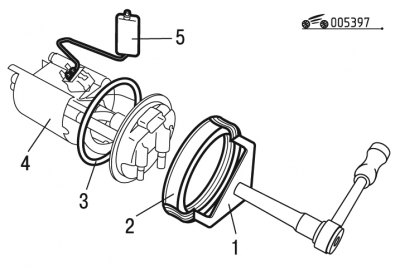
Figure 3.97. Removing the fuel level sensor: 1 - device; 2 - bushing; 3 - sealing ring; 4 - sensor;…

Figure 3.97. Removing the fuel level sensor: 1 - device; 2 - bushing; 3 - sealing ring; 4 - sensor; 5 - float

  • remove bushing 2 (figure 3.97) using device 1;
  • remove sensor 4, taking precautions not to damage or deform float 5;

Caution: Replace sealing ring 3 every time.


Installation


Install the fuel level sensor in the following order:
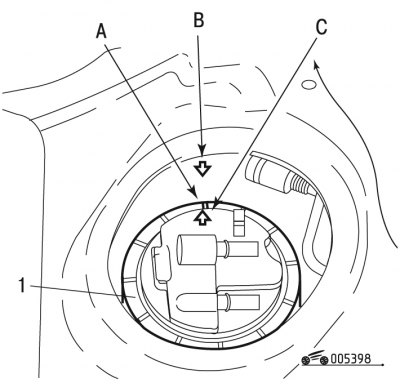
Figure 3.98. Installing the fuel level sensor: 1 - bushing; A, B, C - marks

Figure 3.98. Installing the fuel level sensor: 1 - bushing; A, B, C - marks

  • install the fuel level sensor/fuel pump assembly into the fuel tank, aligning the arrow with C (figure 3.98) with the tag B;
  • install bushing 1 in place and tighten using tool 1 (see figure 3.97), so that mark A coincides with arrow C and mark B;
  • connect tube 1 (see figure 3.96) fuel supply and fuel return pipe 2;
  • connect pin connector 3;
  • install protective cover 4 so that groove A is on the front side of the vehicle;
  • install plate 2 (see figure 3.95);
  • install the rear seat.
This article is available at russian, bulgarian, belarusian, ukrainian, serbian, croatian, romanian, polish, slovak, hungarian
Article reviewed by editor: Matveev Demid
Share information:
Previous
Peugeot 206: Gasoline engines
Next

Removal and installation the intermediate muffler on the EW10J4…
Draining oil using a vacuum pump
Recommended motor oils and their volumes
Draining and filling coolant
Removal and installation the camshaft of the EW10J4 engine
Removal and installation the fuel tank filler neck
Removal and installation the protective cap of the fuel tank…
Removal and installation the fuel tank
Exhaust gas recirculation system
General information about gasoline engines
See similar information for other Peugeot models

➨ Oil level sensor — removal and refitting Peugeot 106 (1991-2003)
➨ Fuel level sensor (model 405) — checking Peugeot 305 (1977-1989)
➨ Fuel level sensor in the tank Peugeot 405 (1987-1997)
➨ Scheme 12. Windscreen washer and wiper, heated jets and washing… Peugeot 605 (1989-2000)
➨ Fuel level indicator sensor — removal and installation Peugeot Partner I (1996-2008)
Link to this article in different formats
Comments and feedback from visitors
No comments yet


Add two numbers 49 + 34


Peugeot 207 (2006-2014) 
  • General information
  • Car care
  • Governing bodies
  • Driving and operation
  • Power unit
  • Engine characteristics
  • Engine repair
  • Cooling system
  • Lubrication system
  • Ignition system
  • Control system (gasoline)
  • Fuel system (gasoline)
  • Control system (diesel)
  • Transmission
  • Clutch
  • Mechanical gearbox
  • Automatic gearbox
  • Drive shafts
  • Chassis, running gear
  • Car suspension
  • Steering
  • Brake system
  • Body and interior
  • Exterior (external elements)
  • Interior (internal elements)
  • Heating and air conditioning
  • Electrical equipment
  • Equipment and devices
  • Headlights and lighting
  • Power devices
  • Electrical circuits
Peugeot 206 (1998-2012) 
  • General information
  • User manual
  • Maintenance
  • Power unit
  • Gasoline engines
  • Diesel engines
  • Diesel power system
  • Engine management system
  • Transmission
  • Clutch
  • Mechanical gearbox
  • Automatic gearbox
  • Drive shafts
  • Chassis, running gear
  • Front suspension
  • Rear suspension
  • Steering
  • Brake system
  • Body and interior
  • Body elements
  • Doors, locks and windows
  • Electrical equipment
  • Equipment and devices
  • Electrical circuits
PeugeotBook.ru © 2018–2026 | Mobile version | Sitemap: EN BG BY UA RS HR RO PL SK HU | Write message | Site search | Add to bookmarks | Peugeot owners
106 (1991-2003) | 206 (1998-2012) | 207 (2006-2014) | 305 (1977-1989) | 306 (1993-2002) | 307 (2001-2008) | 405 (1987-1997) | 406 (1995-2004) | 605 (1989-2000) | Partner-I (1996-2008) | Eurovans-807 (2002-2014) | Eurovans-806 (1994-2002) | J5 (1981-1993) |
Cookies are used to ensure the correct display of pages on the site.