
- remove the gearbox from the car;
- remove the crankcase, primary and secondary shafts from the gearbox;
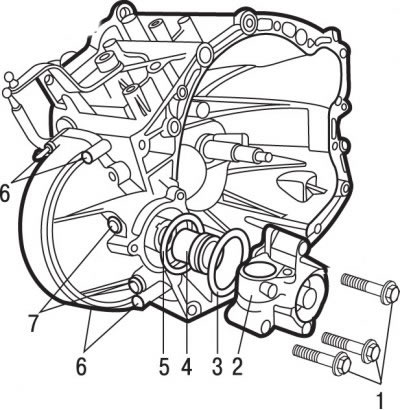
Pic. 5.34. Differential mount: 1 - fastening bolts; 2 - differential housing extension; 3 - sealing ring; 4 - speedometer drive worm; 5 - adjusting gasket; 6, 7 - differential housing mounting bolts
- unscrew bolts 1 and remove extension 2 (pic. 5.34);
- remove sealing ring 3, speedometer drive worm 4 and shim 5;
- turn out bolts of fastening of a case of differential 6 and 7;

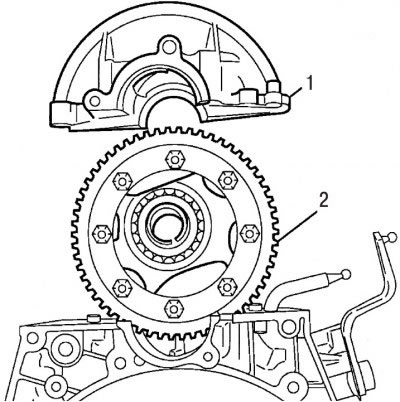
Pic. 5.35. Differential housing compartment: 1 - screwdriver blade; 2 - differential housing; A, B - recesses to facilitate the removal of the differential housing
- differential housing 2 has notches A and B (pic. 5.35), to facilitate its removal. Alternately insert a screwdriver blade into recesses A and B and, by pressing and turning it, separate the differential housing from the gearbox housing. Continue to separate the differential housing by tapping on each side with a hammer through a block of wood;
Pic. 5.36. Removing the differential housing (1) and differential boxes (2)
- remove differential housing 1 and differential housing 2 from the gearbox housing (pic. 5.36).
To install the gearbox differential housing:
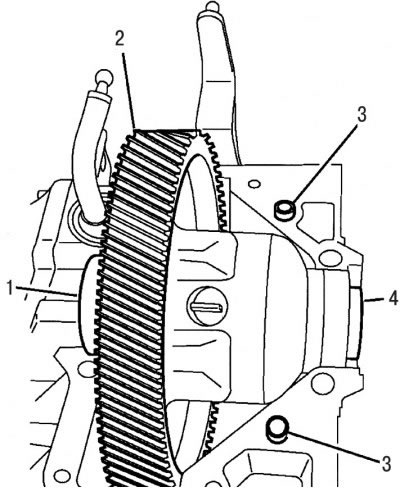
Pic. 5.37. Differential box installation: 1, 4 - outer races of bearings; 2 - differential box; 3 - dowel pins
- make sure the locating pins 3 (pic. 5.37) located in the gearbox housing;
- make sure that the mating surfaces of the differential housing and gearbox housing are clean and free from defects;
- apply a thin, even layer of sealing paste E15 to the mating surface;
- install differential box 2 with outer bearing races 1 and 4 in the gearbox housing;
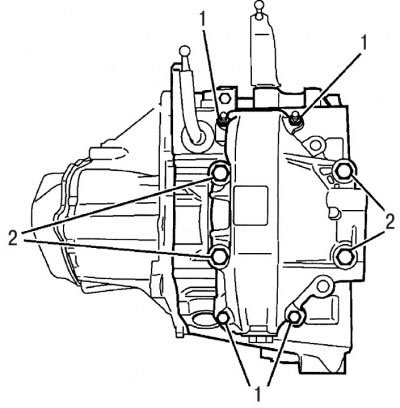
Pic. 5.38. Bolt location (1 and 2) differential housing mountings
- install the differential housing and fix it with bolts 1 and 2 (pic. 5.38);
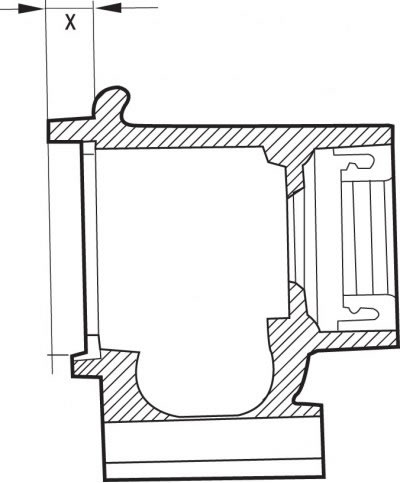
Pic. 5.39. Place of protrusion measurement (X) extension flange
- measure protrusion X (pic. 5.39) extension flange;
- with 1st installation option (protrusion of the extension flange is 10 mm) do the following:
- install worm 4 (see fig. 5.34) speedometer drive and extension 2 with a new sealing ring;
- fix the extension with bolts 1, tightening them to a torque of 15 Nm;
- tighten the bolts 7 for fastening the differential housing to a torque of 50 Nm, and bolts 6 to a torque of 12.5 Nm;
- with the 2nd installation option (protrusion of the extension flange is 8.65 mm) do the following:
- install shim 5 on the outer race of the bearing;
- install an extension without a sealing ring on the differential housing;
- gradually tighten the extension mounting bolts while turning the differential to obtain an angle of rotation that allows you to properly install the bearing races;
- remove the differential case extension;
- remove the adjusting shim;
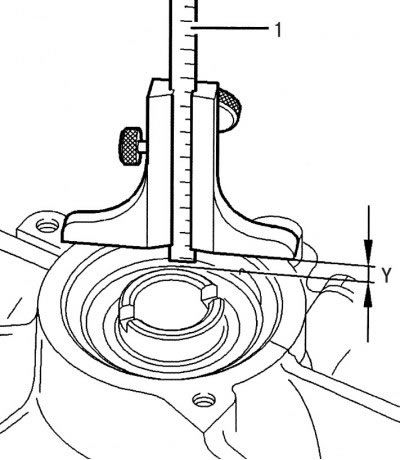
Pic. 5.40. Using a depth gauge (1) for measuring the distance between the O-ring plane (Y) and outer race of the bearing
- depth gauge 1 measure the distance between the O-ring plane Y (pic. 5.40) and the outer race of the bearing;
- calculate shim thickness: Y - X + 0.1 = shim thickness (in millimeters);
- install shim 5 (see fig. 34), worm 4 of the speedometer drive and extension 2 with a new sealing ring 3;
- tighten the extension fastening bolts 12.5 Nm;
- tighten bolts 2 (see fig. 5.38) fixing the differential housing with a torque of 50 Nm and bolts 1 with a torque of 12.5 Nm. This order of tightening the bolts will ensure good alignment of the planes to be joined;
- install the crankcase, primary and secondary shafts;
- install the gearbox on the car.