



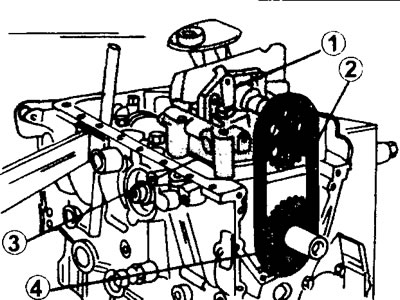
26.0 Location of the oil pump in the engine crankcase.
1 - oil pump
2 - drive chain
3 - spacer plate (if installed)
4 - oil pump drive sprocket on the crankshaft
The oil pump can be removed without removing the engine from the vehicle. The procedure is almost the same for all types of engines.
1. Place the front of the vehicle on jack stands. If possible, raise the car on a lift or place the front wheels of the car on a ramp.
2. Remove the engine splash guard.
3. Place a suitable container under the crankcase and drain the oil from the sump. The oil should be slightly warm to improve fluidity.
4. Unscrew the bolts securing the oil pan to the crankcase and disconnect the pan. If the pan is tightly seated on the crankcase, tap it with a rubber hammer and then push it out by inserting a screwdriver between the mating surfaces.
5. Remove the oil pump in the same manner as when disassembling engine 9 (see the relevant chapter).
The pump will need to be turned slightly to remove the drive chain. If the pump is removed because it does not provide the necessary oil pressure for circulation, then the pump should be sent for repair. This malfunction cannot be eliminated by simply overhauling the pump. Only the oil intake mesh filter can be replaced separately (see illustration).
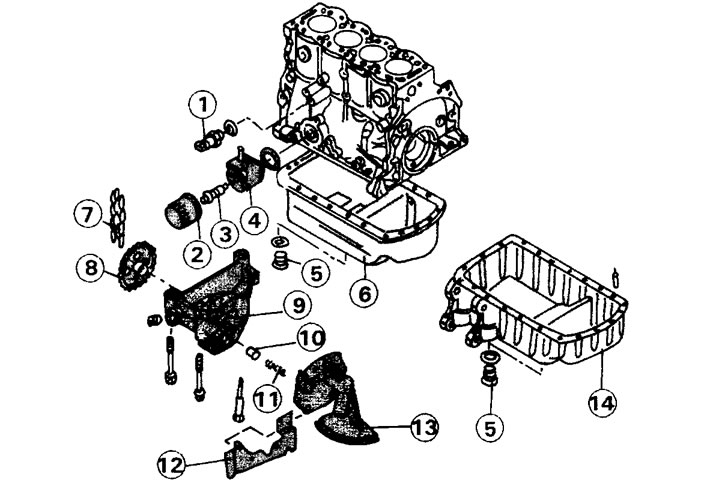
26.5 Oil pan and oil pump for the XUD 1.9 liter diesel engine
1 - oil pressure sensor with sealing ring
2 - oil filter
3 - oil filter housing mounting bolt
4 - oil radiator (diesel engines)
5 - threaded drain plug with sealing ring
6 - oil pan made of sheet iron (cars without air conditioning)
7 - oil pump drive chain
8 - drive sprocket
9 - oil pump
10 - piston of the pressure-reducing valve
11 - pressure reducing valve spring
12 - oil deflector
13 - oil intake mesh filter
14 - aluminum oil pan (cars with air conditioning)
Text taken from the website: www.PEUGEOTBOOK.ru
If you suspect a defect in the pressure reducing valve, you can unscrew the valve and replace its parts. However, to do this it is necessary to disassemble the pump.
Before installing the pump, the contact surfaces of the crankcase should be thoroughly cleaned. The use of sharp or abrasive instruments is not permitted.
6. Install the oil pump back into place. The drive chain must be placed on the sprockets. To fit the chain onto the driven sprocket, tilt the front of the pump slightly and then place the pump on the mounting pin.
7. Install the oil pan and secure it with bolts. Keep in mind that the pan mounting bolts are of different lengths.
8. Make sure the drain holes are closed with screw plugs. The tightening torque of the threaded plugs is 25-30 Nm.
9. Fill with engine oil of the appropriate grade and in the volume as prescribed in the specification.
To avoid the oil pump from seizing when starting the engine after removing and installing the pump, it is recommended to disconnect the fuel shut-off valve power supply plug on the high-pressure fuel pump or the high-voltage wires of the spark plugs and crank the engine for approximately 30 seconds using the starter. After this, connect the wires or plug and start the engine, letting it idle for a while.
10. Make sure that there is no oil leaking from the pan. After some time, check the engine oil level and top it up if necessary to bring it to the required level.