



Removal
1. Place the car on jack stands so that the rear wheels hang freely.
2. Remove the rear wheels.
3. Loosen nuts 1 and 2 and, placing a garage jack 3 or a suitable support under the bridge beam, slightly lift the beam to compress the shock absorbers slightly (see illustration).
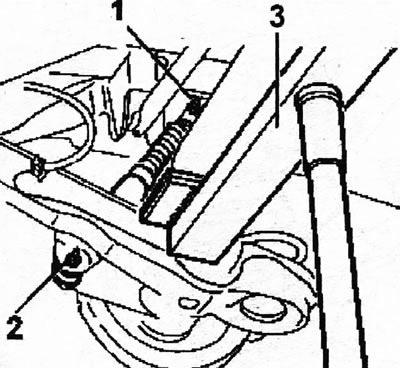
8.3. Loosen nuts 1 and 2 and, placing a garage jack 3 or a suitable support under the bridge beam, slightly lift the beam to compress the shock absorbers slightly
Original can be viewed at www.PeugeotBook.ru
4. Unscrew the nuts completely and remove the shock absorbers. Perform the specified work on both sides of the bridge.
5. Loosen the adjusting nut on the parking brake cable equalizer.
6. Disconnect the parking brake cables from the drive levers on the rear wheel brake mechanisms. Release both cables from the holders on the body.
7. Disconnect the ABS sensors, release the sensor wires from the suspension mount and move the sensors.
8. Disconnect the brake hose 3 by unscrewing the union nut and holding the hose from turning and releasing it from the mount (see illustration).
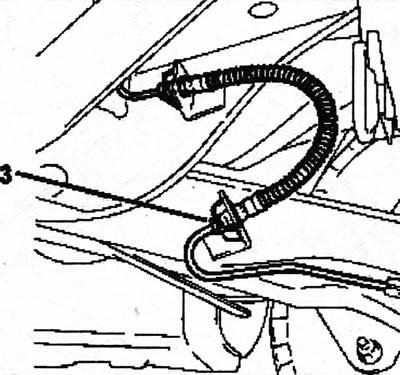
8.8. Disconnect the brake hose 3 by unscrewing the union nut and holding the hose from turning and releasing it from the mount
9. Plug the hose and wheel cylinder openings to prevent brake fluid from leaking and to prevent dirt from getting in.
10. Disconnect the sensor that registers the height of the body above the road surface from the right longitudinal arm (ground clearance).
11. Unscrew the stabilizer bar mounting bolt and lower the cross member.
12. Remove the suspension springs as soon as they are released after lowering the cross member.
13. Unscrew the two bolts that secure the rear axle to the body, disconnect it and lower it.
14. Press out the silent blocks from the cross beam that connect it to the body and install new ones (see illustration).
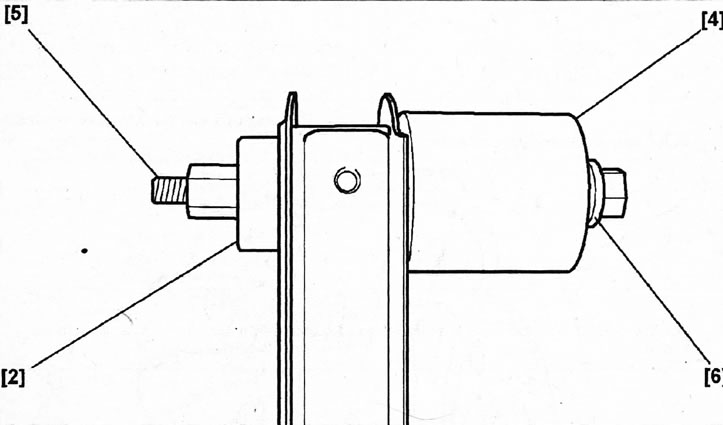
8.14. Press out the silent blocks from the cross beam, with which it is connected to the body, and install new ones
Attention! To press out silent blocks, you need the appropriate mandrels.
Installation of the rear suspension cross beam is performed in the reverse order of removal.
15. Place the garage lift with the rear axle installed on it under the raised car and place the axle with its hubs on wooden blocks.
16. Install both trailing arms into place and insert the mounting bolts.
17. Screw the nuts onto the trailing arm mounting bolts and tighten them without performing the final tightening.
18. Lubricate the ABS sensors with Loctite paste and secure them. Place and secure the wires of both sensors as they were before removal.
19. Install the coil springs and, if necessary, raise the beam slightly so that the upper and lower ends of the springs are in place. To perform this operation, an assistant is required so that both springs can be controlled simultaneously.
20. Secure the anti-roll bar by tightening the mounting bolt by hand.
21. Connect the brake hose.
22. Secure the parking brake cables. After installing the beam, it will be necessary to check the adjustment of the parking brake cable. The rear wheels should not turn if the parking brake lever is tightened to the 4th or 5th tooth of the sector.
23. Install the shock absorbers, securing them to the upper and lower supports. Do not tighten the shock absorber support bolts to the final torque.
24. Remove air from the brake system, see the relevant chapter.
25. Install the wheels and tighten the wheel bolts.
26. Lower the car onto its wheels. Tightening the rear suspension bolts and nuts to specifications must be done with the vehicle standing on its wheels. Access to some bolts and nuts becomes difficult in this case. You can use a hydraulic lift with a platform, if possible, or drive into the pit.
27. Tighten the rear suspension bolts and nuts to the specified torque.