
English Русский
Български
Беларускі
Український
Српски
Hrvatski
Română
Polski
Slovenský
Magyar
Bookmark Articles Sitemap Contacts
Company Hyundai Company Opel Company Skoda Company Kia Company Mitsubishi Company LADA Company Audi
PeugeotBook.ru


Series 100   Series 200   Series 300   400-500   Series 600   Crossovers   Others
 
Partner I (1996-2008) Peugeot 807 (2002-2014) Peugeot 806 (1994-2002) Peugeot J5 (1981-1993)

Rear Hub and Hub Bearing — Removal and Installation (Peugeot Eurovans 807)

  • Main
  • Пежо
  • Peugeot 807 (2002-2014)
  • Chassis, running gear
  • Car suspension
  • Rear Hub and Hub Bearing — Removal and Installation
0
Please note: The hub and its bearing are a non-removable unit, so they must be replaced with new ones after each disassembly. To remove the hub and inner bearing race, a universal two- or three-jaw puller is required.


For subsequent installation of the hub, you will need a suitable mandrel and thrust bearing (see illustration 9.0). If they are not available, you can use a piece of pipe of the appropriate diameter and a disk of a sufficiently large diameter.
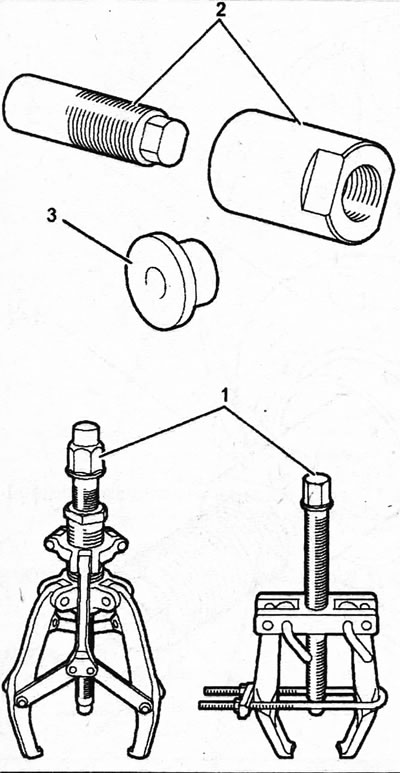
9.0. Rear Hub Removal Tools 1 - puller; 2 - mandrel; 3 - thrust bearing

9.0. Rear Hub Removal Tools 1 - puller; 2 - mandrel; 3 - thrust bearing


Removal


1. Place the rear of the vehicle on jack stands. The rear wheel suspension should be unloaded, and the rear wheels should hang freely. Place chocks under the front wheels to prevent the car from rolling forward and slipping off the jacks.

2. Remove the rear wheel to access the desired hub.

3. Use a small chisel to knock off the protective cap from the hub nut. At the same time, turn the hub so that the cap can be knocked off gradually along its circumference. When removing the cap, be careful not to damage the cap itself.

4. Remove the brake disc by disconnecting the caliper and ABS sensor, see the relevant chapter. Secure the disconnected caliper to the body using wire. Do not hang the caliper by the brake hose.


5. Unscrew the rear wheel hub nut using a socket wrench.

6. Remove hub 1 using a puller. The puller jaws are installed around the circumference of the hub. The puller spindle must rest against the hub axis to avoid damaging the threads. It is recommended to place insert 2 under the end of the spindle (see illustration).
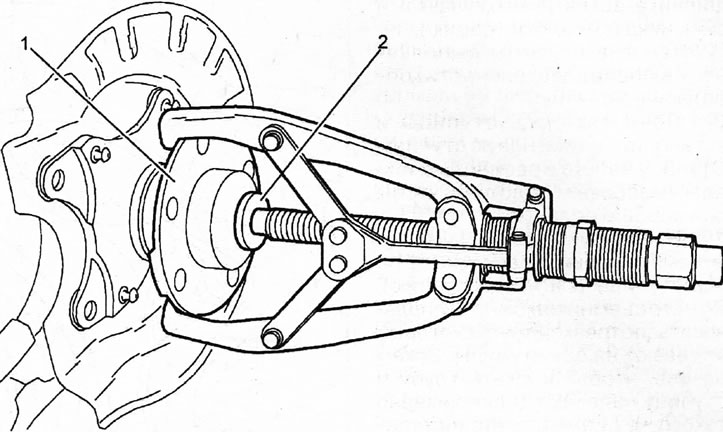
9.6. Remove hub 1 using a puller, placing liner 2 under the end of its spindle

9.6. Remove hub 1 using a puller, placing liner 2 under the end of its spindle


7. Remove the oil seal from the hub axle. To do this, you can use a screwdriver to press the seal. Mark the installation position of the oil seal.

8. Remove the inner ring 1 of the bearing, which is located on the hub axle, by grasping it with the jaws of the puller (see illustration).
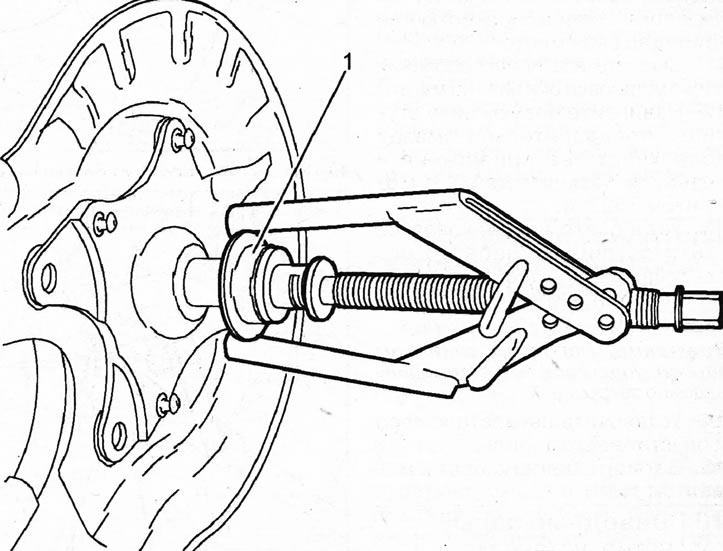
9.8. Remove the inner ring 1 of the bearing sitting on the hub axle by grasping it with the jaws of…

9.8. Remove the inner ring 1 of the bearing sitting on the hub axle by grasping it with the jaws of the puller


The hub is installed in the reverse order of its removal.

9. Clean the hub axle and install a new hub on the axle. Tap the hub with a rubber or plastic hammer until it seats properly.

10. Press on hub 1 using mandrel 2, screwing it onto the hub axle (see illustration). Instead of a puller, you can use a piece of pipe that is placed on the hub axle. Then, a disc of approximately the same diameter as the hub is placed on the axle to press the pipe and hub. The same nut is screwed onto the axle, replacing the mandrel spindle. The nut is tightened until the hub is completely in place.
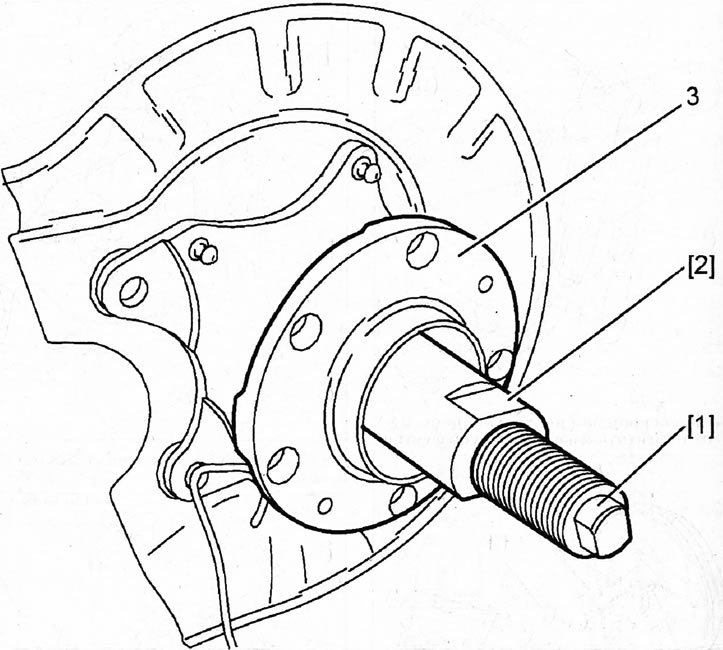
9.10. Press on hub 1 using mandrel 2

9.10. Press on hub 1 using mandrel 2


11. Remove all hardware after installing the hub in place.

12. Screw on the new hub nut, having first lubricated its mating surface and threads, and tighten the nut to a torque of 380 Nm.

13. Install the new hub nut cap and tap it in place with a plastic hammer. Now you can install the brake disc in place.

(Information posted on the website: www.PEUGEOTBOOK.ru)

Caution: Make sure the vehicle is securely supported before tightening.


14. Replace the wheel and lower the vehicle.

15. Tighten the wheel bolts to 100 Nm.
This article is available at russian, bulgarian, belarusian, ukrainian, serbian, croatian, romanian, polish, slovak, hungarian
Article reviewed by editor: Vinogradov Robert
Share information:
Previous
Peugeot 807: Car suspension
Next

Rear axle cross beam — removal and installation
Rear suspension — general information
Anti-roll bar — removal and installation
Steering knuckle — removal and installation
Lower wishbone — removal and installation
Drive shafts — removal, installation and replacement
See similar information for other Peugeot models

➨ Rear brake shoe condition check — models with rear drum brakes Peugeot 106 (1991-2003)
➨ Replacing the rear lights Peugeot 207 (2006-2014)
➨ Rear wheel bearings — removal and installation Peugeot 305 (1977-1989)
➨ Folding the rear seats Peugeot 405 (1987-1997)
➨ Rear Crankshaft Oil Seal (Flywheel Side) — Replacement Peugeot 605 (1989-2000)
Link to this article in different formats
Comments and feedback from visitors
No comments yet


Add two numbers 27 + 30


Partner I (1996-2008) 
  • General information
  • Introduction to the guide
  • Faults en route
  • Weekly checks
  • User manual
  • Maintenance (petrol)
  • Maintenance (diesel)
  • Power unit
  • Petrol engines
  • Diesel engines «XUD»
  • Diesel engines «DW»
  • Overhaul of petrol engines
  • Overhaul of diesel engines
  • Cooling and heating
  • Power and exhaust (petrol)
  • Power and exhaust (XUD diesels)
  • Power and exhaust (DW diesels)
  • Emission reduction
  • Starting and charging system
  • Transmission
  • Clutch
  • Mechanical gearbox
  • Drive shafts
  • Chassis, running gear
  • Brake system
  • Car suspension
  • Steering
  • Body and interior
  • Exterior (external elements)
  • Interior (internal elements)
  • Doors, locks and windows
  • Electrical equipment
  • Equipment and devices
  • Electrical circuits
Peugeot 807 (2002-2014) 
  • General information
  • Operating instructions
  • Maintenance
  • Troubleshooting
  • Power unit
  • Gasoline engines
  • Diesel engines
  • Cooling and heating
  • Fuel injection (petrol)
  • Fuel system (diesel)
  • Fuel system
  • Exhaust system
  • Ignition system
  • Transmission
  • Clutch
  • Manual gearbox
  • Automatic gearbox
  • Chassis, running gear
  • Brake system
  • Car suspension
  • Steering system
  • Body and interior
  • Exterior (external elements)
  • Interior (internal elements)
  • Electrical equipment
  • Power devices
  • Electrical circuits
Peugeot 806 (1994-2002) 
  • General information
  • User manual
  • Maintenance
  • Power unit
  • Petrol engines
  • Diesel engines
  • Lubrication system
  • Cooling system
  • Fuel injection (petrol)
  • Fuel system (diesel)
  • Ignition and exhaust systems
  • ECM Bosch Motronic MP 3.2
  • ECM Magneti-Marelli (MM)
  • Transmission
  • Clutch
  • Mechanical gearbox
  • Chassis, running gear
  • Brake system
  • Car suspension
  • Steering
  • Electrical equipment
  • Equipment and devices
  • Electrical circuits
Peugeot J5 (1981-1993) 
  • General information
  • Introduction to manual
  • Specifications
  • Gasoline engine
  • Engine repair
  • Lubrication system
  • Cooling system
  • Fuel system
  • Ignition system
  • Diesel engine
  • Engine repair (DB9)
  • Lubrication system (DB9)
  • Cooling system (DB9)
  • Fuel injection (DB9)
  • Engine repair (U25)
  • Lubrication system (U25)
  • Cooling system (U25)
  • Fuel injection (U25)
  • Transmission
  • Clutch
  • Gearbox
  • Drive shafts
  • Chassis, running gear
  • Steering system
  • Car suspension
  • Brake system
  • Electrical equipment
  • Power devices
  • Electrical circuits
PeugeotBook.ru © 2018–2026 | Mobile version | Sitemap: EN BG BY UA RS HR RO PL SK HU | Write message | Site search | Add to bookmarks | Peugeot owners
106 (1991-2003) | 206 (1998-2012) | 207 (2006-2014) | 305 (1977-1989) | 306 (1993-2002) | 307 (2001-2008) | 405 (1987-1997) | 406 (1995-2004) | 605 (1989-2000) | Partner-I (1996-2008) | Eurovans-807 (2002-2014) | Eurovans-806 (1994-2002) | J5 (1981-1993) |
Cookies are used to ensure the correct display of pages on the site.