
English Русский
Български
Беларускі
Український
Српски
Hrvatski
Română
Polski
Slovenský
Magyar
Bookmark Articles Sitemap Contacts
Company Hyundai Company Opel Company Skoda Company Kia Company Mitsubishi Company LADA Company Audi
PeugeotBook.ru


Series 100   Series 200   Series 300   400-500   Series 600   Crossovers   Others
 
Partner I (1996-2008) Peugeot 807 (2002-2014) Peugeot 806 (1994-2002) Peugeot J5 (1981-1993)

Front suspension strut — removal and installation (Peugeot Partner I)

  • Main
  • Пежо
  • Partner I (1996-2008)
  • Chassis, running gear
  • Car suspension
  • Front suspension strut — removal and installation
0
Table of contents: Removal 🠇 Installation 🠇
Note: Any nuts that are damaged during removal must be replaced. This is explained by the fact that the threads of these nuts are coated with a compound for locking threaded connections (designed for one puff only). These nuts include the steering knuckle clamp bolt nut and the stabilizer bar strut mounting nut. To perform this procedure you will need spring compressors (spring compressors).


Removal


1. Place wheel chocks under the rear wheels. Apply the parking brake fully. Raise the front of the vehicle and support it securely (see "Lifting and installing the car on supports"). Remove the corresponding front wheel.

2. If the left suspension strut must be removed on models from September 2002 onwards, remove the engine control module and associated support bracket as described in the relevant section to gain access to the upper strut mount chapter 4.

3. Remove the bolt securing the wiring support bracket to the top of the steering knuckle.

4. Release the brake hose and all electrical wiring from the clamps on the strut.

5. Unscrew the nut (and remove the washer) fastening the stabilizer link to the suspension strut and position the stabilizer link away from the suspension strut. Hold the strut with an Allen key to prevent it from turning when loosening the nut (figure 4.5). Throw away the nut; when installing, you should use a new one.
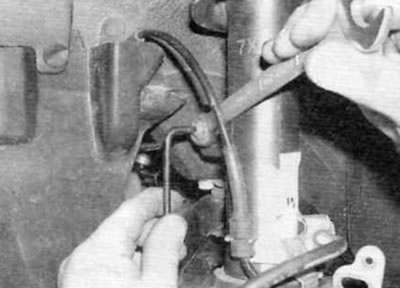
Figure 4.5. Loosen the nut securing the stabilizer bar to the suspension strut

Figure 4.5. Loosen the nut securing the stabilizer bar to the suspension strut


6. Loosen the nut and remove the clamp bolt securing the steering knuckle to the suspension strut. Throw away the nut; when installing, you should use a new one (figure 4.6).
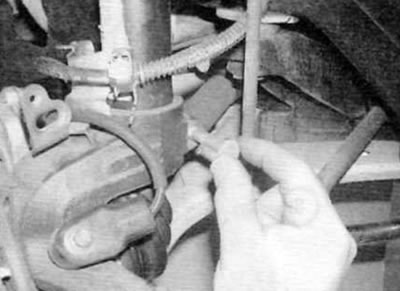
Figure 4.6. Loosen the nut and remove the clamp bolt securing the steering knuckle to the…

Figure 4.6. Loosen the nut and remove the clamp bolt securing the steering knuckle to the suspension strut


7. To be able to remove the suspension strut, the coil spring must now be compressed. Working from under the wheel well, place appropriate spring pullers on the spring and compress the spring enough to allow access to the lower end of the strut assembly to be separated from the steering knuckle(figure 4.7). Use compression devices that can be firmly fixed to the spring (usually with a small clamping bolt). Any other type of fixture may jump or slide off the spring as it tightens.
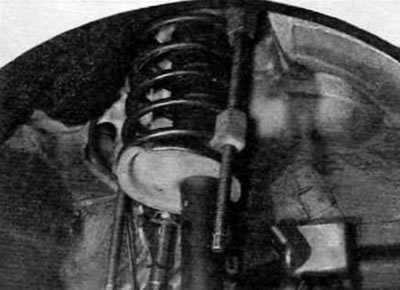
Figure 4.7. Spring compressors installed on the strut spring

Figure 4.7. Spring compressors installed on the strut spring


8. Drive a small chisel into the slot on the steering knuckle to widen the slot slightly and remove the end of the suspension strut (figure 4.8).
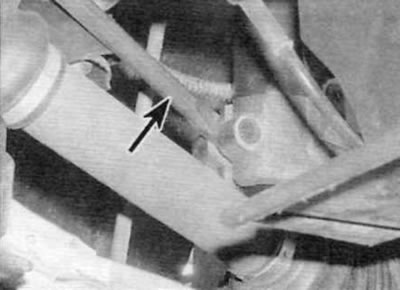
Figure 4.8. Hammer in a small chisel (marked with an arrow) into the slot on the steering knuckle…

Figure 4.8. Hammer in a small chisel (marked with an arrow) into the slot on the steering knuckle to release the steering knuckle


9. Loosen the three bolts securing the upper support of the suspension strut, and then remove the strut from under the wheel arch (figure 4.9).
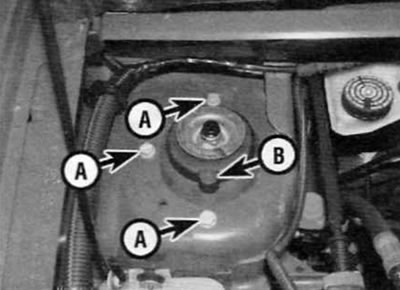
Figure 4.9. Bolts (A) and mounting lug (B) of the upper suspension strut support

Figure 4.9. Bolts (A) and mounting lug (B) of the upper suspension strut support


Installation


10. Having installed the pullers on the spring, as during removal, bring the suspension strut to its standard position. Make sure the locating pin on the upper support plate is properly seated in the corresponding hole in the body and the support plate is properly oriented. On models without power steering, the mounting tab on the rubber mount should face the rear of the vehicle. On models with power steering, the mounting tab should face the front of the vehicle (figure 4.9).


11. Insert the lower end of the suspension strut into the steering knuckle, aligning the clamp slot in the knuckle with the tab on the base of the strut. Also make sure that the thrust tabs on the strut are in contact with the top surface of the steering knuckle.

12. Screw in the upper strut support mounting bolts and tighten them to the specified torque.

13. Insert the clamp bolt that secures the steering knuckle to the suspension strut, screw a new nut onto the clamp bolt and tighten it to the specified torque.

14. Carefully release and remove the spring compressors.

15. If applicable, install the engine control module and support bracket as described in the relevant section chapter 4.

16. Connect the stabilizer link to the suspension strut. Thread the new nut onto the strut and tighten it to the specified torque.

17. Install the wiring harness support bracket to the top of the steering knuckle and secure the hose and wiring to the suspension strut.

18. Install the wheel, lower the vehicle and tighten the wheel bolts to the specified torque.
This article is available at russian, bulgarian, belarusian, ukrainian, serbian, croatian, romanian, polish, slovak, hungarian
Article reviewed by editor: Nikonova Veronica
Share information:
Previous
Partner I: Car suspension
Next

Front hub bearings and steering knuckle — replacement
Steering knuckle assembly — removal and installation
General information about suspension and steering
Suspension and steering specifications
Front suspension strut repair
Lower control arm of the front suspension — removal, repair and…
Front lower control arm ball joint — removal and installation
Front anti-roll bar — removal and installation
Front Anti-Roll Bar — removal and installation
See similar information for other Peugeot models

➨ Front suspension strut — removal, overhaul and refitting Peugeot 106 (1991-2003)
➨ General characteristics and tightening torques of the front… Peugeot 207 (2006-2014)
➨ Front suspension strut — bulkhead Peugeot 305 (1977-1989)
➨ Front suspension — design description Peugeot 405 (1987-1997)
➨ Front suspension shock absorber strut — disassembly Peugeot 605 (1989-2000)
Link to this article in different formats
Comments and feedback from visitors
No comments yet


Add two numbers 33 + 12


Partner I (1996-2008) 
  • General information
  • Introduction to the guide
  • Faults en route
  • Weekly checks
  • User manual
  • Maintenance (petrol)
  • Maintenance (diesel)
  • Power unit
  • Petrol engines
  • Diesel engines «XUD»
  • Diesel engines «DW»
  • Overhaul of petrol engines
  • Overhaul of diesel engines
  • Cooling and heating
  • Power and exhaust (petrol)
  • Power and exhaust (XUD diesels)
  • Power and exhaust (DW diesels)
  • Emission reduction
  • Starting and charging system
  • Transmission
  • Clutch
  • Mechanical gearbox
  • Drive shafts
  • Chassis, running gear
  • Brake system
  • Car suspension
  • Steering
  • Body and interior
  • Exterior (external elements)
  • Interior (internal elements)
  • Doors, locks and windows
  • Electrical equipment
  • Equipment and devices
  • Electrical circuits
Peugeot 807 (2002-2014) 
  • General information
  • Operating instructions
  • Maintenance
  • Troubleshooting
  • Power unit
  • Gasoline engines
  • Diesel engines
  • Cooling and heating
  • Fuel injection (petrol)
  • Fuel system (diesel)
  • Fuel system
  • Exhaust system
  • Ignition system
  • Transmission
  • Clutch
  • Manual gearbox
  • Automatic gearbox
  • Chassis, running gear
  • Brake system
  • Car suspension
  • Steering system
  • Body and interior
  • Exterior (external elements)
  • Interior (internal elements)
  • Electrical equipment
  • Power devices
  • Electrical circuits
Peugeot 806 (1994-2002) 
  • General information
  • User manual
  • Maintenance
  • Power unit
  • Petrol engines
  • Diesel engines
  • Lubrication system
  • Cooling system
  • Fuel injection (petrol)
  • Fuel system (diesel)
  • Ignition and exhaust systems
  • ECM Bosch Motronic MP 3.2
  • ECM Magneti-Marelli (MM)
  • Transmission
  • Clutch
  • Mechanical gearbox
  • Chassis, running gear
  • Brake system
  • Car suspension
  • Steering
  • Electrical equipment
  • Equipment and devices
  • Electrical circuits
Peugeot J5 (1981-1993) 
  • General information
  • Introduction to manual
  • Specifications
  • Gasoline engine
  • Engine repair
  • Lubrication system
  • Cooling system
  • Fuel system
  • Ignition system
  • Diesel engine
  • Engine repair (DB9)
  • Lubrication system (DB9)
  • Cooling system (DB9)
  • Fuel injection (DB9)
  • Engine repair (U25)
  • Lubrication system (U25)
  • Cooling system (U25)
  • Fuel injection (U25)
  • Transmission
  • Clutch
  • Gearbox
  • Drive shafts
  • Chassis, running gear
  • Steering system
  • Car suspension
  • Brake system
  • Electrical equipment
  • Power devices
  • Electrical circuits
PeugeotBook.ru © 2018–2026 | Mobile version | Sitemap: EN BG BY UA RS HR RO PL SK HU | Write message | Site search | Add to bookmarks | Peugeot owners
106 (1991-2003) | 206 (1998-2012) | 207 (2006-2014) | 305 (1977-1989) | 306 (1993-2002) | 307 (2001-2008) | 405 (1987-1997) | 406 (1995-2004) | 605 (1989-2000) | Partner-I (1996-2008) | Eurovans-807 (2002-2014) | Eurovans-806 (1994-2002) | J5 (1981-1993) |
Cookies are used to ensure the correct display of pages on the site.