



Table of contents: Low beam / high beam headlights 🠇 Fog lights and tail light 🠇 Rear lights 🠇 Additional brake light 🠇 Direction indicators 🠇 License plate light 🠇
Important safety elements of a car are headlights, lanterns and lamps.
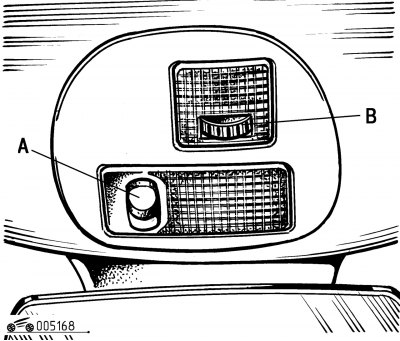
Figure 1.68. Front interior light
The interior lighting is provided by several lamps (shades) and is controlled automatically. When the ignition is turned off — the key is set to the "S" position — all interior lighting in the car is turned off after 15 minutes, regardless of the position of the switches. The central (front) interior lighting lamp is located above the windshield and is controlled by switch A (figure 1.68).
The front ceiling light is switched on depending on the position of switch A:
 - the front ceiling light turns on when one of the body doors, the trunk or the tailgate is opened (206 SW);
 - the lamp is off;
 - the lights are constantly on when the ignition key is set to position "A" or "M".
While driving, the central light starts to flash if one of the doors is not closed tightly.
The individual (local) lighting lamps are located in front, next to the front interior light. They are switched on by key switch B (see figure 1.68), located near local lamps.
Low beam / high beam headlights
Low/high beam headlights with single optics use H4 type lamps with a power of 55/60 W, and headlights with double optics use H7 type lamps with a power of 55 W.
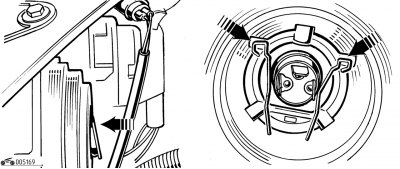
Figure 1.69. Replacing the H4 type lamp
Replacing a lamp in a headlight with single optics (figure 1.69) proceed in the following order:
- disconnect the plug connection;
- remove the rubber protective cover;
- press the two tabs of the lock and remove the cartridge;
- replace the lamp;
- when replacing a lamp, make sure that the socket is in place and is securely held by the clips;
- carefully install the protective rubber cap;
- connect the plug connection.
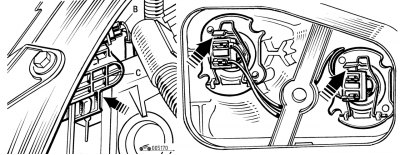
Figure 1.70. Replacing the H7 type lamp
Replacing a lamp in a headlight with dual optics (figure 1.70) proceed in the following order:
- pull up the clamp tab C and remove the protective cover;
- disconnect the plug connection;
- remove the rubber protective cover;
- press the two tabs of the lock and remove the cartridge;
- replace the lamp;
- when replacing a lamp, make sure that the socket is in place and is securely held by the clips;
- connect the plug connection;
- carefully install the protective rubber cap.
Note: When replacing the right headlight bulb, first remove the washer fluid filler tube from the windshield washer reservoir. Moisture may condense inside the headlight optical elements. It disappears when the headlights are turned on. If necessary, hold the bulb with clean cotton gloves on.
Wipe the protective glasses of the headlights using special products, followed by rinsing with plenty of water. Remove any ice that forms with special defrosting aerosols.
Fog lights and tail light
The front fog lights use 55W H1 bulbs.
Replace the bulbs in the front fog lights in the following order:
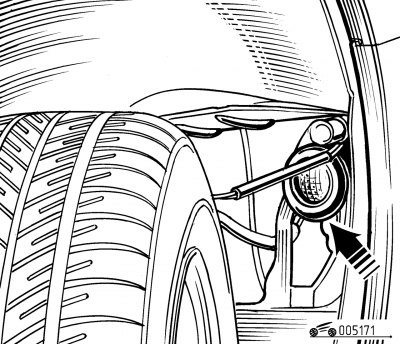
Figure 1.71. Front fog lights
- press the bottom of the cover that covers the fog lights (figure 1.71);
- open the lid;
- turn the protective cover and remove it;
- disconnect the plug connection;
- press the two tabs of the clamps and remove the lamp.
The rear fog light uses P21 type bulbs with a power of 21 W.
To replace the bulb in the front fog light, follow these steps:
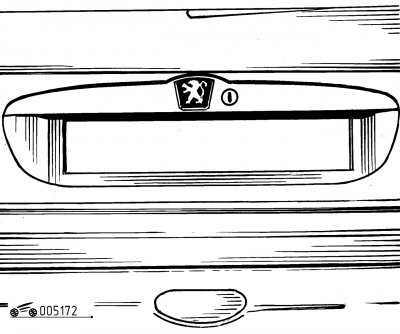
Figure 1.72. Fog lamp
- disconnect and remove the lamp (figure 1.72);
- rotate the chuck a quarter turn (90°);
- replace the lamp.
Rear lights
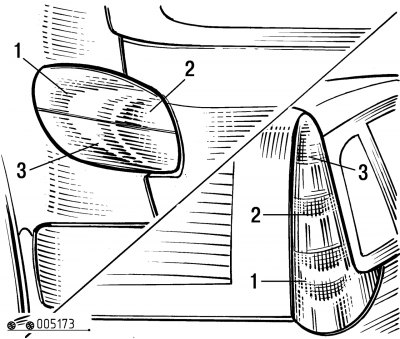
Figure 1.73. Rear lights
The rear lights are designed as a single unit (figure 1.73):
- 1 - direction indicator lights, orange lamp (PY21);
- 2 - reversing lights (P21);
- 3 — brake lights/side lights (P21).
The power of all P21 and PY21 lamps installed in the rear light is 21 W, only the parking light lamp has a power of 5 W.
Replace the bulbs in the rear light of the hatchback in the following order:
- bend down the inner lining of the trunk in the area of the upper part of the side;
- unscrew the wing screw located inside the trunk;
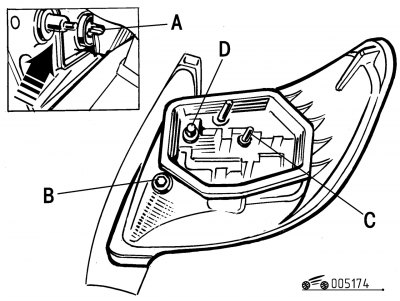
Figure 1.74. Removing the rear light of a hatchback body
- disconnect plug connection A (figure 1.74);
- remove the headlight assembly;
- remove key B from the lamp board;
- unscrew bolt C using key B and remove the lamp board;
- replace the burnt out light bulb;
- when installing the lamp, insert key B into socket D and install the lamp in place.
Replace the lamps in the rear light of the station wagon body in the following order:
- bend down the inner lining of the trunk in the area of the upper part of the side;
- unscrew both wing screws located inside the trunk;
- remove the headlight assembly;
- disconnect the plug connection;
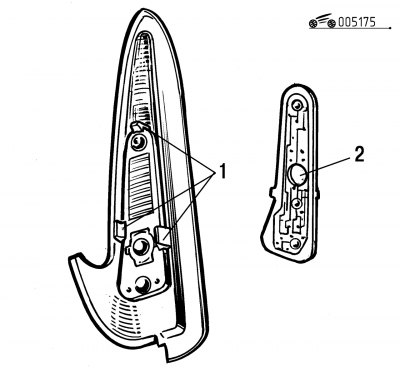
Figure 1.75. Removing the rear light of the station wagon body
- press the clamps 1 (figure 1.75) and remove the 2 lamp board;
- replace the burnt out light bulb;
- when installing the lantern, secure the upholstery starting from the bottom.
Additional brake light
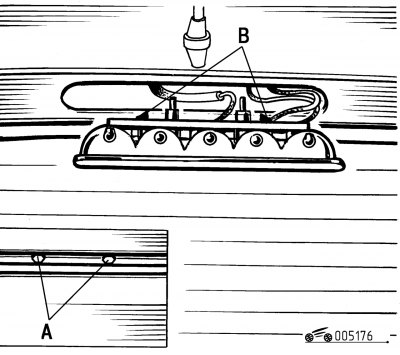
Figure 1.76. Additional (central) stop signal
The optional additional brake light is located behind the rear seats under the luggage compartment shelf (figure 1.76) and is equipped with five lamps with a power of 5 W each.
Replacement of lamps in additional (central) at the stop signal, proceed in the following order:
- open the trunk;
- using a 10 mm wrench, unscrew the two bolts A (see figure 1.76);
- remove the flashlight unit;
- press the clamp tabs B;
- remove the board with the lamps;
- remove the bulb by pressing it lightly and turning it to the left.
The additional brake light on the station wagon (206 SW) uses LEDs.
Direction indicators
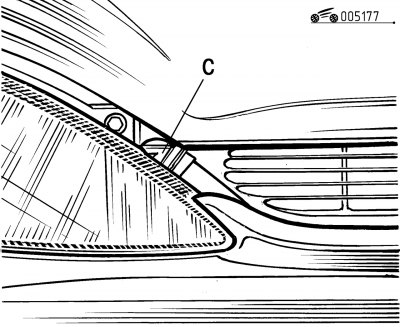
Figure 1.77. Front direction indicators
The car has front and side turn signal repeaters (figure 1.77 and 1.78). The power of the PY 21 type front turn signal lamps is 21 W, and the WY5 type side lamps are 5 W.
Replace the front turn signals in the following order:
- turn the lamp holder C (see figure 1.77) 1/4 turn (90°);
- remove and replace the lamp.
Replace the front turn signal repeaters in the following order:
- remove the lamp by pulling the front or rear part of the diffuser;
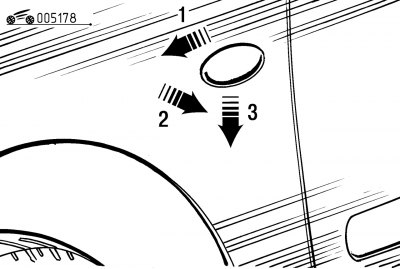
Figure 1.78. Side turn signal repeaters
- holding the flashlight by the socket, turn the lamp diffuser (see figure 1.78) 1/4 turn (90°);
- remove and replace the lamp.
License plate light
The W5 type rear number plate light is located in the trunk lid. Power 5 W.
Replace the license plate light in the following order:
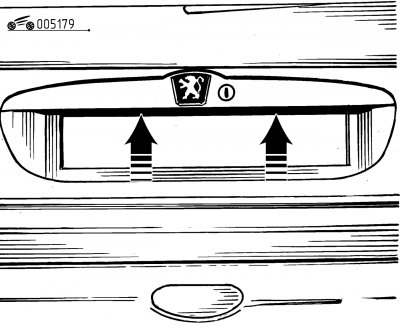
Figure 1.79. License plate light
- insert a thin screwdriver into the slot (hole) of the diffuser and, pressing, push it out (arrows, figure 1.79) - the lantern will come out of the clamps;
- remove the headlight lens and replace the bulb.
Number plate lightThe W5 type rear number plate light is located in the trunk lid. Power 5 W.
Replace the license plate light in the following order:
- insert a thin screwdriver into the slot (hole) of the diffuser and, pressing, push it out (arrows, figure 1.79) - the lantern will come out of the clamps;
- remove the headlight lens and replace the bulb.