



Engine assembly is performed in the reverse order of disassembly, identical to the assembly of a 1.9-liter engine. After installing the crank mechanism and oil pump, proceed in the following order.
Oil pump - installation
1. Install a new dry seal gasket if the vehicle is not equipped with air conditioning.
2. Screw in the 23 oil pan mounting bolts, observing the markings applied during removal, and tighten them evenly to a torque of 16 Nm (see illustration 17.59). Four bolts securing the oil pan on the flywheel side have a socket head.
3. Screw in the engine oil level indicator sensor with a tightening torque of 10 Nm.
The installation of the oil pan, made of aluminum, which is supplied with cars equipped with air conditioning, is carried out using a mounting pin on the crankcase. A sealing gasket for the pan is not required, however the mating surfaces are lubricated with a sealing compound. The pan mounting bolts are screwed in according to the marks made during removal and tightened to a torque of 16 Nm (see illustration 17.0).
4. Install the flywheel onto the crankshaft.
5. Secure the driven and pressure plates of the clutch to the flywheel. The tightening torque of the mounting bolts is 20 Nm.
6. Install the oil cooler with the coolant hose fittings facing up. Screw on the union nuts and tighten them to a torque of 58 Nm. Also screw in the oil level indicator sensor to a torque of 39 Nm.
7. Lubricate the oil filter sealing ring with engine oil and secure the oil filter to the oil radiator. After this, tighten the filter a quarter of a turn.
8. Install a new gasket between the thermostat housing and the water pump and tighten the mounting bolts to 20 Nm. Apply sealant to the flat surface of the thermostat housing and install the thermostat into the housing. Close the thermostat cover, screw in the three mounting bolts, and tighten them to a torque of 20 Nm (see illustration).
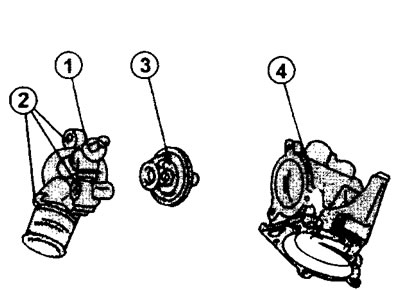
19.8 Outlet pipe and thermostat housing
1 - thermostat housing cover
2 - cover mounting bolts
3 - thermostat
4 - thermostat housing
9. Attach the thermostat housing to the cylinder block and tighten with bolts to a torque of 20 Nm.
10. Install the water pump, tightening the six mounting bolts to a torque of 10 Nm.
11. Install the cylinder head covers in place (see the relevant chapter).
Please note: Cylinder head gaskets are available in different thicknesses. The thickness of the gasket depends on the height of the piston protrusion above the surface of the cylinder block. To determine the height of the piston protrusion, they must be positioned in order at TDC and the protrusion measured. The procedure in this case is the same as for a 1.9-liter engine. The nominal piston protrusion values and gasket designations are also the same (see the relevant chapter).
12. Lubricate the working surface of the new oil seal and, placing it on the camshaft, press it into the hole in the cylinder head. After pressing the seal, install the timing belt gear onto the camshaft. In this case, do not allow the key that secures the gear to the shaft to shift.
13. Screw in the gear mounting bolt and, holding it from turning, tighten the bolt to a torque of 50 Nm.
14. Install the timing belt tension roller and tighten its mounting bolt to a torque of 37 Nm.
15. Install the key into the hole on the crankshaft and put on the timing gear.
16. Place the timing belt and tighten it.
17. Install the fuel injection pump. Screw in the fuel injection pump mounting bolts and the bracket, but do not tighten them yet.
18. Install the cylinder head and tighten the 11 mounting bolts to 8 Nm.
19. Place the drive gear on the injection pump shaft and secure it with the bolt. When tightening the bolt, hold the gear from turning (see illustration 18.21). The tightening torque is 50 Nm.
20. Install the belt pulley on the crankshaft. Lubricate the pulley mounting bolt threads with Loctite and tighten to 70 Nm. Then tighten the bolt an additional 60°. Prevent the crankshaft from turning by locking the flywheel.
21. Screw in the glow plugs. The spark plug tightening torque is 22 Nm. Attach the current-supplying busbar to the four spark plug contact pins and secure with nuts, tightening them to 4 Nm.
22. Screw in the injectors (tightening torque 90 Nm) and connect the high-pressure fuel lines to them by screwing on the union nuts with a torque of 20 Nm.
23. Install the timing belt guards.
The installation of the remaining parts is carried out in the reverse order of disassembly. The tightening torque for the exhaust manifold nuts is 20 Nm, for the intake manifold - 23 Nm.