
English Русский
Български
Беларускі
Український
Српски
Hrvatski
Română
Polski
Slovenský
Magyar
Bookmark Articles Sitemap Contacts
Company Hyundai Company Opel Company Skoda Company Kia Company Mitsubishi Company LADA Company Audi
PeugeotBook.ru


Series 100   Series 200   Series 300   400-500   Series 600   Crossovers   Others
 
Partner I (1996-2008) Peugeot 807 (2002-2014) Peugeot 806 (1994-2002) Peugeot J5 (1981-1993)

Fuel filter — replacing the filter element, removing condensate (Peugeot Eurovans 806)

  • Main
  • Пежо
  • Peugeot 806 (1994-2002)
  • Power unit
  • Fuel system (diesel)
  • Fuel filter — replacing the filter element, removing condensate
0
Table of contents: Replacing the filter element 🠇 Condensate drain 🠇
The replaceable filter element of the fuel filter is replaced in accordance with the mileage, which is noted in the service book. In addition to the appropriate replacement of the replaceable filter element, it is necessary to regularly drain the condensate from the fuel filter housing. This is usually done when changing the engine oil.

Replacing the filter element


1. Disconnect the negative (-) battery terminal.

2. Remove the air filter.

3. Place a container under the fuel filter to collect the fuel.

4. Remove the vent plug next to the fuel filter cover.

5. Unscrew the drain plug on the filter housing and drain the condensate into a container (see illustration).
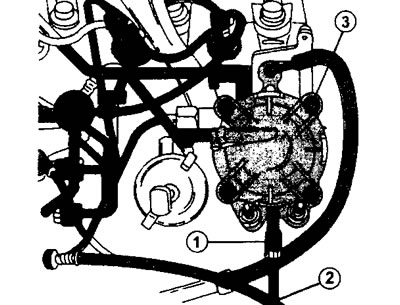
5.5 Unscrew the drain plug 1 on the filter housing and drain the condensate into a container…

5.5 Unscrew the drain plug 1 on the filter housing and drain the condensate into a container provided. The filter cover is secured with four bolts 3


To drain the condensate, you can connect hose 2. If the car does not have a condensate level indicator light in the fuel filter, then the condensate is drained every 10,000 km.

6. Loosen the fuel filter cover mounting bolts and remove the cover.


7. Remove filter element 3 from the filter housing together with the sealing ring (see illustration).
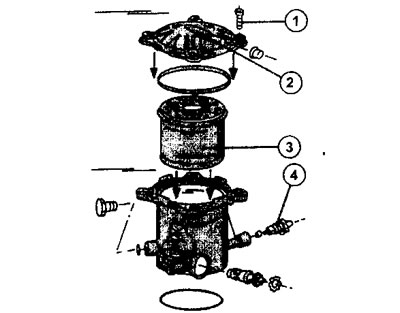
5.7 Fuel filter elements.

5.7 Fuel filter elements.
1 - cover mounting bolt
2 - fuel filter cover
3 - replaceable filter element
4 - drain plug


8. Remove all O-rings as they need to be replaced with new ones (see illustration).
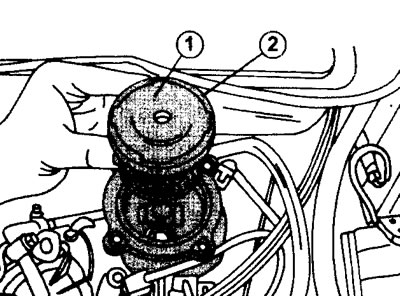
5.8 Remove the replaceable filter element 1 and sealing ring 2

5.8 Remove the replaceable filter element 1 and sealing ring 2


9. Clean the fuel filter housing and install a new replaceable filter element.

10. Close the filter housing with the lid and tighten the lid mounting bolts.

11. Screw the drain plug into the bottom of the fuel filter housing.

12. Replace the air filter and connect the negative (-) battery terminal to the battery.

13. Remove air from the fuel system.


Caution! Air must be removed from the fuel system in cases where the system has been opened.


To remove air, unscrew the drain plug. Attach a hose to the drain pipe and lower the free end into a container that is placed under the fuel filter.

14. Bleed the system by pressing the manual fuel priming lever approximately 20 times until clean fuel, without air bubbles, comes out of the hose (see illustrations 5.14 and 5.14a).
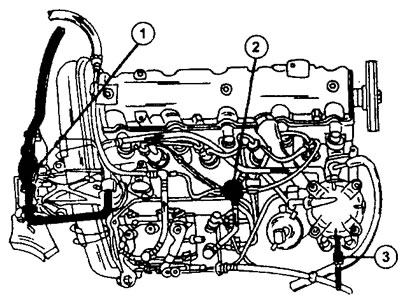
5.14 Location of lever 1 for manual fuel pumping, plug 2 for ventilation hole and drain hole 3

5.14 Location of lever 1 for manual fuel pumping, plug 2 for ventilation hole and drain hole 3


Source of the article is posted at (PEUGEOTBOOK.ru)
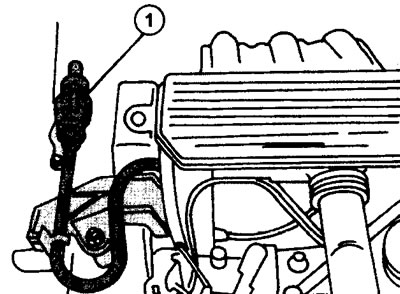
5.14a Location of lever 1 for manual fuel pumping on XUD9 engines

5.14a Location of lever 1 for manual fuel pumping on XUD9 engines


15. Screw in the vent plug and remove the hose from the pipe.

16. Start the engine and let it idle until the engine operation stabilizes.


17. Turn off the engine and then start it again. Leave the engine idling and do not press the accelerator pedal to ensure that all air has been removed from the fuel system.

Condensate drain


Important! It is recommended to make it a rule to drain accumulated condensate from the fuel filter every time you change the oil. After draining the condensate, the fuel system should be bled to remove any trapped air. Some models have a condensate level sensor in the fuel filter, which is connected to a warning light on the instrument panel. If the volume of accumulated condensate reaches a certain level, the light comes on.


18. Remove the air filter.

19. Unscrew the ventilation hole plug.

20. Place a container under the fuel filter to collect condensate.

21. Unscrew the drain plug and drain the condensate into a container. Drain the condensate until clean fuel comes out of the fuel filter.

22. Screw in the drain plug.

23. Bleed the fuel system.
This article is available at russian, bulgarian, belarusian, ukrainian, serbian, croatian, romanian, polish, slovak, hungarian
Article reviewed by editor: Shirokov Arseny
Share information:
Previous
Peugeot 806: Fuel system (diesel)
Next

Glow Plugs — removal and installation
Injectors — removal and installation
Precautions when working on the fuel system of a diesel engine
General description
Diesel Engine Specifications
High pressure fuel pump — adjustment
See similar information for other Peugeot models

➨ Fuel filter water draining Peugeot 106 (1991-2003)
➨ Replacing the oil filter element Peugeot 207 (2006-2014)
➨ Fuel filter housing — modifications Peugeot 305 (1977-1989)
➨ Replacing the air filter element (60,000 km) Peugeot 406 (1995-2004)
➨ Replacing the replaceable air filter element Peugeot 605 (1989-2000)
Link to this article in different formats
Comments and feedback from visitors
No comments yet


Add two numbers 25 + 13


Partner I (1996-2008) 
  • General information
  • Introduction to the guide
  • Faults en route
  • Weekly checks
  • User manual
  • Maintenance (petrol)
  • Maintenance (diesel)
  • Power unit
  • Petrol engines
  • Diesel engines «XUD»
  • Diesel engines «DW»
  • Overhaul of petrol engines
  • Overhaul of diesel engines
  • Cooling and heating
  • Power and exhaust (petrol)
  • Power and exhaust (XUD diesels)
  • Power and exhaust (DW diesels)
  • Emission reduction
  • Starting and charging system
  • Transmission
  • Clutch
  • Mechanical gearbox
  • Drive shafts
  • Chassis, running gear
  • Brake system
  • Car suspension
  • Steering
  • Body and interior
  • Exterior (external elements)
  • Interior (internal elements)
  • Doors, locks and windows
  • Electrical equipment
  • Equipment and devices
  • Electrical circuits
Peugeot 807 (2002-2014) 
  • General information
  • Operating instructions
  • Maintenance
  • Troubleshooting
  • Power unit
  • Gasoline engines
  • Diesel engines
  • Cooling and heating
  • Fuel injection (petrol)
  • Fuel system (diesel)
  • Fuel system
  • Exhaust system
  • Ignition system
  • Transmission
  • Clutch
  • Manual gearbox
  • Automatic gearbox
  • Chassis, running gear
  • Brake system
  • Car suspension
  • Steering system
  • Body and interior
  • Exterior (external elements)
  • Interior (internal elements)
  • Electrical equipment
  • Power devices
  • Electrical circuits
Peugeot 806 (1994-2002) 
  • General information
  • User manual
  • Maintenance
  • Power unit
  • Petrol engines
  • Diesel engines
  • Lubrication system
  • Cooling system
  • Fuel injection (petrol)
  • Fuel system (diesel)
  • Ignition and exhaust systems
  • ECM Bosch Motronic MP 3.2
  • ECM Magneti-Marelli (MM)
  • Transmission
  • Clutch
  • Mechanical gearbox
  • Chassis, running gear
  • Brake system
  • Car suspension
  • Steering
  • Electrical equipment
  • Equipment and devices
  • Electrical circuits
Peugeot J5 (1981-1993) 
  • General information
  • Introduction to manual
  • Specifications
  • Gasoline engine
  • Engine repair
  • Lubrication system
  • Cooling system
  • Fuel system
  • Ignition system
  • Diesel engine
  • Engine repair (DB9)
  • Lubrication system (DB9)
  • Cooling system (DB9)
  • Fuel injection (DB9)
  • Engine repair (U25)
  • Lubrication system (U25)
  • Cooling system (U25)
  • Fuel injection (U25)
  • Transmission
  • Clutch
  • Gearbox
  • Drive shafts
  • Chassis, running gear
  • Steering system
  • Car suspension
  • Brake system
  • Electrical equipment
  • Power devices
  • Electrical circuits
PeugeotBook.ru © 2018–2026 | Mobile version | Sitemap: EN BG BY UA RS HR RO PL SK HU | Write message | Site search | Add to bookmarks | Peugeot owners
106 (1991-2003) | 206 (1998-2012) | 207 (2006-2014) | 305 (1977-1989) | 306 (1993-2002) | 307 (2001-2008) | 405 (1987-1997) | 406 (1995-2004) | 605 (1989-2000) | Partner-I (1996-2008) | Eurovans-807 (2002-2014) | Eurovans-806 (1994-2002) | J5 (1981-1993) |
Cookies are used to ensure the correct display of pages on the site.