
English Русский
Български
Беларускі
Український
Српски
Hrvatski
Română
Polski
Slovenský
Magyar
Bookmark Articles Sitemap Contacts
Company Hyundai Company Opel Company Skoda Company Kia Company Mitsubishi Company LADA Company Audi
PeugeotBook.ru


Series 100   Series 200   Series 300   400-500   Series 600   Crossovers   Others
 
Peugeot 106 (1991-2003)

Hydraulic pipes and hoses — renewal (Peugeot 106)

  • Main
  • 10X
  • Peugeot 106 (1991-2003)
  • Chassis, running gear
  • Brake system
  • Hydraulic pipes and hoses — renewal
0
Note: Before starting work, refer to the warning at the beginning of Section 2 concerning the dangers of hydraulic fluid.


1. If any pipe or hose is to be renewed, minimise fluid loss by first removing the master cylinder reservoir cap, then tightening it down onto a piece of polythene to obtain an airtight seal. Alternatively, flexible hoses can be sealed, if required, using a proprietary brake hose clamp; metal brake pipe unions can be plugged (if care is taken not to allow dirt into the system) or capped immediately they are disconnected. Place a wad of rag under any union that is to be disconnected, to catch any spilt fluid.

2. If a flexible hose is to be disconnected, unscrew the brake pipe union nut before removing the spring clip which secures the hose to its mounting bracket (see illustration).
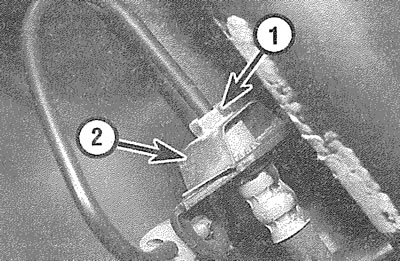
3.2. Brake pipe union nut (1) and hose spring clip (2)

3.2. Brake pipe union nut (1) and hose spring clip (2)


3. To unscrew the union nuts, it is preferable to obtain a brake pipe spanner of the correct size; these are available from most large motor accessory shops. Failing this, a closefitting open-ended spanner will be required, though if the nuts are tight or corroded, their flats may be rounded-off if the spanner slips. In such a case, a self-locking wrench is often the only way to unscrew a stubborn union, but it follows that the pipe and the damaged nuts must be renewed on reassembly. Always clean a union and surrounding area before disconnecting it. If disconnecting a component with more than one union, make a careful note of the connections before disturbing any of them.


4. If a brake pipe is to be renewed, it can be obtained, cut to length and with the union nuts and end flares in place, from Peugeot dealers. All that is then necessary is to bend it to shape, following the line of the original, before fitting it to the vehicle. Alternatively, most motor accessory shops can make up brake pipes from kits, but this requires very careful measurement of the original, to ensure that the replacement is of the correct length. The safest answer is usually to take the original to the shop as a pattern.

5. On refitting, do not overtighten the union nuts. It is not necessary to exercise brute force to obtain a sound joint.

6. Ensure that the pipes and hoses are correctly routed, with no kinks and that they are secured in the clips or brackets provided. After fitting, remove the polythene from the reservoir and bleed the hydraulic system as described in Section 2. Wash off any spilt fluid and check carefully for fluid leaks.
This article is available at russian, bulgarian, belarusian, ukrainian, serbian, croatian, romanian, polish, slovak, hungarian
Article reviewed by editor: Matveev Demid
Share information:
Previous
Peugeot 106: Brake system
Next

Hydraulic system — bleeding
General information
Braking system — specifications
Front brake pads — renewal (solid disc)
Rear brake pads — renewal
Rear brake shoes — renewal
Front brake disc — inspection, removal and refitting
Rear brake disc — inspection, removal and refitting
See similar information for other Peugeot models

➨ Brake and Clutch Hydraulic Fluid Peugeot 207 (2006-2014)
➨ Hydraulic tubes — inspection and replacement Peugeot 305 (1977-1989)
➨ Checking the engine crankcase ventilation hoses (20,000 km/12… Peugeot 405 (1987-1997)
➨ Hydraulic lines and hoses — replacement Peugeot Partner I (1996-2008)
Link to this article in different formats
Comments and feedback from visitors
No comments yet


Add two numbers 38 + 27


Peugeot 106 (1991-2003) 
  • General information
  • Introduction to manual
  • Weekly checks
  • Maintenance (petrol)
  • Maintenance (diesel)
  • Troubleshooting
  • Power unit
  • Petrol engines
  • Diesel engines
  • Engine overhaul
  • Cooling and heating
  • Fuel system (carburetor)
  • Single point injection (petrol)
  • Multipoint injection (petrol)
  • Fuel system (diesel)
  • Emission control system
  • Engine electrical equipment
  • Ignition system
  • Diesel heating
  • Transmission
  • Clutch
  • Manual gearbox
  • Automatic gearbox
  • Drive shafts
  • Chassis, running gear
  • Brake system
  • Car suspension
  • Steering
  • Body and interior
  • Exterior (external elements)
  • Interior (internal elements)
  • Doors, locks and windows
  • Electrical equipment
  • Equipment and devices
  • Electrical diagrams
PeugeotBook.ru © 2018–2026 | Mobile version | Sitemap: EN BG BY UA RS HR RO PL SK HU | Write message | Site search | Add to bookmarks | Peugeot owners
106 (1991-2003) | 206 (1998-2012) | 207 (2006-2014) | 305 (1977-1989) | 306 (1993-2002) | 307 (2001-2008) | 405 (1987-1997) | 406 (1995-2004) | 605 (1989-2000) | Partner-I (1996-2008) | Eurovans-807 (2002-2014) | Eurovans-806 (1994-2002) | J5 (1981-1993) |
Cookies are used to ensure the correct display of pages on the site.