



Table of contents: Oil level control 🠇 Coolant level control 🠇 Checking the brake fluid level 🠇 Wheels and tires 🠇 Checking the condition of the tires 🠇 Wheel balancing 🠇 Tire care 🠇 Winter operation of a diesel engine 🠇
The total scope of checks includes external inspection and checks of the vehicle's systems and equipment elements:
- levels of all operating fluids;
- the condition of all hoses and pipelines;
- air filter;
- engine cooling systems;
- engine lubrication systems;
- conditions of drive belts;
- spark plug conditions (glow plugs);
- battery chargers;
- aB conditions.
The most thorough checks should be made of the power supply, ignition and battery charging systems. This section of the manual provides only a part of the scope of checks, the main material is presented in the relevant sections of the manual.
Oil level control
Check the oil level in the following order:
- warm up the engine by driving 25-30 km at high speed;
- after stopping, wait at least 5 minutes for the oil to drain into the oil pan and visually check the engine for oil leaks;
- check the oil level with a clean dipstick (Fig. 1.122). The difference between the marks on the dipstick is about 1 liter of oil;
Warning! The oil level must be between the marks, otherwise the engine may malfunction. Only high-quality oil should be poured into the engine.
- check the engine oil: if the oil has become milky or drops of water can be seen in it, this indicates a leak in the cylinder head gasket or a crack in the cylinder head or block;
- check the cleanliness of the oil as follows: remove the dipstick and pull it through, holding it between your thumb and forefinger. If dirt or metal particles are found, change the oil;
- restore the oil level through the filler neck on the cylinder head cover.
Normal oil consumption should not exceed 0.5 l per 1000 km. High oil consumption indicates either a leak or increased wear of the oil scraper caps and piston rings.
Search for the location of the oil leak in the following order:
- 1) if the engine is contaminated with oil and its consumption is increased, check the places of possible oil leaks, for which pay attention to the following places of connection of engine parts:
- gasket by opening the filler cap;
- crankcase ventilation hoses;
- cylinder head cover gasket;
- cylinder head gasket;
- oil filter gasket;
- drain plug sealing ring;
- oil pressure sensor seating;
- oil pan seal;
- front and rear crankshaft and camshaft oil seals;
- 2) Insulate the generator with polyethylene film;
- 3) wash the engine using shampoo and water;
- 4) sprinkle possible leak areas with talcum powder or ground chalk;
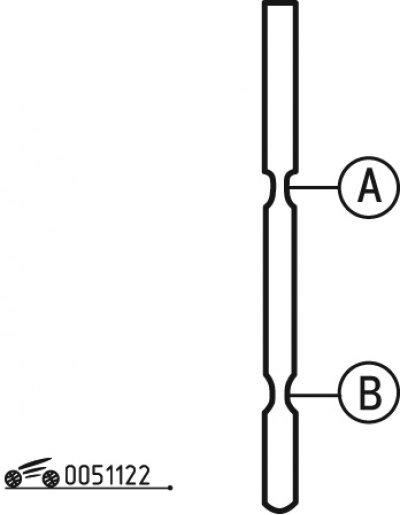
Figure 1.122. Checking the oil level with a dipstick: A - maximum oil level; B - minimum oil level
- 5) check the oil level with the dipstick and bring it up to the norm. The oil level should be between the two marks (see figure 1.122). Add oil up to the upper mark.
Coolant level control
All Peugeot 206 models are equipped with a compensating overpressure cooling system. The expansion tank is located in the engine compartment, mounted on the front wall and connected to it by a hose. As the engine temperature increases during operation, the expanding coolant fills the tank. When the engine cools down, the liquid returns to the cooling system, which maintains a constant level. Antifreeze is used as a coolant - a solution of ethylene glycol (40%) in distilled water (60%).
Warnings!
- 1. Antifreeze is toxic - it causes poisoning when it gets into the body. In addition, it destroys the paintwork.
- 2. Do not remove the filler cap until the engine has completely cooled down (to ambient temperature).
Check the coolant level in the following order:
- 1) Check the coolant level. When the engine is cold, the coolant level should be above the "MIN" mark on the reservoir. As the engine warms up, the level should approach the "MAX" mark. If this is not the case, let the engine cool down and remove the cap from the expansion tank;
- 2) if you need to add a small amount of liquid, you can use distilled water;
- 3) if the coolant level drops systematically, determine the location of the leak in the cooling system;
- 4) inspect the engine cooling jacket, radiator, hoses, expansion tank cap, plugs, coolant pump;
- 5) check the tightness of the expansion tank filler cap;
- 6) check the cleanliness of the antifreeze, if the color changes (brown or rusty) flush the cooling system and replace the antifreeze. It is recommended to replace the antifreeze at 120 thousand km or every five years;
- 7) check the tightness of the entire system.
Source of the article is website PEUGEOTBOOK.ru
Checking the brake fluid level
Warning! Brake fluid is toxic. Avoid contact with skin and eyes; in addition, brake fluid destroys the paintwork of the car body. Brake fluid is hygroscopic (absorbs moisture from the environment), so it should not be stored in an open container. Mixing different types of fluids, such as DOT3 or DOT4 with DOT5, can cause brake system failure.
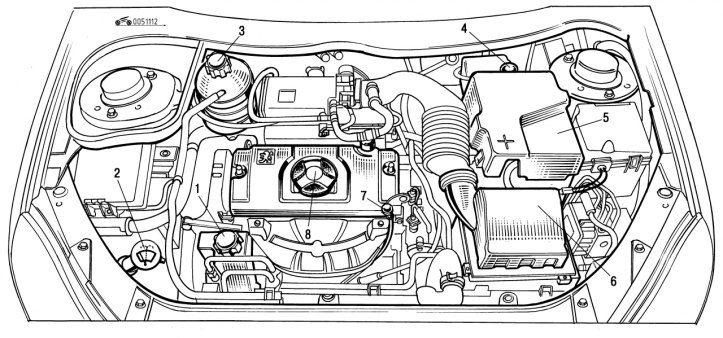
Figure 1.112. Engine compartment (petrol engine 1.1 and 1.4 l): 1 - power steering reservoir; 2 - windshield and headlight washer reservoir; 3 - neck of the expansion tank of the cooling system; 4 - brake fluid reservoir neck; 5 - battery; 6 - air filter; 7 - oil dipstick; 8 - oil filler neck
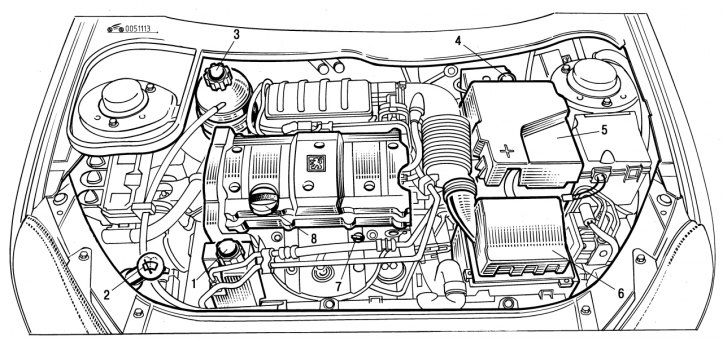
Figure 1.113. Engine compartment (petrol engine 1.6 l 16V): 1 - power steering reservoir; 2 - windshield and headlight washer reservoir; 3 - neck of the expansion tank of the cooling system; 4 - brake fluid reservoir neck; 5 - battery; 6 - air filter; 7 - oil dipstick; 8 - oil filler neck
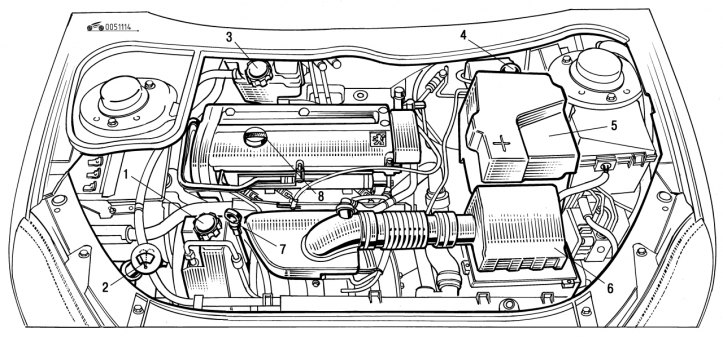
Figure 1.114. Engine compartment (2.0L 16V petrol engine): 1 - power steering reservoir; 2 - windshield and headlight washer reservoir; 3 - neck of the expansion tank of the cooling system; 4 - brake fluid reservoir neck; 5 - battery; 6 - air filter; 7 - oil dipstick; 8 - oil filler neck
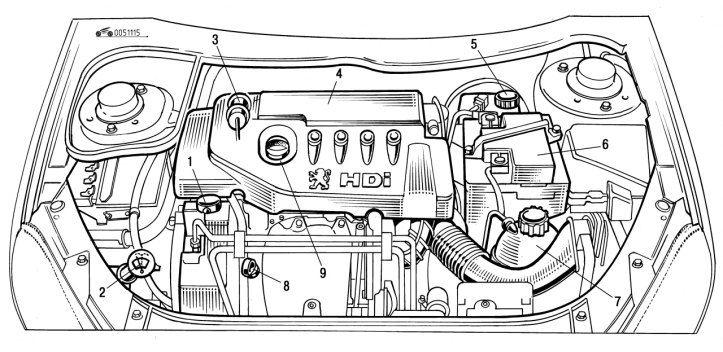
Figure 1.115. Engine compartment (1.4L HDI diesel engine): 1 - power steering reservoir; 2 - windshield and headlight washer reservoir; 3 - fuel pump; 4 - air filter; 5 - brake fluid reservoir neck; 6 - battery; 7 - expansion tank of the cooling system; 8 - oil dipstick; 9 - oil filler neck
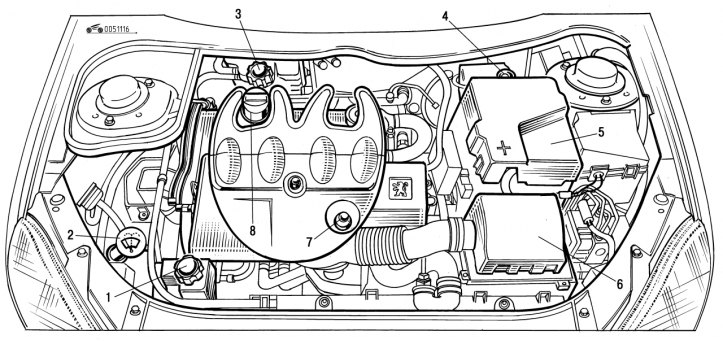
Figure 1.116. Engine compartment (1.9L diesel engine): 1 - power steering reservoir; 2 - windshield and headlight washer reservoir; 3 - neck of the expansion tank of the cooling system; 4 - brake fluid reservoir neck; 5 - battery; 6 - air filter; 7 - oil dipstick; 8 - oil filler neck
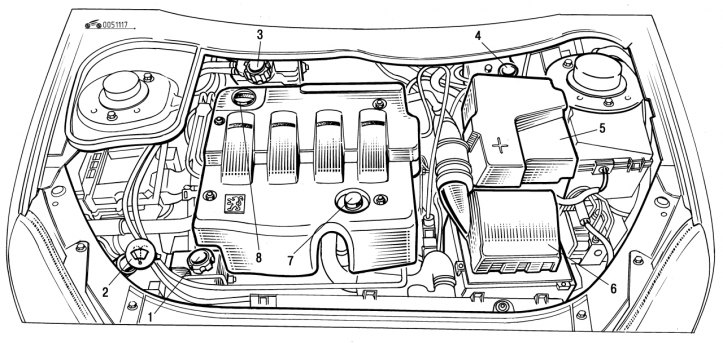
Figure 1.117. Engine compartment (2.0L HDI diesel engine): 1 - power steering reservoir; 2 - windshield and headlight washer reservoir; 3 - neck of the expansion tank of the cooling system 4 - neck of the brake fluid reservoir; 5 - battery; 6 - air filter; 7 - oil dipstick; 8 - oil filler neck
Tank 4 (see figure 1.112, 1.113, 1.114, 1.116, 1.117) or 5 (see figure 1.115) for brake fluid is located in the engine compartment on the left side (from the driver's side). The ventilation hole in the screw plug must always be clean (open). The transparent tank makes it easy to check the fluid level. When the level drops below the "DANGER" mark, the indicator lights up in the instrument cluster.
The fluid level in the closed tank should be between the "MAX" and "DANGER" marks.
Due to wear of brake pads, a slight decrease in the brake fluid level is possible. A significant decrease in the brake fluid level indicates a leak from the system - stop using the car and immediately determine the leak location.
During the visual inspection of the liquid level in the tank, check the operation of the contacts of the float level control mechanism.
Wheels and tires
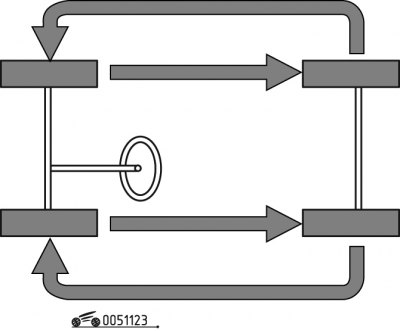
Figure 1.123. Tire rotation diagram
Rotate the tires on your vehicle at least every 5,000 km or when signs of uneven tread wear appear. The rotation diagram is shown in Figure 1.123. Perform the work on a raised and securely secured vehicle.
The proposed scheme allows not to change the direction of rotation of the tires. Changing the direction of rotation leads to their intensive wear.
After completing the wheel rotation, check the air pressure in the tires and the tightness of the wheel mounting bolts using a torque wrench. The tightening torque of the wheel bolts is 85 N·m (8.5 kgf·m).
It is recommended to periodically check the tightening of the wheel mounting bolts after 1000 km of travel.
Note: When changing tires and wheels on a vehicle with a satellite navigation system, recalibrate the system.
Checking the condition of the tires
Depending on the model, Peugeot 206 series cars are equipped with different tires and wheels. All wheels have so-called humps, which are a belt pressed onto the rim of the wheel that prevents the tubeless tire from moving (tearing off) from the rim when the car makes a sharp turn.
Tires and wheels require regular inspection of their condition. On tires, first of all, check the condition of the inflation valve and the wear of the tread.
All tires are equipped with a built-in wear indicator around the circumference in the form of control strips that are exposed when the tread depth decreases to 1.6 mm, after which the tires are considered worn. The optimal tire tread depth is 2.0 mm or more.
Check tire wear in several places at once, as tire wear depends on many factors:
- road surface conditions;
- tire pressure;
- driving style;
- atmospheric conditions;
- suspension conditions;
- wheel balancing;
- front wheel alignment angles.
The location of the wear indicators is marked on the side - "TWI" (Tread wear indicator) and the "S" sign. The efficiency of winter tires ("M+S") on snow, mud and slush is reduced already at a tread depth of less than 4 mm.
Wheel balancing
Serial wheels are balanced at the car manufacturer's plant. Balancing is necessary to eliminate uneven mass distribution and manufacturing inaccuracies of parts.
Wheel imbalances result in shaking, vibration of the steering wheel, damage to the suspension joints and shock absorbers. Vibration occurs in a certain range.
Wheels must be balanced every 20 thousand km of vehicle mileage and after each repair that could cause a redistribution of mass on the wheels.
Tire care
Tire maintenance comes down to following the following rules and recommendations:
- do not wash tires with a jet of water or steam under pressure;
- do not allow the tire to come into contact with oil or grease;
- store tires in a cool, dry, dark place;
- store wheels horizontally, suspended;
- before removing a wheel from a car, increase the pressure in it by 20-50 kPa;
- install winter tires on your rims;
- when installing new tires, run them in for the first 300 km, taking all precautions, especially in icy conditions and rain, and not exceeding the established speed limit;
- when driving on snow and ice, install anti-skid chains only on the drive wheels; do not install chains on 17-inch wheels;
- the speed of a vehicle with chains installed must not exceed 50 km/h.
Winter operation of a diesel engine
When using a diesel engine in winter at low temperatures (below -150 C), one has to deal with the problem of increasing the viscosity of diesel fuel and the precipitation of paraffin compounds. The problem is closely related to the quality of diesel fuel, especially its winter grade. To improve the performance of summer diesel fuel in winter, special additives must be added to it. This prevents the precipitation of paraffin.
If the engine does not start:
- remove the fuel filter and heat it in a bath of water or replace it with a new one;
- place the car in a warm room (garage, workshop);
- spray the fuel system with hot water.
WarningIt is strictly forbidden to use open fire to heat the fuel system of a diesel engine.