



Table of contents: Withdrawal - general information 🠇 Front brakes with Lucas calipers 🠇 Front wheel brakes with Brembo…🠇
Withdrawal - general information
Caution: If the removed brake pads can be reinstalled, they must be marked accordingly to ensure they are installed in their original locations. In this case, it is also recommended to note which shoe is the inner shoe and which is the outer shoe. Otherwise, the brake pad wear indicator light will not work. In addition, if the old pads are installed incorrectly, the front brakes may pull to the side.
Brake pad replacement is necessary when the brake pads have reached a certain minimum acceptable thickness.
1. Measure the thickness of the brake pads by removing the wheel.
When checking the remaining brake pad thickness, be sure to check the pads on both brake mechanisms, because their wear may vary. Brake pads are always replaced as a set.
When removing the wheels to check the thickness and condition of the brake pads, the brake discs should also be checked at the same time. The surface of the brake discs should not have any ridges formed as a result of friction from contaminated material. These grooves lead to premature wear of new brake pads and reduce braking efficiency.
Attention! As the brake pads wear, the piston/pistons of the wheel cylinders increasingly extend out of the cylinder. Therefore, before installing new brake pads, the piston must be pressed back into the cylinder. This causes the brake fluid to be squeezed out of the cylinder back into the expansion tank. If the brake fluid level in the expansion tank is at its maximum, remove the fluid so that it does not spill out and damage adjacent parts. After this, screw on the tank lid to which the filter is attached.
Front brakes with Lucas calipers
Removal
2. Loosen the wheel mounting bolts.
3. Place the front of the car on jack stands and remove the wheels.
4. Disconnect the brake pad wear sensor wire.
5. Loosen the upper caliper mounting bolt with an overhead wrench, holding the guide pin from turning with a second wrench, and then completely unscrew the lower bolt (see illustration).
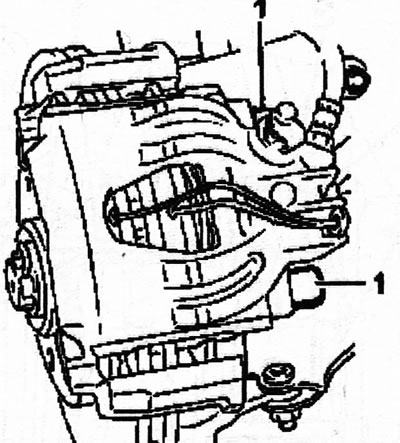
4.5. Loosen the upper bolt 1 and completely unscrew the lower bolt 1
6. Move the caliper up (see illustration) and remove the outer and inner brake pads. Typically, one of the brake pads will remain on the caliper/wheel cylinder and will need to be removed from the cylinder. If the caliper is firmly seated and cannot be moved, you can use a screwdriver to push the caliper back and at the same time push the piston, which has shifted due to wear on the brake pads, back into the cylinder.
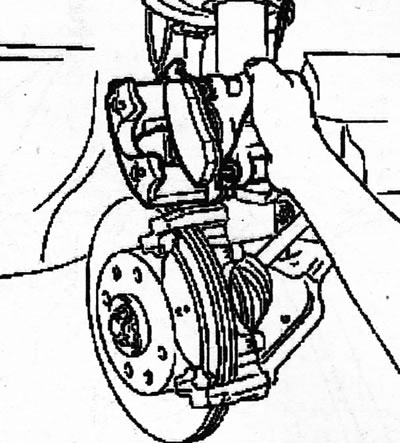
4.6. Move the caliper up (see illustration) and remove the outer and inner brake pads
If both mounting bolts are unscrewed, the caliper can be removed and secured to the body with wire without disconnecting the brake hose from it. In this case, the brake hose must not be twisted or stretched under the weight of the caliper.
Caution! Do not press the brake pedal when the brake pads are removed. In this case, when you press the pedal, the piston will be pushed out of the brake cylinder. If the piston has come out of the cylinder, remove the caliper and take it and the piston to a workshop for repair.
7. Check the remaining thickness of the brake disc.
8. Clean the seating and guide surfaces of the brake pads in the caliper with a rag soaked in alcohol. Do not use tools with sharp edges.
9. Check the condition of the brake cylinder piston cuff. A damaged or cracked seal must be replaced, as dirt penetrating through a damaged cap will quickly lead to caliper depressurization.
Caution! If the brake pads are significantly worn, check the wheel cylinder piston for ease of movement. To do this, insert a wooden block into the caliper and ask an assistant to slowly press the brake pedal. The brake cylinder piston should move easily. To check, you need to install a known good caliper or use a caliper from another wheel. Be careful not to push the piston out when checking. If the piston is hard to move, repair the caliper (the work is done in the workshop).
10. Press the brake cylinder piston using a special pressing tool as far into the cylinder as possible. You can also use a wooden rod made of hardwood (hammer handle), but do not distort the piston or damage it, the inner surface of the cylinder and the cuff.
11. Install new brake pads into the guide.
12. Lower the caliper down and install the new lower caliper mounting bolt. Before installation, lubricate the threads of the new guide pin with a protective lubricant, such as Loctite.
13. Unscrew the upper caliper mounting bolt and replace it with a new one if the caliper was moved upward and not removed completely. Also lubricate the threads of this bolt with Loctite protective lubricant.
14. Tighten both bolts to 35 Nm.
15. Connect the brake pad wear sensor plug. Make sure the wire is routed in such a way that it will not be frayed while driving.
16. Press the brake pedal several times to seat the brake pads. Remember that new brake pads need to be worked in, so avoid sudden braking with a complete stop of the car for some time.
17. Lower the vehicle and tighten the wheel bolts to 100 Nm.
Front wheel brakes with Brembo calipers
Please note: The same requirements for brake fluid, cleaning, and inspection of Lucas caliper brake components apply to this type of brake.
Removal
18. Remove brake fluid from the expansion tank so that it does not splash out when the piston is pressed into the brake cylinder.
19. Disconnect the wires 1 of the brake pad wear sensor (see illustration).
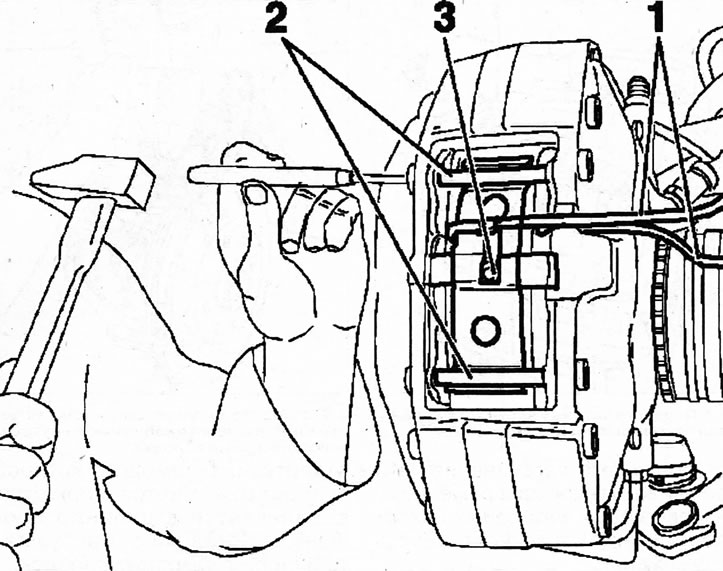
4.19. Disconnect wires 1 of the brake pad wear sensor. Front wheel brake mechanism with Brembo caliper
20. Remove the caliper, see the relevant chapter.
21. Knock out the pins 2 of the brake shoe pressure springs with a suitable punch and remove the springs 3 (see illustration 4.19). The fingers of the pressure springs must be replaced with new ones after dismantling.
22. Press in the wheel cylinder piston using special pliers, placing a wooden block A between the jaw of the pliers and the brake shoe (see illustration).
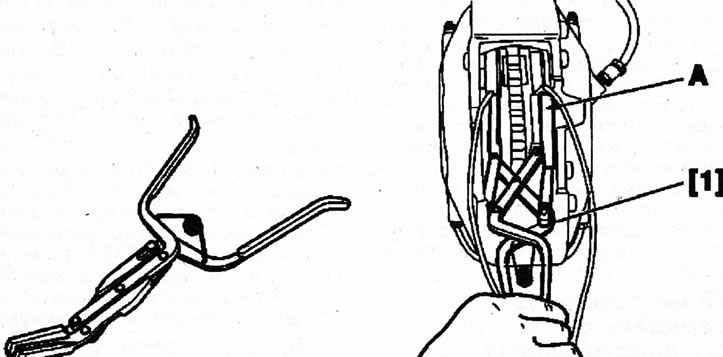
4.22. Press in the wheel cylinder piston using special pliers, placing a wooden block A between the jaw of the pliers and the brake shoe
23. Remove the brake pads.
Installation
24. Inspect the cuffs 4 of all four cylinders, as well as the protective caps 5 on the guide pins (see illustration). Replace damaged parts using the repair kit. It is recommended to entrust this work to a workshop.
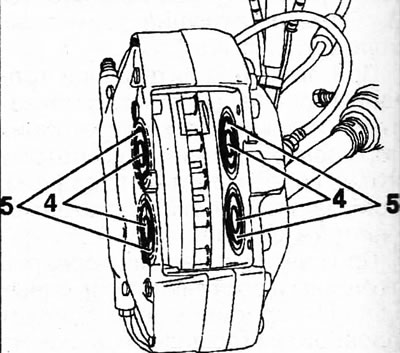
4.24. Inspect the cuffs 4 of all four cylinders, as well as the protective caps 5 on the guide pins
25. Clean the caliper and brake disc with alcohol or a suitable cleaning agent, such as Henkel.
26. Apply the grease supplied with the brake pads to surfaces B, avoiding contact with their working surface (see illustration).
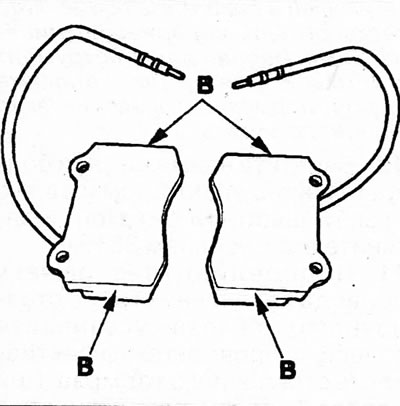
4.26. Lubricate surfaces B, avoiding contact of lubricant with the working surface of the brake pads
27. Install the brake pads 6 in the guide and secure them with a pressure spring, inserting new retaining pins 2, which are driven into place with a punch (see illustration).
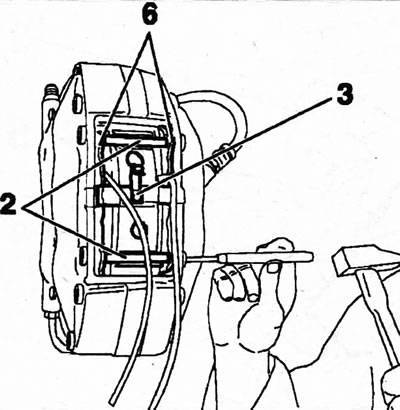
4.27. Install brake pads 6 in the guide and secure them with a pressure spring, inserting new retaining pins 2
28. Connect the brake pad wear sensor wires, lay them down and secure them in the holder as they were before disconnecting.
29. Fill the reservoir with fresh brake fluid if necessary.
Caution! If the brake hose has been disconnected from the main line, it must be reconnected without allowing the hose to become twisted or stretched. To check the brake hose routing, turn the steering wheel from lock to lock and make sure that the hose does not come into contact with any suspension parts and will not chafe while driving. Tighten the union nut to the appropriate torque, and hold the hose itself from turning using a hex key.
In this case, the brake system should be bled after installing the brake pads and caliper, see the relevant chapter.
30. Press the brake pedal several times to seat the brake pads on the brake disc.