
English Русский
Български
Беларускі
Український
Српски
Hrvatski
Română
Polski
Slovenský
Magyar
Bookmark Articles Sitemap Contacts
Company Hyundai Company Opel Company Skoda Company Kia Company Mitsubishi Company LADA Company Audi
PeugeotBook.ru


Series 100   Series 200   Series 300   400-500   Series 600   Crossovers   Others
 
Partner I (1996-2008) Peugeot 807 (2002-2014) Peugeot 806 (1994-2002) Peugeot J5 (1981-1993)

Wheel alignment angles (Peugeot J5)

  • Main
  • Пежо
  • Peugeot J5 (1981-1993)
  • Chassis, running gear
  • Steering system
  • Wheel alignment angles
0
Table of contents: 10.5.1. Longitudinal inclination of…🠇 10.5.2. Collapse 🠇 10.5.3. Front wheel alignment 🠇
Adjustment of the front wheels is carried out with the vehicle under operational load, that is, the vehicle must be unloaded and filled with fuel, oil and water.

10.5.1. Longitudinal inclination of the kingpin


The longitudinal inclination angle of the kingpin is adjusted by installing 2.5 mm thick washers on the brace in the place shown in Figure 130. From one to three washers can be installed in this place. It should be taken into account that over the years of vehicle production, the specified value of the longitudinal inclination angle of the kingpin has changed. The exact values are contained in the tables of adjustments and sizes.
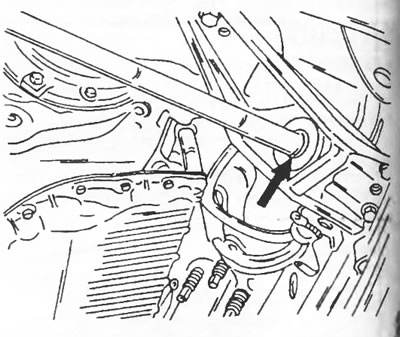
Figure 130. One to three 2.5 mm thick washers can be installed in the place indicated by the arrow…

Figure 130. One to three 2.5 mm thick washers can be installed in the place indicated by the arrow to adjust the longitudinal inclination angle of the kingpin.


The angle can be measured with a conventional measuring instrument according to the manufacturer's instructions.

If the measured values differ from the specified ones, it can be assumed that the front suspension is tilted. In this case, testing on an optical bench is required, since this is the only way to establish accurate values.


When performing the work yourself, keep in mind that the rear strut nut is tightened to a torque of 140 Nm, while the front nut is tightened to a torque of only 100 Nm. Removal and installation of the strut are described in the section "Front axle and front suspension".

10.5.2. Collapse


The camber angle is measured with a conventional measuring instrument in accordance with the instrument manufacturer's instructions. There should be no camber between both wheels; differ by more than 30'. Camber is not adjustable. If the measured values differ from the specified ones, it can be assumed that the front suspension is tilted. In this case, testing on an optical bench is required, since this is the only way to establish accurate values.

10.5.3. Front wheel alignment


Front wheel toe can be measured with a mechanical toe gauge. The wheels must have a positive toe-in of 0.5 +/- 1.0 mm, i.e. the front sides of the wheels must be closer to each other than the rear sides. The measurement is carried out as follows:
  • Check and, if necessary, adjust the tire pressure.
  • Place the vehicle on a level surface and set the wheels to point straight ahead. This can be done using the spokes of the steering wheel. If you are not completely sure that the center position of the steering wheel corresponds to the position of the wheels when driving straight ahead, you can set the rack to the position shown in Figure 126 and set the "X" dimension to 76.0 mm.
  • Place the measuring rod on the front side of the wheels and place both measuring pins on the edges of the rims, setting the rod scale to zero. This is done at the level of the wheel hubs.
  • Mark the contact points of the measuring pins with chalk.
  • Remove the measuring rod.
  • Move the car forward by half a turn of the wheels, that is, both chalk marks should be on the rear side of the wheels at the level of their hubs.
  • Place the measuring rod under the vehicle and attach the measuring pins to the rims. If the wheels have positive toe-in, the pins should be pulled out of the rack.
  • Place the pins and read the scale readings. The size should be 0.5 mm larger or at least within the tolerance of ±1.0 mm.
  • If this is not the case, loosen the lock nuts on both tie rods at the outer ball joints and change the length of the tie rods to the same value. Change the length in small portions and measure the toe-in each time. It should be taken into account that the visible section of the thread between the steering tip and the nut on both sides should be the same (with an accuracy of approximately 2.0 mm).
  • Finally, tighten both locknuts to a torque of 60 Nm. While doing this, hold the steering rods from turning. To prevent the cuffs from twisting when turning the steering rods, you need to release their fastening from the outside.

Original publication on the website [PeugeotBook]
This article is available at russian, bulgarian, belarusian, ukrainian, serbian, croatian, romanian, polish, slovak, hungarian
Article reviewed by editor: Bespalov Alexey
Share information:
Previous
Peugeot J5: Steering system
Next

Replacing steering rods
Replacing the steering shaft
Central steering position
Rack and pinion steering
Steering system
Power steering system
See similar information for other Peugeot models

➨ Wheel alignment and steering angles — general information Peugeot 106 (1991-2003)
➨ Wheel alignment angles Peugeot 206 (1998-2012)
➨ Front wheel alignment angles Peugeot 305 (1977-1989)
➨ Wheel alignment angles Peugeot 405 (1987-1997)
➨ Wheel alignment angles Peugeot 605 (1989-2000)
Link to this article in different formats
Comments and feedback from visitors
No comments yet


Add two numbers 33 + 42


Partner I (1996-2008) 
  • General information
  • Introduction to the guide
  • Faults en route
  • Weekly checks
  • User manual
  • Maintenance (petrol)
  • Maintenance (diesel)
  • Power unit
  • Petrol engines
  • Diesel engines «XUD»
  • Diesel engines «DW»
  • Overhaul of petrol engines
  • Overhaul of diesel engines
  • Cooling and heating
  • Power and exhaust (petrol)
  • Power and exhaust (XUD diesels)
  • Power and exhaust (DW diesels)
  • Emission reduction
  • Starting and charging system
  • Transmission
  • Clutch
  • Mechanical gearbox
  • Drive shafts
  • Chassis, running gear
  • Brake system
  • Car suspension
  • Steering
  • Body and interior
  • Exterior (external elements)
  • Interior (internal elements)
  • Doors, locks and windows
  • Electrical equipment
  • Equipment and devices
  • Electrical circuits
Peugeot 807 (2002-2014) 
  • General information
  • Operating instructions
  • Maintenance
  • Troubleshooting
  • Power unit
  • Gasoline engines
  • Diesel engines
  • Cooling and heating
  • Fuel injection (petrol)
  • Fuel system (diesel)
  • Fuel system
  • Exhaust system
  • Ignition system
  • Transmission
  • Clutch
  • Manual gearbox
  • Automatic gearbox
  • Chassis, running gear
  • Brake system
  • Car suspension
  • Steering system
  • Body and interior
  • Exterior (external elements)
  • Interior (internal elements)
  • Electrical equipment
  • Power devices
  • Electrical circuits
Peugeot 806 (1994-2002) 
  • General information
  • User manual
  • Maintenance
  • Power unit
  • Petrol engines
  • Diesel engines
  • Lubrication system
  • Cooling system
  • Fuel injection (petrol)
  • Fuel system (diesel)
  • Ignition and exhaust systems
  • ECM Bosch Motronic MP 3.2
  • ECM Magneti-Marelli (MM)
  • Transmission
  • Clutch
  • Mechanical gearbox
  • Chassis, running gear
  • Brake system
  • Car suspension
  • Steering
  • Electrical equipment
  • Equipment and devices
  • Electrical circuits
Peugeot J5 (1981-1993) 
  • General information
  • Introduction to manual
  • Specifications
  • Gasoline engine
  • Engine repair
  • Lubrication system
  • Cooling system
  • Fuel system
  • Ignition system
  • Diesel engine
  • Engine repair (DB9)
  • Lubrication system (DB9)
  • Cooling system (DB9)
  • Fuel injection (DB9)
  • Engine repair (U25)
  • Lubrication system (U25)
  • Cooling system (U25)
  • Fuel injection (U25)
  • Transmission
  • Clutch
  • Gearbox
  • Drive shafts
  • Chassis, running gear
  • Steering system
  • Car suspension
  • Brake system
  • Electrical equipment
  • Power devices
  • Electrical circuits
PeugeotBook.ru © 2018–2026 | Mobile version | Sitemap: EN BG BY UA RS HR RO PL SK HU | Write message | Site search | Add to bookmarks | Peugeot owners
106 (1991-2003) | 206 (1998-2012) | 207 (2006-2014) | 305 (1977-1989) | 306 (1993-2002) | 307 (2001-2008) | 405 (1987-1997) | 406 (1995-2004) | 605 (1989-2000) | Partner-I (1996-2008) | Eurovans-807 (2002-2014) | Eurovans-806 (1994-2002) | J5 (1981-1993) |
Cookies are used to ensure the correct display of pages on the site.